Home → TN eCampus Faculty → Printer Friendly Version
TN eCampus Faculty
- 1. Faculty FAQ
- 1.1. Navigating Brightspace
- 1.2. Get Help
- 1.3. Academic Calendar
- 1.4. Serving Students with Disabilities
- 1.5. Final Grades and Resources
- 1.6. Student Participation Survey and Instructor Expectations
- 1.7. Best Practices for Online Learning
- 1.8. Developer Support and Information
- 1.9. Working with a Publisher
- 1.10. Course Evaluation Survey
- 2. Working with the TN eCampus Team
- 3. Instructor Support and Information
- 3.1. Attendance FAQ
- 3.2. Instructors Using Publisher Materials
- 3.3. Final Grades Guide
- 3.4. Proctored Exams
- 3.5. Examity Virtual Proctoring
- 3.6. Respondus Virtual Proctoring for: BIOL2010, 2020, 2230
- 3.7. Virtual Tutoring
- 3.8. Turnitin Training Resources
- 3.9. Academic Honesty
- 3.10. Virtual Library Services
- 3.11. Embedded Librarians
- 3.12. Virtual Bookstore Resources
- 3.13. Moving Your Class Online
- 4. Expectations for Instructors
- 5. Best Practices for Online Learning
- 6. Brightspace LMS Tools
- 6.1. Supported Browsers
- 6.2. Username and Password
- 6.3. Access to Courses by Role
- 6.4. Getting Started Widget
- 6.5. Announcements Tool
- 6.6. Navigating Course Content
- 6.7. Creating Course Modules & HTML Files
- 6.8. Quicklink
- 6.9. Hyperlinks in the HTML Editor
- 6.10. Accessible HTML File Content
- 6.11. Accessibility Checker
- 6.12. Ally Overview
- 6.13. Understanding Ally Reports: What to Fix and How
- 6.14. Ally and Students
- 6.15. Text/HTML Editor
- 6.16. Equation Editor
- 6.17. Course Files, Quicklinks, & Outside URLs
- 6.18. Pulse App for Brightspace Courses
- 6.19. Discussion Forums
- 6.20. Discussion Topics
- 6.21. Discussion Evaluation
- 6.22. Groups
- 6.23. Assignments Creation
- 6.24. Assignments - Create a Select Box Item
- 6.25. Assignments Evaluation
- 6.26. Rubrics
- 6.27. Annotations for Assignments
- 6.28. Quick Eval for Assignments
- 6.29. Turnitin Originality Checking
- 6.30. Question Library
- 6.31. Quizzes: Create with Quiz Builder
- 6.32. Quizzes: Restrictions & Submission Views
- 6.33. Quizzes: Assessment
- 6.34. Edit, Delete, or Restore a Quiz
- 6.35. Quizzes: Retake Missed Questions
- 6.36. Quizzes: Attempts in Progress, Resetting Quiz Attempts
- 6.37. Grades and the Grade Book
- 6.38. Grade Systems
- 6.39. Grades – Automatic Zero for Missing Submissions NEW
- 6.40. Grades: Final Letter Grade Display
- 6.41. Course Content Statistics
- 6.42. Checklist
- 6.43. Grant Special Access
- 6.44. View User (Student) Progress
- 6.45. Email Communication in Brightspace
- 6.46. Video Note Recording
- 6.47. Release Conditions
- 6.48. Release Condition Types
- 6.49. Accommodations – Quiz accommodations | New
- 6.50. Availability, Visibility, and Access Options
- 6.51. Intelligent Agents
- 6.52. Brightspace Community
- 6.53. Activity Feed
- 7. Developer Support and Information
- 8. Accessibility
- 8.1. Accessibility in Higher Education Video
- 8.2. Accessibility or Accommodation?
- 8.3. Tips for Accessible Online Content
- 8.4. Tips for Social Media
- 8.5. Accessible Course Facilitation
- 8.6. Document Templates and Headings
- 8.7. Decorative Images in Brightspace
- 8.8. Captioning Video in YouTube
- 8.9. Descriptive Audio or Video Description
- 8.10. Getting Help with Accessibility
- 8.11. Creating Accessible Materials
- 8.12. Legal References for Accessible Design
- 8.13. Alternate Access Plans (AAP)
1. Faculty FAQ
1.1. Navigating Brightspace
Navigating Brightspace
After logging into gotoclass.tnecampus.org, the TN eCampus homepage will open. The home page presents courses automatically as image tiles in the widget. You can also use the highlighted grid icon on the top toolbar to open a list of courses.
Up to 12 courses can be "pinned" to the top of the widget. Use the search feature to locate courses by name or code. Use a filter to narrow the search even further.
Exploring a Course
The Navigation Bar (NavBar) consists of a single row of menu choices. For example, choose Content to open a course's Table of Contents view. Additionally, navigation in Brightspace is responsive to screen size. Full-sized monitors will display the entire menu. Brightspace will collapse part of the full list under the More menu on the right side of the window when opened in smaller displays. Smartphones and very small tablets will convert the layout to a flyout menu from the left side.
Course Admin
Course Admin is the central source to access all tools and features in one place. Many of the tools are also available in the NavBar, but there are a few others that are not. The number 1 reason to visit Course Admin is Managed Files, which is the structure of folders and files that make up the course. Please note the highlighted items too. They are not available from the NavBar, but you may find them interesting and useful.
Brightspace Updates
D2L is constantly improving Brightspace to better meet the needs of students and improve the usability for staff. As of May 2018, D2L released the Daylight project for a visual overhaul of D2L’s Brightspace product suite. This update was designed to be mobile-friendly and fully accessible as well. By the end of 2021, D2L had deployed a variety of updated "Experiences" that refreshed how Brightspace users engage with Assignments, Discussions, Quizzes, and Rubrics for a consistent experience. You can always check the What's New page here in the Knowledge Books for the latest information.
1.2. Get Help
Help Desk
There are two Help Desk services. Both can be applicable to faculty.
D2L Brigthspace Support for Students and Faculty
Brightspace Help Desk services are available for technical support issues related to Brightspace primarily for students, but staff can also receive assistance with logging in, passwords, and similar access needs. The Brightspace Help Desk is available 24/7 (except for a few select holidays). Simply call, email, or chat to request assistance. Resources and links may also be found on the My Home and Course Home in each course for easy access.
- Phone: (866) 895-8429
- Brightspace Help Request
- Brightspace Chat Now!
Student Liaison are not a part of the Brigthspace Help Desk, but student liaisons can be an extremely valuable resource to students with minor technical issues and a host of other course-related topics.
TN eCampus Faculty Support
The TN eCampus Help Desk supports faculty with course-related issues. 24/7 support is available here in Knowledge Books. You can also submit a support ticket in HelpSpot anytime. Completing the email form gathers and tracks important information and routes your need to the most appropriate person for a timely response.
1.3. Academic Calendar
Academic Calendar
The Academic Calendar is maintained on the TNeCampus.org website. It can be viewed as a regular calendar, but it is first presented by the semester terms.
- 15-week courses are Full term Spring and Fall courses.
- 10-week courses are Delayed Start term Spring and Fall courses.
- 7-week courses are Accelerated term Spring and Fall courses. Term 1 and Term 2 run back to back not concurrently.
- 10-week courses are also used for the Summer term.
1.4. Serving Students with Disabilities
Serving Students with Disabilities
Accessibility as a topic is covered in more detail in Module 3 of the iTeach course. This page provides information for instructors implementing courses for students with disabilities. You may also access more information in the Accessibility tutorials in the Knowledge Books.
Requirements
State and Federal laws, like the Americans with Disabilities Act require institutions and instructors to provide accessible content and appropriate accommodations for students with disabilities. TN eCampus strives to make all its courses accessible for all students. This initiative is harmonized with TBR’s Accessibility Initiative
and the Tennessee Higher Education Accessibility Task Force recommendations pursuant to Tennessee State Bill 1692
. It is the law and everyone in higher education is obligated to appropriately serve students with disabilities.
Course Content
TN eCampus courses are designed by course developers to be accessible by everyone. However, instructors are responsible for making sure that any material created or added to a course is also accessible. Additionally, if an instructor finds content that is not accessible or has questions about accessibility in a course, contact the TN eCampus Help Desk for support.
Instructional Accommodation
Students with Disabilities must contact their local disability services office to make requests for accommodations. If a student is approved for accommodation, the local disability services office will provide a letter outlining the requirements of the accommodation. By law, instructors are not allowed to ask the student about their disability, but if instructors have questions about the accommodation, he/she may contact the disability services office.
You can learn more about serving students with disabilities in Knowledge Books.
- Accessibility in Higher Education Video
- Accessibility or Accommodation?
- Legal References for Accessible Design
- Tips for Accessible Online Content
- Checklist for Accessible Course Facilitation
- Getting Help with Accessibility
1.5. Final Grades and Resources
Final Grades
All final grades must be entered in the Final Letter Grade (FLG) column. The assigned grade should be a letter (A-F), which must be input prior to the Final Grade Deadline . Any student grades which are not entered by the specified deadline must be turned in manually using a TN eCampus Grade Change Form
. If you have questions or need to request assistance with entering final grades (including if your course does not have the final letter grade column), please file a support ticket
.
Quicklinks to Other Instructor Resources
- Academic Honesty
- Attendance FAQ
- Embedded Librarians
- Incompletes and Grade Changes
- Proctoring
- Smarthinking
- Turnitin
- Virtual Bookstore
- Virtual Library Services
1.6. Student Participation Survey and Instructor Expectations
Student Participation Survey
The Student Participation Survey is the only method approved by federal government requirements, as well as, by TBR's Oversight Committee for identifying student participation in a course. Students have 14 days from the start of classes, including weekends, to complete the brief survey. This survey requires students to acknowledge they have read the following:
- Course Syllabus
- Online Behavior Statement
- Academic Integrity/Honesty Guidelines
An Announcements item is displayed across the top of the Course Homepage to notify students of the survey. It is very important this news item remains at the top of the course homepage to alert students to complete the survey. This is the only way attendance is reported. Students may access the survey by choosing the link in Announcements or by navigating to the Surveys link located in the course tools menu. The announcements will automatically be removed from the feed and the survey will be locked after the 14th day of class. See an example of the Participation Survey Example .
1.7. Best Practices for Online Learning
Best Practices for Online Learning
This chapter provides tips for effective online teaching through best practices for engaging with students as the instructor as well as how to encourage students to engage with the content and with each other.
- Instructor Presence (KB): An important component of any online course is instructor presence. Creating a sense of instructor presence has been shown to encourage increased student engagement.
- Creating a Community of Learners (KB): Online courses are comprised of a mix of ages, socio-economic status, ethnicity, English proficiency, sexual or gender identity, ability, and geographic location. Students will be more successful if they feel that they are in a safe, welcoming space where they are appreciated as individuals.
- Facilitating Discussions (KB): Research shows that students get the most out of a course when they engage with the instructor, other students, the content, and themselves through reflection. Students will respond more if they know that someone is actively reading and responding to their posts.
- Providing Good Feedback (KB): Providing students with meaningful feedback helps them to not only understand the content better but to understand their own thinking and learning processes as well. Meaningful feedback greatly enhances learning and improves student achievement.
- Understanding FERPA (KB): The Family Educational Rights and Privacy Act (new window), known as FERPA, is a Federal law that protects the privacy of student education records.
1.8. Developer Support and Information
Developer Support
TN eCampus course developers are responsible for the design, development, and maintenance of their course(s). Course developers are required to keep the content in their course up to date to reflect changes in their field. They are also expected to work with the Campus Relations Manager to prepare the course Master Copy for cloning each semester. The Campus Relations Manager’s Master Copy Update Guide is an invaluable resource to complete these updates by the Master Copy (MC) cloning deadline.
View the first edition of Master Copy Update Guide .
Quicklinks to Other Developer Resources
- Course Development Proposal or Course Redevelopment Proposal form
- TN eCampus Academic Calendar
- Creating a Pulse Friendly Course
- For course development support and assistance of approved and current courses, please complete a Help Ticket
1.9. Working with a Publisher
Publisher Materials
TN eCampus courses use a wide variety of publishers and content providers to meet course development needs. Services may vary from publisher to publisher. This page provides links to an introduction and table view of key points for each publisher. You may also choose to view a one page summary of top publishers in the next section.
Developers Start Here
Resources by Publisher
- Carnegie Mellon University: Online Learning Initiative (OLI)
- Cengage: MindTap
- Lumen: Waymaker
- McGraw-Hill: Connect
- McMillan Learning: Sapling Learning
- Pearson: CourseConnect
- Pearson: MyLabs
- Pearson: Revel
- Sage Publications
- TestOut: LabSim
- TopHat
- VitalSource
1.10. Course Evaluation Survey
Course Evaluation Survey
Instructors have a new resource to view course evaluation survey response data. It is accessible directly from the TN eCampus homepage. Scroll down from the top of the page to My Surveys on the right. Choose Evaluation Kit to access current survey data.
*Please note, survey data from the fall of 2018 and the spring of 2019 is also available from the previous source. Choose the next widget for that date range.
View a Survey
Choose the project you want to review under Project Results. In this example, there is 1 survey and 2 participants that have completed the survey. (Your survey results will likely have more detail.) You may also monitor the survey activity from Response Rate Tracker by choosing the project or viewing the graph. Response Rate Tracker only tracks submissions and summarizes that information.
There is a secondary navigation option by choosing the 3 horizontal bars icon.
Report Options
There are a variety of options available to review the data by choosing the Report/download icon. A menu list of report options will open. Detailed and Detailed + Comments are typically useful report types. There are 2 other report types and a Raw Data option to explore as well. Choose the report type of your choice for any of the courses listed.
Reports may be opened as a PDF or saved to a file.
This image is a portion of a Detailed + Comments. This report defines response summaries and also graphs the data. Additionally, if the survey offers a question with a comment option, the actual comments will be presented in the report.
Student Tutorial
Students have a tutorial for surveys too. Feel free to share this link Course Evaluation Survey (new window).
2. Working with the TN eCampus Team
2.1. Course Developer
Course Developer
Each course master copy is maintained by a faculty course developer. Each course will have a "Developer Information" submodule with the contact information for the official course developer. If you have questions about course content, assignments, discussions, or activities, you should contact the developer directly.
Only course developers can make changes to the master copy or changes to assignments, activities, or the primary course content. If you find a typographical or grammatical error in your course content, please correct it in your copy of the course and notify the Course Developer to update the Master Copy (MC) for future semesters.
If your course is missing the developer information, please contact the Campus Relations Manager .
2.2. TN eCampus Support Staff
TN eCampus Support Staff
Student Success Manager
Callie Wise: Callie.Wise@tbr.edu
Provides support for a variety of student-related issues and student resources such as Smarthinking, the Virtual Library, and the Virtual Bookstore. Serves as primary staff contact for the campus Student Liaisons.
Campus Relations Manager
Colbe Wilson: Colbe.Wilson@tbr.edu
Provides support as the liaison for faculty, course developers, faculty mentors, and distance education directors. Also supports topics including tutoring, proctoring, mentoring, and plagiarism detection, and strategic training events.
TN eCampus Director of Instructional Design and Training
Nicola Wayer: NWayer@tbr.edu
Provides support for Instructional Design and Training for the TN eCampus. Place a Help Ticket to request support and services from the IDT team.
Help Desk
D2L technical help and TN eCampus course and faculty support Help Desk information.
Who Does What Matrix
TN eCampus is a small team serving a large number of faculty, students, and institutions. Here is a guide to help you know whom to contact if you have questions.
|
Topic |
Colbe Wilson
Director of Campus Relations |
Callie Wise
Student Success Manager |
Director of Instructional Design and Training |
Operations Coordinator |
Director of Technology |
LMS Manager |
|
Accessibility |
|
|
X |
|
|
|
|
Attendance issues |
|
X |
|
|
|
|
|
CDP and iTeach training |
|
|
|
X |
|
|
|
Complaints regarding a student |
|
X |
|
|
|
|
|
Course development |
|
|
X |
|
|
|
|
Course staffing |
X |
|
|
|
|
|
|
Curriculum committee |
|
|
X |
|
|
|
|
D2L system administration and tech support |
|
|
|
|
|
X |
|
D2L's end-user help desk point of contact |
|
X |
|
|
|
|
|
Embedded librarian |
|
|
|
X |
|
|
|
Evaluation data |
|
|
|
|
X |
|
|
Faculty Credentialing System (FCS) |
|
|
|
X |
|
|
|
Faculty liaison coordinator |
X |
|
|
|
|
|
|
Faculty support services and communications (triage help tickets) |
X |
|
|
|
|
|
|
Grade appeals |
|
X |
|
|
|
|
|
Instructional design |
|
|
X |
|
|
|
|
Internal operations and external academic calendars |
X |
|
|
|
|
|
|
Maestro |
|
|
|
|
X |
|
|
Master list |
X |
|
|
|
|
X |
|
MC updates and semester prep |
X |
|
|
|
|
|
|
Online tutoring contact |
|
X |
|
|
|
|
|
Proctoring |
X |
|
|
|
|
|
|
Publisher integrations |
|
|
X |
|
|
|
|
Requesting MC/DC |
|
|
X |
|
|
|
|
Semester course data |
|
|
|
X |
|
|
|
Student liaison coordinator |
|
X |
|
|
|
|
|
Student technical support |
|
X |
|
|
|
|
|
Summer Academy |
X |
|
|
|
|
|
|
Textbook adoption and verification |
|
|
|
X |
|
|
|
Training Records |
|
|
|
X |
|
|
|
Topic |
||||
|
Staffing (instructor assignment; developer change) |
X |
|
|
|
|
Course offering |
X |
|
|
|
|
Training |
|
X |
|
|
|
Embedded Librarians |
|
X |
|
|
|
Textbooks |
|
|
X |
|
|
Any requests that are not listed |
|
|
|
X |
2.3. Escalate Student-Success Concerns
Report It Now
In an effort to better equip faculty and support students, TN eCampus has implemented an easy way for instructors to escalate student-success concerns.
Research indicates that early alert systems can be a key component of successful student-retention strategies and can be particularly effective when used to connect at-risk students to vital support resources. Additionally, best practice suggests that student engagement problems tend to persist without some form of intervention.
Monitor Class Progress
Class Progress (Brightspace tool) is a valuable resource to monitor early login activity, low activity after the course starts, and failing grades that may also follow declining course activity. As the course instructor, you will want to monitor and respond to these and other flags of concern before things spiral.
Steps You Can Take Now
After discovering concerns reach, out to students to help get them on track as you normally would do. If the student(s) don't respond or don't "course correct", reach out to TN eCampus to alert us of student engagement and performance problems as soon as they arise-- via the Report It Now button, located on each course home page.
Clicking the Report It Now button will provide feedback for students who are either not actively engaging OR who may be performing at an “at-risk” level. Your escalation will notify both TN eCampus Student Success staff and the student's home campus.
Complete the Form
Starting Summer 2024: For those who previously filed an alert, when the form opens, you may notice it looks different from previous versions. This update is part of our effort to create a more dynamic form that allows us to better intervene in at-risk student situations.
1. Click the Report it Now button. A form will open.
2. Enter your name, external email address, and course code (including section number). For your convenience, the course code will automatically populate as you type it in.
3. Fill in the Student Information details.
4. Choose the Reason for the Early Alert from the dropdown menu.
5. Add any additional details in the final two text fields. These fields are not required but allow you the opportunity to provide context.
6. Once the form is complete, you can add an extra Early Alert for a different student by clicking Add Another Student or file the single Early Alert by clicking Submit.
Early Alert Systems in Higher Education (Hanover Research)
2.4. Filing a Help Ticket
Getting Help Fast
Filing a help ticket is quick and easy. It is also the most direct and efficient way to get your concern to the right person. From the TNeCampus.helpspot.com/faculty homepage, choose Submit a Request.
Sample Entry
Providing complete and descriptive information will aid in a timely and accurate resolution. Choose the menu information that best applies to the situation or leave it blank. Take a look at this example.
Notice the optional Attach Document area. A saved screenshot or relevant document file may be helpful to attach to the ticket. Enter the Security Word in the text box provided. Choose Submit Request when finished.
HelpSpot Response
An automated reply will be sent to your email address to confirm the receipt of your ticket. The message will include your ticket number and an option to reply with any additional information. You may also view the history of your request from the included link anytime. The staff member assigned to assist you will contact you next.
2.5. Student Liaison
Student Liaisons
Student Liaisons are an extremely valuable resource for students. Remind students of this resource anytime they need guidance or assistance for the following topics:
- Course registration procedure
- Course log-in and other minor technical issues
- Questions concerning hardware or software requirements for an online course
- Degree program and course offering information
- Grade appeals
- Facilitation of timely resolution for concerns and issues
- Complaint process regarding an instructor or classmate
Student Liaison Lookup
Each campus has a Student Liaison to assist TN eCampus students.
3. Instructor Support and Information
3.1. Attendance FAQ
Frequently Asked Questions
Q: How is student attendance reported?
A: TN eCampus instructors do not report attendance. Students complete the Student Participation Survey. (See Expectations for Instructors.)
Q: How can I ensure my students are reported as attending?
A: TN eCampus instructors are encouraged to remind their students that this survey is required in order to report them as attending to their home institution and failure to do so can adversely affect their financial aid.
Q: Can the survey be reopened after the deadline?
A: No. After the 14th day of class, TN eCampus is no longer running and sending attendance reports to the campuses. If you have a student who has missed the deadline for completing the survey, please advise them to contact their Student Liaison . The Student Liaison at their home institution can gather data on the student's activities in Brightspace and verify the student's attendance.
Q: How do I know if my students have completed the survey?
A: Instructors can easily determine who has/has not completed the survey by following the steps outlined below:
To get started, select Surveys from the NavBar.
Select the down arrow next to the Student Participation Survey to expand the menu and select Statistics.
Set the Restrict to filter to Users who have not taken an attempt to determine who has not completed the survey or users who have completed an attempt. Then use the magnifying glass icon to search. Students sometimes forget to click the Submit button at the end of the survey. Search for Users with attempts in progress as well. Students have an unlimited number of attempts on this survey, if you find a student has an attempt in progress, advise them to retake the survey. Remind them to complete the survey with the Submit button at the end.
Q: What should I do if a student has not participated in class?
A: Go to the Classlist to determine if they are accessing the course. If the student has accessed the course, there will be a date in the Last Accessed column next to their name as shown below.
If the student has never accessed the course, the Last Accessed column will be blank. If this is blank or it has been a while since the student has accessed the course, please reach out to your Student Liaison to determine the student's home institution. You or your Student Liaison can then reach out to the student's home institution or TN eCampus Student Support to gather contact information for the student to reach out and try to engage the student in a class.
3.2. Instructors Using Publisher Materials
Instructors Using Publisher Materials
In addition to course facilitation, the instructor role is also responsible for implementing publisher provided materials chosen by the course developer. Each course Master Copy is equipped with a Developer Information page, containing contact information and any special notes, tips, or expectations helpful in teaching the course. Instructors should expect the course to be completely ready, including the determination of all due dates, and clear instructions on how the materials all work, including embedded and outward linking publisher materials. It is important that both instructors and developers communicate frequently. Contact the course developer if there is any missing information or you need clarification for using publisher materials.
Publisher Information
More information about the different publisher products can be found in the TN eCampus Faculty Support Knowledge Books (new window) pages. Your instructional designer can help you to get access to instructor resources such as slide decks, quiz banks, and instructor manuals from the publisher of your selected textbook.
3.3. Final Grades Guide
Final Grades
All final grades must be entered in the Final Letter Grade column. This assigned grade should be a letter (A-F), which must be input prior to the Final Grade Deadline (new window). Any student grades which are not entered by the specified deadline must be turned in manually using a TN eCampus Grade Change Form (new window).
If you have questions or need to request assistance with entering final grades (including if your course does not have the final letter grade column), please file a support ticket (new window).
Steps to Entering Final Grades
In the course, select Grades from the NavBar. Choose Enter Grades and Switch to Standard View if needed (not Spreadsheet View).
Scroll to the right until you reach the Final Letter Grade column. Select the arrow to open the drop-down menu and select Enter Grades.
Next to each student's name, select the appropriate final letter grade from the drop-down menu in the Grade column. TN eCampus cannot accept a grade of NFG (No Final Grade). Assigning NFG to a student will read as a missing grade, and a Grade Change Form will be required.
After entering a final letter grade for each student, select Save or Save and Close.
Incomplete or Grade Changes
Instructions for Incompletes (grades), Grade Changes, and the required form can be found on the Submitting Grade Changes and Revising Incompletes (new window) page.
*Please note, the deadline depends upon the student's home school rather than the delivery institution.
Troubleshoot Final Grades
3.4. Proctored Exams
Proctored Exams
The use of proctors for the mid-term and final exam is determined by the course developer. The instructor's role is to support students as they set up proctoring options. There are three possible paths for students to secure proctoring for exams:
- Proctor through Virtual Proctoring (new window)
- Proctor at a TBR site (new window)
- Proctor at an alternate site (new window)
Instructors can help students by reminding them well in advance of proctored events. Likewise, students should notify the instructor of the proctoring option selected. Virtual proctoring must be offered in all TN eCampus courses that require proctored exams, including accelerated courses. If students will not be proctored through a TBR site, test information must be sent to the proctor in advance of the exam.
Virtual Proctoring Instructor Set-Up
Instructors should work with the course developers to set up proctoring in their courses. Course developers may create test rules to customize the test experience just like they would in the classroom. For example, course developers may determine the length of the exam and create specific rules for test-takers. The rules page also enables course developers and instructors to assign unique accommodations, such as extended time allowances for specific test-takers.
3.5. Examity Virtual Proctoring
Examity Virtual Proctoring
Examity is the current virtual proctoring option for online courses through TN eCampus. This page will provide a tutorial for course developers and instructors to setup virtual proctoring for Mid-term and Final exams.
Single Sign-on
There is no need for students or instructors to log into a website to access this service. Examity proctoring uses the single sign on process, which means once a student or instructor logs into their course there is full access to the program. TN eCampus staff will insert the Examity SSO link within your course in the Getting Started module during the first two weeks of semester start.
You can click that link to access the Examity dashboard.
Virtual Proctoring Dashboard
The dashboard will open after the link is selected. It offers access to four key areas starting with courses assigned to the instructor.
Courses Details identifies key information including course status. The next tabs expose more information under the course group.
Test-taker presents details on all students enrolled in the exam. Notice the Profile completion, Status, and Accommodation columns.
Choose a student link to see the profile and exams or choose the Courses tab to see more.
Course Accommodations allow instructors to select specific students that need adjustments to the testing process including accommodation for persons with disabilities.
Exams Info provides access to edit exam items. Notice Test Window, Exam Duration, Exam Password, and more in this window. Live Premium is the only choice for Security Level for TN eCampus courses. Choosing exam information within the Courses tab will open the Exams tab to reveal the same information.
The rules tab presents the standard rules and provides an option to add Addition Rules.
Instructions can be imported from other courses or new instructions may be added. Notice instructions may be visible to the Proctor, Test-taker, or both.
Tracking Exam Status allows instructors to track exam progress and to view videos of completed exams. If there are noted incidents in the video, there will be time-stamped flags to reduce watch time to review the incident. Notice this exam has two flags that are pending an auditor check.
What do the flags mean?
- Blue alerts are reported when a technical issue arises.
- Green flags are raised for significant steps where there is no violation.
- Yellow flags are issued when a rule is broken but cheating does not necessarily take place.
- Red flags are given when the student exhibits clear cheating behavior.
Essentially they are listed in ascending order of concern.
The system reports provide summaries for information found throughout the system.
- Schedule Status: Identify test-takers scheduled or not scheduled
- Schedule Details: Review the detail of scheduled sessions
- Evaluations: Test-taker proctor survey results
- Exam Status: Past exam sessions
Help Communicating with Students
Use the Instructor to Student tool kit (new window) to connect with students. You may also download this file at the bottom of the page. This Word file contains editable message samples you can customize and share with students. If you need to reach a student outside of D2L, contact the student liaison (new window) at your home campus.
Have more proctoring questions?
Examity Instructor/Admin Training
This video is a comprehensive training for instructors and administrators using Examity for the first time.
Examity Instructor Training V5
This video is a comprehensive training for instructors and administrators using Examity for the first time. It is for clients exclusively using Automated Premium and Automated Standard
How to Create an Exam
This video demonstrates how to create an exam from your dashboard when Examity is not integrated with your system.
Pearson MyLabs Courses
If your exams are located within Pearson MyLabs, you must set up your own proctored exam within the Examity dashboard. When you build your exam, you must use this URL for the exam link: https://mlm.pearson.com/northamerica/mymathlab/. This is the only link that does not redirect and throw the student out of the Examity window. You should also include an instruction to both proctors and students that reads “Students should login using their Pearson credentials.” (Students may already know this, but please still include it).
TN eCampus has a dedicated account manager who can answer any questions you have. Please contact Brian Bell bbell@examity.com (sends email) or (855) 392-6489 EXT 761 (Faculty ONLY)
Student Resources
Students have their own Examity tutorial page (new window) in Knowledge Books. If a student needs assistance acquiring a webcam, please contact the TN eCampus Help Desk at tnecampus@helpspot.com (new window). Britt Young is your TN eCampus proctoring contact, and you can email her at byoung@tbr.edu.
Examity has created their 5 Tips for Online Test-Taking Success (new window). This 1-page resource could be helpful for students getting started.
- Check exam rules
- Prep The Test Area
- Use a Hardwired Internet Connection
- Test Computer Systems
- Rest Easy
Feel free to share these links with your students.
3.6. Respondus Virtual Proctoring for: BIOL2010, 2020, 2230
Respondus Virtual Proctoring
BIOL2010, 2020, 2230 courses use Respondus virtual proctoring. Watch this short video or download the quick start guide.
From the course homepage NavBar, choose Quizzes and LockDown Browser to initiate the proctoring process. Read the prompt and choose Continue.
Follow the prompts to set up your browser for the exam.
Follow the prompts to complete the setup.
3.7. Virtual Tutoring
Virtual Tutoring
Tutoring establishes a welcoming environment that engages and empowers students where they are. Tutors will not give answers to problems or do the work, but they will help students become independent learners. Tutoring Overview (new window)
Getting Started
From any TN eCampus page, choose the Virtual Tutoring link from Course Resources widget on the right side of the page. Nettutor is the current vendor for virtual tutoring. This can change from one year to the next. Referencing virtual tutoring is preferred over specific brands since they can change. Opening the Virtual Tutoring link accesses a single sign-on. Students do not need a username or password to access tutoring.
Main Features
There are 4 primary paths to service and support for virtual tutoring.
- Meet with a Tutor in a Live Session
- Ask a Tutor a Question
- Drop off Your Paper for Review
- Your Locker (archive of past sessions, submitted questions, and reviewed papers)
Video Tutorial
Watch a brief video to see these features in action. Students also have access to a step-by-step tutorial (new window) here in the Knowledge Books.
Help and Support
- Email to support@linksystems.atlassian.net (sends email) (24x7)
- Call (813) 674-0660 x204 Monday through Friday 9 am to 5 pm EST
3.8. Turnitin Training Resources
Turnitin Video Resources
TNeCampus and Turnitin provided webinar training for faculty and instructors. These videos break out the major components of the webinars into small chunks. Watch the whole group if you missed the webinar.
How to Create an Assignment in Turnitin
Brightspace was updated with the New Assignment Experience. This did not change the functionality of Turnitin, but it did change the steps to create an assignment with Turnitin support. We will update the video, but refer to the written instructions for Create an Assignment tutorial. Choose the Updated Tab.
How to Read the Originality Report in Feedback Studio
How to Provide Feedback in Feedback Studio
Using PeerMark Peer Review Tool
Turnitin Tutorial Resources
Turnitin has some excellent resources developed on the Turnitin website.
Turnitin Instructor Tutorial Group
3.9. Academic Honesty
Overview
All TN eCampus courses are expected to promote high standards of honesty and integrity. As the instructor, you have an important role in supporting expectations for academic honesty. Academic honesty conduct violations include, but are not limited to:
- An attempt by one or more students to use unauthorized information in the taking of an exam, to submit as one's own work, themes, reports, drawings, laboratory notes, computer programs
- Products prepared by another person or to knowingly assist another student in obtaining or using unauthorized materials.
- Plagiarism, cheating, and other forms of academic dishonesty are prohibited.
- Academic Self-Plagiarism, also known as, “double-dipping,” occurs when a student submits a whole paper or a substantial portion of a paper to fulfill a course requirement, even though that paper had been submitted earlier to satisfy the requirements for another course taught by a different professor without consent from both professors.
- Additionally, students guilty of academic misconduct, either directly or indirectly, are immediately responsible to their instructor and institution for possible disciplinary sanctions, failing grades, or failing the course.
Read more about Academic Honesty (new window) and the TBR policy (new window).
Citing References
Most students are not aware of how to cite references or sources to avoid plagiarism. The following links will be helpful in determining what plagiarism is and styles you prefer students use for citation purposes.
Citation Styles
- APA--The OWL at Purdue APA Style Citations (new window)
- ASA--The OWL at Purdue ASA Style Citations (new window)
- MLA--The OWL at Purdue MLA Style Citations (New Window)
- Chicago--The OWL at Purdue Chicago Style Citations (new window)
3.10. Virtual Library Services
Library Services
Through Virtual Library services found at tbr.libguides.com/library/home, students and instructors have access to a vast collection of online databases, journals, reference materials, eBooks, directories, streaming video, and more!
Virtual library services also include:
- Access to highly-trained librarians available through email, live chat, and reference desk phone support.
A Reference Librarian can assist you with:
-
- Developing a research topic and strategy
- Identifying and locating resources online or in the databases
- Formatting your paper and citing sources
- Inter-library loan services
- Tennessee Academic Library Collaborative (TALC) TBR and UT libraries
- WorldCat
- Universal library card which provides “check out” privileges at nearby Tennessee Board of Regents libraries
Check out the TN eCampus .
3.11. Embedded Librarians
Embedded Librarians
In some courses, instructors and students may also work with a librarian. A librarian can provide course enrichment and information literacy training that may include:
- Collecting and providing access to specialized resources
- Developing tutorials and online activities
- Engaging directly with students through the D2L discussion board or in virtual meetings. The discussion board is the simplest way to set up an embedded librarian so that they can fully interact with students in your course.
More information about the Virtual Library can be found at TN eCampus Library .
Request an Embedded Librarian
You can Request a Librarian(Google Form) by completing this form.
3.12. Virtual Bookstore Resources
Virtual Bookstore
Students
Open 24/7, the TN eCampus Virtual Bookstore sells textbooks, course materials, and the correct access codes required for electronic course materials needed for an online course. The virtual bookstore is open prior to the start of each semester and offers textbooks in both new and used conditions. Students can learn more about ordering from the TN eCampus Bookstore tutorial in Knowledge Books.
Instructors
Instructors are encouraged to refer students to the TN eCampus Virtual Bookstore for course texts. There are other sellers, but the only way to be students receive the current edition text and correct access codes is through the bookstore. Neither the TN eCampus Virtual Bookstore nor TN eCampus can refund or be responsible for refunds of books ordered outside of the TN eCampus Virtual Bookstore. Please notify students of last-minute changes before a course begins. Please provide the entire name, edition, and ISBN code.
Course Developers
Text editions must be updated each year. The Bookstore can confirm edition changes to assist developers and instructors. There is a tutorial for using the Textbook Verification form in Knowledge Books. Please refer to the tutorial or contact the Bookstore if you have questions.
Contact TN eCampus Virtual Bookstore
- Phone: 888.251.2665 or 615.494.8680
- Fax: 615.898.5114
- Email: tnecampus@mtsu.edu
- Web:
TN eCampus Bookstore
3.13. Moving Your Class Online
Strategies for Moving Your Course Online Effectively and Efficiently
This page is here to share video for this recent webinar with participants and anyone that could not join the webinar. Please follow this Webinar Playlist on Youtube (new window) to view the content. You will find 3 videos that divide the content into smaller chunks.
Companion Course
We have also created a companion course (new window) the follows the content and resources shared and used in the development of the webinar. If you prefer to read or research, then this webinar companion is for you. Feel free to share this page or any of these resources with colleagues.
4. Expectations for Instructors
4.1. Simple Syllabus - Syllabus Simplified
TN eCampus has partnered with Simple Syllabus to drive an important student communication innovation. Simple Syllabus makes it possible to ensure accessible and consistent messaging around class schedules, office hours, textbooks to be used, policies, instructor bios, and even content sensitive to accreditation such as learning objectives and the course outline for the entire course catalog.
The migration to a new syllabus format has already been completed by the TN eCampus administrators and your course developer. As the course instructor, you only need to update Instructor Information. The written instructions below show you how to update this information.
Instructors have an important role in syllabus management for their course section/s.
- Instructors should insert their preferred phone number
- Provide an alternative email address that is external to D2L, for instance, @school.edu.
- As well as add a brief biography and/or personal message to students.
- Direct students to locate and use the syllabus.
Getting Started with Simple Syllabus
In your D2L course section, you will see a submodule in your "Getting Started" module called “Course Syllabus” with the “Simple Syllabus” tool link in there.
Please don't remove this new submodule or move the new Simple Syllabus tool link from that submodule. The new tool is how all TN eCampus section instructors and students will access their Syllabus.
You and your students will access the new syllabus directly through the course’s Table of Contents in the Getting Started module. Open Course Syllabus submodule and then choose the Simple Syllabus tool link to begin.
Scroll to the Faculty/Instructor Information section. Click the pencil icon to edit your information, your name and alternate email will be auto-populated by Simple. Please add your phone number (optional but strongly recommended), and additional email. Please also note the Help text provided which includes the Course Developer information for your course.
Note: All other sections of the syllabus are already complete, and you will NOT be able to edit them.
Submitting your Simple Syllabus
Once you have updated your details in the Faculty/Instructor Information, don’t forget to click on Submit when finished.
If you don’t submit your syllabus after updating your instructor details, the info you add will not be saved, and students will get an error when they try to view the Syllabus.
Note: If you are an instructor for multiple sections of the same course (R50, R51 etc.), don’t forget to update the Simple Syllabus in each section separately.
Need Help?
Send a ticket to the Help Desk (HelpSpot) for questions and support. Use the category Instructional Support, Simple Syllabus.
4.2. TN eCampus Instructor Requirements
Instructor Requirements
Instructors are required to...
- Post and update your contact information, bio, and office hours within 48 hours after gaining access to course shell(s) for each semester. This timeline is necessary to allow mentors time to review updates.
- Log in to the course a minimum of every 24-48 hours. Regular instructor presence is key to student success. Contact the Help Desk or your mentor if you have trouble logging into the course. Logins are monitored to ensure the fulfillment of this obligation.
- Respond to student emails within 48 hours including weekends.
- Post grades on any assignment, test, or other graded material within 2 weeks of its due date. This is critical feedback for students. Give feedback beyond grades to recognize achievement and constructively encourage them in areas they struggle with. Be prepared to offer resources and opportunities for remediation wherever possible.
- Instructors must assign grades (A, B, C, D, F, or I) in the final grade column. Learning Support courses cannot use D as a grade. NFG cannot be used for final grade entry.
- Be diligent adhering to all course deadlines. This is very important for the flow and pace of the course. For example, if an instructor misses a deadline for posting final grades, then they must manually complete a Grade Change Form (new window) for each student in their section. Meeting deadlines will lessen your workload and stress too.
- Get to know D2L which is our learning management system (LMS). There are many resources available (new window) to you to help you learn about D2L. Please use these resources to increase your knowledge and skill to navigate and use the tools effectively.
- Know where to get help. Ask your mentor if the problem or question is regarding teaching or learning. Contact the Help Desk if you have technical difficulty or need help with D2L. Please file a Help Desk ticket (new window) for prompt assistance.
Instructors must also...
- Be very mindful not to violate the privacy of a student by discussing their grades, performance, or disability status in an open course or public environment. This includes course discussion boards. FERPA (new window) regulations tightly restrict how and when we communicate with students. One of the advantages of online teaching and learning is that nearly everything communicated between faculty and students is automatically documented, whether in course communication or email. This documentation is valuable for both student and instructor should any problems arise later.
- Instructors may not significantly alter the design, delivery, or content of any module or course that they instruct. All major changes and deletions must be handled by the Course Developer. Course Developer information can be found on the “Instructors Only Files” page. This section is in draft status just for instructors. You should have a good working relationship with both your mentor and your course developer. It is wise to touch base with both your course developer and mentor on a regular basis to keep lines of communication open in all directions.
- All TN eCampus courses are asynchronous. Instructors may not require synchronous interactions or assignments.
- Only Course Developers can designate exams to be proctored. Only midterm and final exams may be proctored if designated. We do offer online proctoring on a case-by-case basis. Exams should remain open during the entire exam testing time as listed on the term calendar Web page. Proctoring is strongly discouraged.
4.3. Customizing Your Course
Master Course Model
TN eCampus works from a Master course model where a single course is developed and then copied into sections each semester, and taught by instructors from the TBR campuses. Your development work will be completed in a Development Copy (DC). Once the (re)development project is complete, the Development Copy will be renamed as a Master Copy (MC). The Master Copy is never taught from, nor does it ever carry any enrollments. All sectional copies (R50, R51, R52, etc) are copied from the Master Copy, but the content is NEVER copied from the sectional copies back to a Master Copy. Once the course is approved after the Final Review, it is listed on the website and in the campus registration systems.
Customize a Course
- Instructors may ADD supplemental material to the course.
- Instructors may NOT remove any material from their course shells. The course developer determines the layout, the content, and the assessment strategy. If you have concerns about the design of your section, please confer directly with your course developer.
- Supplemental material added to the course must PROVIDE asynchronous and nongraded opportunities for enhanced teaching and learning. The students may not be required to be present for a live study session over Web conferencing software, for instance. (Also, it should be recorded and made available to students whose schedules do not allow their synchronous attendance.) Puzzles, games, discussions, projects, and simulations are all great ways to integrate learning in a low-risk, highly social context that supports student success.
- Instructors may NOT teach outside the D2L system or ADD inaccessible content. All instruction and correspondence with students must occur within the D2L system. Send emails through D2L to ensure all course content from the Web is linked in properly. You will be receiving accessibility training in this course as well as subsequent training. It's important that all content added to the course is ADA accessible.
Help to Maintain and Improve Courses
- Report any course content problems to the Course Developer.
- Personalize the Instructor Message, Instructor Information, and Course Home pages in their assigned section.
In the event a misspelling or grammatical error appears, instructors are asked to both report the error to the Course Developer and correct the error in their section immediately.
4.4. Student Participation Survey
Student Participation Survey
The Student Participation Survey is the only method approved by federal requirements as well as by TBR's Oversight Committee for identifying student participation in a course.
Students have 14 days from the start of classes, including weekends, to complete the brief survey. This survey requires students to acknowledge that they have read the following:
- Course Syllabus
- Online Behavior Statement
- Academic Integrity/Honesty Guidelines
A news item is displayed at the top of the Course Homepage to notify the student of the survey. It is very important that this news item stays at the top of the course homepage so that students are alerted to complete the survey as this is the only way attendance is reported. Students may access the survey by clicking the link in the news item or by navigating to the Survey's link located on the course tools drop-down menu. The news item will automatically be removed from the news feed and the survey will be locked after the 14th day of class.
TN eCampus runs an automated report to extract completion information from the Student Participation survey that is then sent to the student's home institution.
An example of the Student Participation Survey news item is shown below and a PDF copy of the survey is attached should you wish to review it.
5. Best Practices for Online Learning
5.1. Instructor Presence
Instructor Presence
An important component of any online course is instructor or teaching presence. Students need to feel like you, as the instructor, are active and engaged in the course. Creating a sense of instructor presence has been shown to encourage increased student engagement. Here are some tips to help you create a sense of teaching presence in your course.
- Include recorded welcome videos, module overviews, lectures, and experiments.
- Post a photo of yourself on your Instructor Information or Instructor Welcome pages.
- Provide substantive feedback on assignments.
- Engage students in conversations outside of the regular discussion boards. You might have a "water cooler" or "Ask the Instructor" discussion space for additional conversation.
- Send regular announcements or messages with course updates and reminders. You might send one at the beginning of each module to introduce the new content and activities and one at the end of each module to recap what was discussed and covered.
- Share current news stories, internet resources, or anecdotes that relate to course content and learning goals. This helps students to make connections between what they're learning and real-world examples.
- Make sure you update your instructor information page. Consider adding additional information to help students get to know you better.
- Grade and return assignments as quickly as possible. TN eCampus policy is that all assignments must be graded within two weeks.
- Return email and phone messages promptly. TN eCampus policy is that you should respond within 48 hours.
- Consider scheduling regular virtual office hours. Students might contact you via phone, email, or text message, or you can video conference for a more personal exchange.
- Participate actively in discussion boards.
Online instructor and e-learning researcher, Dr. Curt Bonk, provides more tips for building a sense of instructor presence and adding your voice to the course in his video, "Building Instructor and Social Presence" (new window).
5.2. Creating a Community of Learners
Creating a Community of Learners
In your online course, you will find that your students comprise a mix of ages, socio-economic status, ethnicity, English-proficiency, sexual or gender identity, ability, and geographic location. Despite all their differences, your students are coming together for the purpose of learning. Students will be more successful in your course if they feel that they are in a safe, welcoming space where they are appreciated as individuals. Here are some things you can do to help build a sense of community that is open and welcoming to all students.
- Get to know your students and help them get to know their peers in an icebreaker discussion board at the start of the semester. As you get to know students better, you may be able to help them connect with each other. For example, in responding to discussion posts, you might refer to another student's post that made a related or contrasting point. Getting to know your students and why they are taking your class can help you to better understand their needs and positively impact learning.
- Once you know your students better, you can tap into students' backgrounds, cultures, and experiences. In helping them to make these kinds of connections, you help them to connect with the content more deeply.
- Provide guidelines for expected behavior in the online course space. Set ground rules. This may include posting guidelines for online discussion netiquette. Because online communication can be easily misinterpreted, remind students that it is best to avoid sarcasm, to not use all CAPS as that may be taken for yelling, and to always use polite, inclusive language rather than slang or slurs. You should also make clear your expectations and hold students accountable for their behavior and make them accountable to each other. All ideas and viewpoints should be respected.
- Be a role model. In your own communication with students, be careful not to use stereotypes. Set a positive tone that is encouraging to students. Be approachable to students and let them know that you respect them as individuals. Show appreciation when students express views from multiple perspectives.
- If your course contains group activities, consider assigning students to heterogeneous groups to give them experience working cooperatively with a diverse group of people.
- Send an announcement at the beginning and end of each module to let students know what is coming up and to summarize what has just finished. Making sure that all students are on the same page helps to contribute to a sense the individual student is part of a group, of a larger learning community. You may even have students take turns in writing a summary post, making them accountable for communicating clearly with the entire group and not just with the instructor.
5.3. Facilitating Discussions
Promoting Participation
To help students get engaged in an online discussion, you must be engaged and present in the discussion yourself. Students will respond more if they know that someone is actively reading and responding to their posts. It is also helpful to explain the purpose of discussions. This may be done as part of an instructor introduction in a module or as part of your initial post to a forum. If possible, respond to as many students' first postings as possible. Use their name to make them feel welcome and supported. If you have a large number of students, to make it more manageable you may respond to some students one week and others the following week. Send messages to those students who aren't participating to find out what is causing their limited participation. You may find that they are having technical difficulties or perhaps are feeling unsure about what to post. Finally, consider posting a summary of the overall group discussion at the end of a module. This may come in the form of a discussion post or as part of a course announcement, to sum up, what was covered and done in the just-completed module.
Promoting Interaction
Research shows that students get the most out of a course when they engage with the instructor, other students, the content, and themselves through reflection. Each of these forms of interaction is important for effective learning. As an instructor, you can help to encourage these kinds of interactions through participation and prompting in discussions and through your responses to discussion posts and assignments. It is critical that you be active and engaged in the discussions, but be careful not to dominate the conversation. Remember, you are there to be a "guide on the side". If you see the flow of the conversation veering off track, you may need to intervene, perhaps asking questions to get students thinking in the right direction.
Promoting Critical Thinking
A good prompt will provoke an original response and provide a “jumping off point” for students. Prompts should help students to make connections between their personal experience, prior learning, and new knowledge. Providing a jumping off point gives students a point to start from. As you respond to and engage with your students in discussions, you can draw more out of them, helping them to dive more deeply into the topic.
Sometimes students will not know how to respond to a discussion prompt. You may need to probe to draw more information out of them. One strategy is to use Curry and Cook's (2014) MANIC strategy. Answering these questions can help to teach students how to draw supporting evidence from their readings to make a detailed, thoughtful response.
Ask students:
- What was the Most important thing in the reading?
- What was something you Agree within the reading?
- What was something you do Not agree with in the reading?
- What was something you found Interesting in the reading?
- What was something you found Confusing in the reading?
Setting Clear Expectations
You should set clear expectations for what students should post and when. What is the timeline for initial posts and responses? Students are more likely to participate if they get responses. Require that initial posts be made early in the week, making responses to peers due by the end of the course week. Your course developer may have already set a schedule. If not, whatever schedule you choose, you should stick to the same routine throughout the course. Also, in your own posts, you should model the kind and format of responses you expect from students. You should also model how students should give feedback to one another. Rather than using emoticons, students should be encouraged to acknowledge others' contributions in writing, e.g. "I agree with your point" or "I am wondering about your last point. Could you tell me more?". Similarly, encourage students to start their responses with something positive before they add their critique or feedback.
Curry, J.H. & Cook, J. (2014). Facilitating online discussions at a manic pace: A new strategy for an old problem. The Quarterly Review of Distance Education, 15(3), 1-11.
5.4. Providing Good Feedback
Feedback Tips
Providing students with meaningful feedback helps them to not only understand the content better but to understand their own thinking and learning processes as well. Meaningful feedback greatly enhances learning and improves student achievement. Here are some tips for providing meaningful feedback to students (@Rebezuniga, 2014):
- Be as specific as possible. Phrases such as "good job" don't tell the learner what they did right and "not quite there yet" doesn't give insight into what needs to be done better. Take the time to provide your learners with information on exactly what they did well, and what may still need improvement.
- Give feedback sooner rather than later. Feedback is most effective when it is given immediately rather than a few days, weeks, or months down the line. The University of Minnesota found that students were able to comprehend material better with immediate versus delayed feedback.
- Address the learner's advancement toward a goal. Effective feedback is most often oriented around a specific achievement that students are or should be, working toward.
- Present feedback carefully. Situations in which feedback could be counterproductive include when the learner feels too strictly monitored, when learners interpret feedback as an attempt to control them, and when learners feel an uncomfortable sense of competition. Explain the purpose of any monitoring. Feedback is meant to help them to compete against their own personal bests.
- Involve learners in the process. Students must be given access to information about their performance.
- Start with a positive message. A positive message provides encouragement. Start with something positive before discussing areas that need to be improved.
- Say something personal. Include examples from students' work so they know you have read it and that the feedback is personal to their work.
- Help students to see the connection between the course and their lives. In your feedback, you can apply real-world examples to their work or as examples for them to follow.
- Consider presenting feedback in different formats. You may choose to give feedback in writing, but you might also record a short audio or video response using the tools in D2L.
- If your course has rubrics, use them for assessment and feedback. Rubrics help students to see where they earned or lost points against a set of outcomes or criteria and levels of performance.
5.5. Understanding FERPA
Family Educational Rights and Privacy Act
The Family Educational Rights and Privacy Act (new window), known as FERPA, is a Federal law that protects the privacy of student education records. The law applies to all schools that receive funds under an applicable program of the U.S. Department of Education.
- FERPA gives parents certain rights with respect to their children's education records.
- Rights transfer to the student when he or she reaches the age of 18 or attends a school beyond the high school level. Students to whom the rights have transferred are referred to as, eligible students, and have the right to inspect and review the student's education records maintained by the school.
- Schools are not required to provide copies of records unless, for reasons such as great distance, it is impossible for parents or eligible students to review the records.
- Parents or eligible students also have the right to request that a school correct records which they believe to be inaccurate or misleading.
- Schools may disclose, without consent, directory information such as a student's name, address, telephone number, date and place of birth, honors, awards, and dates of attendance. However, schools must tell parents and eligible students about directory information and allow parents and eligible students a reasonable amount of time to request that the school not disclose directory information about them.
- You should never transmit protected information via email. This includes grades, test scores, transcripts, and students' personally identifiable information such as a Social Security number.
5.6. Alternate Communication Resources
Alternate Communication Resources
We strongly recommend communicating within the Brightspace learning environment. It is a central source for students and instructors and it documents all course activity.
With that said, we learned in the Spring of 2020, not all teaching and learning was planned by instructors or students to be "online" learning. Due to a rapid shift to online instruction, we encourage instructors to use tools and resources that give them the clearest path to major objectives with a minimal learning curve for them and their students. The intent of this page is to share some popular choices that are typically easy to use and have a low cost. Your institution may have access to site licenses to other products you should consider.
Google Voice
Why use Google Voice? Voice allows you to do the following:
- Choose a number you can share with anyone and control how you are contacted without compromising your regular phone number
- Read and search voice messages just like email
- Send text messages from your Voice number
Setup Google Voice Tutorial (new window)
Google Hangouts
Why use Google Hangouts? Hangouts allows you to do the following:
- Setup video conferencing to synchronously meet with individuals or a group
- Make voice calls
- Text or chat with individuals or a group
Google Hangouts – Getting Started (new window)
Screencast-O-Matic
Why use Screencast-O-Matic? Screencast-O-Matic is one of many recording tools that are free or free to try. Your computer or camera software may allow you to record videos too. This is a popular choice that allows you to do the following:
- Record yourself talking
- Record presentations or demonstrations displayed on your computer or both
- Save your recording to share asynchronously, which allows students to decide when to watch
- Save the file to your computer and upload it to Brightspace, YouTube or Screencast-O-Matic
- Add captions to make the content to the widest group of students
Welcome to Screencast-O-Matic (new window)
6. Brightspace LMS Tools
6.1. Supported Browsers
Brightspace Supported Browsers
(Updated 01.26.2022)
Brightspace works well with several browsers. Brightspace no longer supports any version of Microsoft Edge Legacy. You will receive a warning message if you use this browser. Microsoft Edge Chromium version is supported.
Brightspace Learning Environment's browser version check now displays warnings for browsers earlier than the following versions:
- Chrome 107+ (released October 2022)
- Android Chrome 107+ (released October 2022)
- macOS Safari 16+ (released September 2022)
- iOS Safari 16+ (released September 2022)
- Firefox 106+ (released October 2022)
You may be able to access Brightspace Learning Environment with older versions of the supported browsers; however, D2L does not test Brightspace Learning Environment against these older versions. You may also receive a warning that your current browser is not supported. For an optimal experience that offers better performance, accessibility, and security, D2L strongly recommends that all users access Brightspace Learning Environment with a supported browser.
Legacy Edge or Chromium Edge
Follow these steps to quickly check MS Edge. (Many browsers have similar menu options, including Google Chrome.)
6.2. Username and Password
New to TN eCampus?
If you are new to TN eCampus and unsure where to begin, please contact TN eCampus .
Username
Usernames are in the following format based on role:
- Instructors: firstname.lastname
- Course Developers: dev.firstname.lastname
- Mentors: mentor.firstname.lastname
- Distance Education Directors: DE.firstname.lastname
Password Reset
If you need a password reset, please select Forgot Password . This action will send a password reset link to the email address associated with your Brightspace (D2L) account. The email address associated with your account is usually your institutional email, but it may be a personal email address. The email will come from donotreply@tnecampus.brightspace.com. Please make sure to check your junk/spam folders, if you do not receive the reset link. Please contact our office for further assistance by emailing TN eCampus
.
6.3. Access to Courses by Role
Access by Role
Role assignment determines the ability to create and edit courses and the view of what is shared in a course. For example, students can submit assignments and add to discussion posts, but they cannot alter the structure of a course.
Instructors
Instructor enrollments begin 10 days prior to the first day of class. Changes made during this 10 day period will be reflected in Brightspace (D2L) within 24 hours after the change has been submitted to TN eCampus by the Distance Education Director. If you have questions about your teaching assignment, please check with your Distance Education Director as TN eCampus does not make teaching assignments. (Students cannot access until the first day.)
Course Developers
Course developers are enrolled in all sections of their course(s) approximately 3 weeks before the semester begins. Course developers are expected to review their sections and notify TN eCampus if there appear to be any errors.
Distance Education Directors
Distance Education Directors are enrolled in the master copy of all courses owned by their institution and have the ability to export the course.
6.4. Getting Started Widget
Getting Started Widget
The Getting Started Widget is a customization developed by D2L for Brightspace designed to focus on communication with students when they log into a course. This widget does not require any unique setup by the instructor. The functionality is dependent on the content of the Getting Started module in the course, which typically includes a Message from the Instructor and Course Expectations and any other file included in that module.
*Please note, even HIDDEN FILES will populate in the Getting Started Widget. (They are hidden in the module.) Use submodules to provide additional information in this module. Read more at the end of the tutorial.
When students log into the course, the widget will open automatically to the first page of the Getting Started content. Choosing Next prompts the next file to load. Scrolling may be necessary for longer pages.
Students will continue to choose Next until the last file is presented. The last file offers the option to Dismiss the widget. Choosing Dismiss will stop the initiation of the widget at the login to the course.
Students can always see the content again even if they have previously dismissed the widget. Students will see the blue Getting Started button/bar above the announcements section and may choose Getting Started to run the widget. (Of course, they can see the module under the content tab as well.)
Submodules and External Learning Tools
Submodules in the Getting Started module will not populate in the widget. If you have content such as, an External Learning Tool, that needs to be placed early in the Table of Contents, then use a submodule folder for those items within the Getting Started module. Students will see the items when they check course content, but the submodule content will not interfere with the widget.
6.5. Announcements Tool
Create an Announcement
Announcements are a great way to keep students on track. Faculty and developers have a role in creating announcements. Faculty may add announcements during the current semester. Typical faculty announcements include a greeting or welcome message, time-sensitive updates, or adding other information specific to the course section.
Getting Started
From the Course Home page, select Announcements. The Announcements window will open. Choose New Announcement to start an announcement.
Enter a Headline (title) and content.
Announcement availability has three decision points. Show Start Date sets when the announcement should be visible to students. Start Date sets announcements to be scheduled to run immediately or at a future time. End Date removes the availability of the announcement. Remove announcement based on end date will remove the announcement on the end date automatically. Additional release conditions may also be set as needed.
Select Publish to make the announcement available or Save as Draft to save your work without publishing.
The announcements page will open with a list of all announcements in the course. Announcements will be listed in the order as they appear on the course homepage. By default, a new announcement will be listed at the top. The Course Information announcement must always be displayed at the top of the course homepage. Newly added announcements must be reordered. All other announcement items should appear below this group of announcements.
- Course Information
- Course Description
- Welcome
- How this Course Works
- All other announcements
To reorder an announcement, select More Actions and then Reorder. The Reorder page will open. Change the order by adjusting the numeric order. Choose Save when complete.
Edit an Announcement
Choose Edit from the context menu of the announcement. The Edit Announcement page will open. Make any necessary edits to the content or availability. Choose Update to finish.
Copy Announcements
Announcements that have a lot of the same content can now be copied by choosing Copy in the context menu. The copy of the announcement will include:
- Headline, with "Copy of " appended to the front
- Content
- Show Start Date setting checkbox. (Start dates and/or end dates are not copied over.)
- Attachments or Release conditions if applicable
The new announcement will be in draft mode and will not trigger any actions until saved.
Delete an Announcement
Select an announcement and choose Delete from the menu. A confirmation window will open. Choose Yes to continue.
To delete more than one item, select each checkbox of the items you want to delete. Choose the Delete at the top of the list. A confirmation window will open. Choose Yes to continue.
Announcements can be restored. Select More Actions and then choose Restore. The Restore Announcements window will open. Check the announcement you want to restore. Choose Yes to continue.
6.6. Navigating Course Content
Navigating Course Content
Navigate to a course by choosing a course from My Courses or the Course Selector.
My Courses Widget
The widget has updated sort logic that presents both pinned and unpinned courses in the My Courses Widget, promoting the pinned courses to be displayed first in the widget. Pinned will not be present if no courses are pinned. Additionally, users have the ability to show courses on tabs according to the course’s Semester, Department, or Role.
Choose Content from the navbar on the course homepage to access the course content.
In this example, the left column contains the Table of Contents and lists all modules in the course including the Getting Started module. The right column displays the contents of a selected module. Choosing Message from your Instructor opens a sample page.
Navigate through each page in the module by selecting the Back and Forward arrows at the top and bottom right corner of the page or use the Bread Crumb Trail to navigate back to the table of contents, a module, or page by selecting the desired location.
Prefer to watch a short video?
6.7. Creating Course Modules & HTML Files
Creating Content Modules, Sub-modules, and Topics
Course content contains modules, sub-modules, and topics. You must create a module before you can add topics. You can create submodules (modules within existing modules) to establish a deeper hierarchy.
Getting Started
Course content contains modules, sub-modules, and topics. You must create a module before you can add topics. You can create submodules (modules within existing modules) to establish a deeper hierarchy.
A module can be added either at the bottom of the table of contents or below the last module in the content section by selecting Add a module or Add a sub-module. Add a name for the module and select Enter/Return. Structurally, modules were added to the table of contents. Submodules are added to the module highlighted in the table of contents.
While it is possible to drag and drop files into the module, it is not recommended until you have verified with your regional accessibility specialist that the files are accessible. Furthermore, consider using content to build accessibly compliant course files with the HTML/Text Editor.
You can learn more by watching a video from D2L.
Topics
To create an accessible HTML page, select Create a File from the Upload/Create menu.
Use Enter a Title to create a descriptive title. Keep in mind, this title will be the title of the document in the table of contents and the course files.
Document Template
Before entering any content, Select a Document Template for the document. General Page Structure is commonly used for common pages.
*Please note, templates must be applied appropriately to all new pages. Templates provided in the template menu are the only templates available. Browse for Template is on the menu, but you will not be able to navigate back to them since they are shared from an org unit level.
HTML/Text Editor
The Text Editor is a key resource for developing accessible content. Headings, lists, links, images, and equations can be copied and pasted, but using these and other text editor tools ensures the most accessible options. Even when text and object "look" the same as they did in other documents there may be unexpected HTML code. Use plain text and each of the needed tools to format your documents. Insert Stuff has some topics you might miss just browsing through the toolbar. Use it to embed and record videos and insert course offerings and resources from your computer just to name a few. The Text Editor is packed with features.
Additionally, Insert Stuff is expanded in this image to reveal its contents and other options.
Images and Alternative Text
If pictures are inserted in documents, an alternative text prompt will open. If the image is meant to convey information, there must be a full description of the information in the Alternative Text box. If the image is strictly meant for decoration, mark This image is decorative and select OK to finish.
See WebAIM's site for more information on Alternative Text Basics .
Editor Attribute Improvements for Accessibility
Brightspace added a new tab to the existing Attributes menu of Brightspace Editor, allowing users to enter page attributes for language and title to meet accessibility compliance requirements. Previously, users had to manually add code into the source editor to add language and title page attributes.
Using this feature will resolve the Ally error message about language.
Changing Path in Managed Files
Content must be organized in Managed Files. After entering or adding content, select Change Path.
The Course Offering Files window will open displaying a list of folders in the course. It is recommended to create a folder for each module in the course. If a folder already exists for a module, highlight it, and choose Select Path. If the folder does not yet exist, select New Folder and name it appropriately. Selecting the path for the document determines where to save it to keep your course organized and easy to manage.
*Please note, when creating new folders, the new folder you create will be nested within the folder that is highlighted. It is easy to inadvertently select an unintended folder within the course folder.
Enter an appropriate Folder Name and then choose Create. (In this example, we have created a chapter overview document in module 4 of the course content with the title folder Module 04.)
*Please note, it is recommended that you keep folder names consistent to improve course management.
The new folder is shown in the Course Offering Files list. Highlight the folder then choose Select Path.
Notice the file path shown at the bottom of the page. Review the document created and choose Update when finished, or select the Revert to Draft to save the document and return to finish editing it at a later time. Documents saved as a draft are not viewable by students.
Edit an HTML File
There are two starting points to editing a file. Choose Edit HTML from the context menu of the document title or select Edit HTML at the bottom of the page.
Either option will open the HTML editor. Apply any additions or changes needed. This process is very similar to creating a new file. Choose Publish when finished.
.
Delete Content (carefully)
The option to Delete content is found in many menu locations. There are two choices to delete in Brightspace.
- Delete content from the location selected. This only deletes the content or object that is selected in that location. Content that was uploaded to the Managed Files or was sourced from another location in the course will remain in alternate locations. For example, a discussion created and attached/linked to a specific module within the Table of Contents would remain a discussion in the course, but it would no longer be linked to that module if deleted.
- Delete permanently removes content or objects from all nested modules, topics, and associated files including Managed Files.
6.8. Quicklink
Creating a Quicklink
Choose Existing Activities to link activities into the course. Select the type of activity to be linked from the menu. In this example, we will select Discussions. The Add Activity window will open. Choose the discussion forum where the topic to link is located.
The topics included in the forum will then be listed. Select the topic to be linked to the module. After selecting the topic, the window will close and go back to the module in the table of contents.
The Module 4 Discussion link is now included in the Activities sub-module.
6.9. Hyperlinks in the HTML Editor
Hyperlinks in the Editor
Hyperlinks work in Brightspace much like any other web page. The linked text should be descriptive of the target location or site. Links should make sense out of context. Avoid using links that use, “click here” or “more.” Do not use headings for hyperlinks. Instead, link text in the body of the content. "For more information, see the tutorial for Hyperlinks (same frame)."
Creating Links
Select the text in your content that is the topic, web page name, or URL (the address) of the desired web page. Long or complex URLs are cumbersome to read visually and use with assistive technologies, such as screen readers. Many URLs will populate the main page with the core address. For example, gotoclass.tnecampus.org is enough to open the TN eCampus courses login page. Test the core URL in a separate browser before using it.
Select the desired text without any additional spaces. Choose the Link symbol from the toolbar. When you first select text there will also be a floating format window available but this only allows you to paste in the URL. You cannot set the window or other details. Additionally, Insert Stuff has the option to add a link, embed code, and more.
A new window will open. Scroll down to the URL at the bottom of the menu.
A blank form will open. Add the full address in the URL field. The selected text should be in the Title field. You can edit this information if changes are needed.
Presenting Content
There are 3 options for presenting web content:
- Whole Window (full page)
- Same Frame (the frame the current content resides)
- New Window (opens a new page or window)
Choose the matching radio button and add the target type selected in parenthesis. New Window is used in the example below. This choice is typically used when the link leads to another website. Same Frame is often used when linking inside the same website. Whole Window is typically used within the same website, but the full window is preferred over Same Frame. Choose Update (to save changes) when finished entering the link content.
Check the Link
With the link content complete, choose Update to finish.
Check the link to confirm the target chosen is working correctly and the desired page opens.
Link to Playlist
Pro tip: Links to individual files can change and should be checked regularly. If you are linking to videos, consider a playlist if available. A playlist is more likely to stay the same. New or updated videos may be added and have a new URL.
6.10. Accessible HTML File Content
Creating Accessible HTML File Content
Brightspace courses may contain many different types of sources for course content. Some of the most common include the following: web pages, document files, tables, audio clips, images, and video. Text content may be introduced by copying and pasting into course files. Plain text is preferred to avoid unexpected formating. Other sources should be imported into Managed Files (in an organized fashion) and inserted into the course files. Each type of content has its own accessibility component to be considered. In the tutorial, Creating Course Modules & Files , the steps to create content pages are outlined. This section will focus on making sure the content is accessible and Section 504 compliant.
Behind the Scene
Course files in Brightspace are referred to as HTML Files because HTML code is the structure behind the scene. The HTML code is hidden, but accessible in the edit mode through the code icon </> located on the bottom row of tools of the editor window. Some users may prefer to use create and edit content through the HTML code, but it is not necessary to be an HTML code expert to create and edit pages in Brightspace. If you are interested in learning more about HTML coding, there are numerous sites on the web designed to quick-start users with HTML. A couple of examples include w3schools.com and Way2Turorial.com
. Both sites have a similar approach to introducing and explaining the foundations.
Steps to Build Accessible Course Files
As also described in Creating Course Modules & Files , start by using Create a New File in the module/submodule.
Before entering any content, Select a Document Template for the document. Add a descriptive title for the file in Enter a Title.
*Please note, templates must be applied appropriately to all new files. Templates provided in the template menu are the only templates available. Browse for Template is on the menu, but you will not be able to use them.
Depending on the template chosen, sample headings and text will populate. Select and replace the text for the course.
*Please note, the sample text has the H1 followed by a horizontal rule. This is a part of the template design. If the content is pasted to the page has a defined H1 tagged, the heading will hold and the horizontal rule will remain in place. On the other hand, pasting plain text will appear without headings or rules. Once the headings are tagged, the horizontal rule will reappear. Continue to make updates.
Source Options
Brightspace will allow many kinds of content, but not all sources are optimal or even accessible to all users. Consider alternatives to just copying and pasting raw content into courses.
Plain Text Editor
The clearest and cleanest method is to copy text content into your course file is from a plain text editor, like Text Edit for Mac or Notepad for PC. In this example, a web page has been copied into Notepad. The plain text has no formatting, hyperlinks, or images. Everything beyond the text can be made accessible by using the page editing tools in Brightspace. It may seem faster and easier to paste content directly into the page, but it may require advanced skills and knowledge to recognize and repair the inaccessible issues.
It is possible to copy and paste images and insert files from your computer into the HTML Editor in Brightspace (and the process seems quite efficient), however, TN eCampus courses are set up on the Master Course model. To add files to course content, files must be uploaded to folders in Managed Files. This is the only way to successfully clone content from the Master Copy to section copies. Keeping modules and content organized in the Managed Files tool gives confidence all of the work is saved and easily edited if needed.
With the new text copied and pasted into the course file, select and set the headers for each section with the WYSIWYG (What You See Is What You Get) tools on the course page.
Headings must remain in a logical order to be accessible to everyone. The course page content typically will start with (H1). Major subheadings should be tagged with as (H2) and so on. Each may have detailed content or even deeper subheadings (H3-H6). The important thing is to keep them consistent with the layers of content as outlined in this image found on the W3C Web Accessibility Initiative website. Please see this website for even more detailed information on headings.
Make style changes as needed. Typical tools are shown. Check the menus for more options.
Lists
Lists are a very powerful way to convey information in a structured way. Such structural information allows assistive technologies to announce the number of items on the menu and provide corresponding navigation functionality.
- Use an Unordered list (bullets) when the menu items are not in a specific order.
- Use an Ordered list (numbered or lettered) when the sequence of the menu items is important. (Consider this optional carefully. An ordered list is the most often misused of the two types.)
Correct ordered lists in new content by selecting the list and choose Ordered or Unordered from the toolbar. (Unordered is the default button on tools the row. Expanding the menu gives the Ordered list option.) Initially, the list will start as one bullet or number. Carefully, add a line after each item by placing the mouse at the end and choose Enter/Return. Then, move the cursor to the blank line of the new list line and press Delete to bring the last line to that row.
Make any other edits with the tools and the Accessibility Checker to confirm the page is accessible. See the accompanying page in this chapter for more information on the Accessibility Checker
The Other Stuff
Audio clips, images, videos, and other non-text artifacts must be uploaded to Managed Files.
Insert Stuff is the first button on the toolbar. Use this option to import objects from Course Offering Files. There are other choices including, Enter Embed Code to embed video content from outside sources. The Camera icon adds images. Be sure to follow the same path of Course Offering Files. It is tempting to import from your computer or other sources, but this will not work in courses to be cloned. The third icon is the Link icon. Use this icon to add hyperlinks. Insert Stuff can also add hyperlinks.
Copy and Paste Source Document Content from Microsoft Word and Others
Brightspace has updated the way text from Microsoft Word content can be pasted to course pages. In most situations, the text and some formatting will carry over as seen in the original document. On the surface, this may seem to be easy and the content may look just the same as the source. In the previous process, each step was created correctly from the text content. Pasting content from Word, web pages, or other content sources will require a step-by-step check of each topic.
Copying from Word typically applies headings if they were applied from an accessible source document, but the headings may not be in the correct order. In some cases, headings may just be bold text. Look at this example of a web page copied to a course page.
Some portions are correct and there are others that "look okay" visually. Errors must be corrected to be accessible.
Lists may look like lists. This is easy to check. Try to select the bullet or number along with the text. In an actual list, the number or bullet cannot be selected. Delete the numbers or bullets and update the list as described previously.
Additionally, Hyperlinks may not remain linked after pasting into course files. Try each link and update it as needed.
Conclusion
Creating accessible documents in Brightspace can be tackled in different ways with varying skill levels, experience with accessibility development, and knowledge of HTML coding. It is important to recognize that copying content from many sources has improved, but still requires vigilance and a basic understanding of accessibility standards and content layout. The surest and simplest way to create clear and accessible content is to build it from plain text and format the content with the WYSIWYG tools. Copying directly from other sources will require the content to be checked to be sure it is more than just visually appealing. It must be Accessible!
6.11. Accessibility Checker
Brightspace Accessibility Checker
The HTML editor has many functions to assist in content development, including an Accessibility Checker function. Begin by choosing Edit HTML for a course page.
When the edit window opens, choose Accessibility Checker from the toolbar.
The Accessibility Checker will open and begin to review the content. If there are accessibility errors, the checker will flag the error for review. Some errors must be corrected after the checker is finished. Make a note, but choose Ignore if Repair is not an option.
Some errors can be Repaired during the check. Here we can add Alternative Text in the textbox.
If there are no errors, this message will appear.
This is a valuable tool, but the user still needs to be aware of accessibility issues and not rely solely on this feature. For example, the accessibility checker cannot alert you if a video does not have captions. The Brightspace Community (new window) has a 7 step article demonstrating additional examples using this tool.
Additional Resources
Ally Accessibility Checker
The Brightspace Accessibility Checker is an excellent tool. TN eCampus has also integrated BlackBoard Ally Accessibility Checker in as well. Please see the Ally tutorial here in this chapter to learn more.
6.12. Ally Overview
Ally Overview for Faculty
TN eCampus has made Blackboard Ally accessibility checker available for all partnership courses. Ally works seamlessly with Brightspace to gauge the accessibility of course content. Ally can point out many kinds of compliance issues, provide a step-by-step guide on how to fix many issues, and can even help you decide where to begin.
Getting Started
To get started from the NavBar, open the More menu and choose Ally Course Report.
Ally Dashboard
The dashboard has 4 key information sets to help you decide how much needs to be done and where it might be best to begin.
- The snapshot graphic gives an overall grade
- The course content tallies the content by file type
- Choose this option to remediate the easiest files
- Choose this option to remediate the greatest need file
From the Overview tab choose View or Start to access the specific report path that works best for you. You may want to remediate by groups of file types, the easiest files, or the files with the biggest problems. In this example, we will explore low-scoring content.
Choose a course file from the list. Notice the document type, file name, and score information provided in this view. The next window will highlight the problem areas if possible, the percentage score, and options to learn more about the accessibility topic and possible solutions. (Some recommended solutions are still in development.) TN eCampus Knowledge Books have accessibility tutorials (new window) available 24/7 as well.
Also, be sure to notice the All Issues button. Using this feature expands all issues with a file.
Receive Accessibility Feedback
When Ally was installed, it checked every course in the system, but Ally checks also checks every course update and edit. Notice these symbols next to content Ally can check. Like the course report, this is a snapshot of the file's accessibility status.
Low: The file is not accessible and needs immediate attention.
Medium: The file is somewhat accessible and could use improvement.
High: The file is accessible but could be improved.
Perfect: The file is accessible. No improvement was detected.
Steps to Remediation
Remediation is not intended directly inside Ally. Ally will show you where the problem exists but you have to make those changes in the HTML file or upload a new source file with the corrections made.
This topic is further covered in a separate tutorial, Understanding Ally Reports: What to Fix and How (KB).
Need Help
Knowledge Books has a chapter for Accessibility tutorials (same frame). There you will find a variety of tips, checklists, and how-to's you can review anytime. If you need help with an accessibility problem, you can always file a ticket through the TN eCampus Help Desk (new window).
Prefer a short video? This video demonstrates Ally's functionality in the Blackboard LMS. This is very similar to the overall functionality in Brightspace.
Alternative File Formats for Students
In addition to providing course developers and instructors with insight into your content accessibility, Ally automatically creates alternative versions of your files. This allows students to choose the type of file they want that best suits their needs.
While you're in the process of improving files, students can access alternative document types. For example, Ally can convert a scanned document to a text document using OCR technology that can be read by a screen reader or Ally can convert that same document to electronic braille or an ePub book.
Share with Students
This resource creates more accessible and more useful content for students of all abilities. Please share this feature with students to increase their awareness. Students have tutorial information in the TN eCampus Knowledge Books (new window). You may also share a brief video, Blackboard Ally for Students (new window).
6.13. Understanding Ally Reports: What to Fix and How
Understanding Ally Reports: What to Fix and How
Blackboard Ally is a great tool that can support accessibility efforts. Like any automated tool, there are limits to reaching ultimate accessibility. Ally is very good at finding many accessibility issues, but it is not a complete replacement for a good working knowledge of accessibility practices.
Getting Started
The dashboard and dials are explained on the Ally Overview tutorial page. This snapshot view is a good launch point for most activities.
Accessibility Resources
Ally can suggest ways to correct some issues, but sometimes Ally will report that guidance is coming. This can be frustrating to users depending on this level of assistance. You may review a variety of accessibility topics in the TN eCampus Knowledge Books. Specifically, Tips for Checking Accessibility (KB) is a good place to start.
Issues Checked with Ally
| Topics Checked | Ally Supports | Steps You Can Take |
| Page Language | Checks for missing language coding | These can be ignored. This is typically seen in older courses. These pages may not have updated templates. Contact your Instructional Designer for assistance. |
| Page Title | Checks for missing title | These can be ignored. This is typically seen in older courses. These pages may not have updated templates. Contact your Instructional Designer for assistance. |
| Content Headings | Checks for missing or empty headings. Offers some support for corrections. | Review course pages and files to confirm headings are applied instead of larger or bold fonts. |
| Color/Contrast | Checks for insufficient color and/or contrast. Offers some support for corrections. | Use the source software tool to select improvements that will meet WCAG 2.0 level AA requires a contrast ratio of at least 4.5:1 for normal text and 3:1 for large text. |
| Alternative Text | Checks for missing AltText. Cannot evaluate the quality of the text. Auto-generated text will cause Ally to skip images. Offers some support for corrections. | Evaluate the quality of previously added AltText, especially auto-text generated MS Word or PowerPoint and other programs. The original documents may have had a setting to automatically generate text, which can be worse than no text. |
| Video Captions | Checks for missing video captions. Ally can check video files for the presence of captions but it cannot evaluate the quality or the need for audio description. Links to videos hosted on a 3rd party sites are not checked or flagged for review. | Evaluate captions for videos that have them present. Auto captions are a fast start to quality but should not be depended on for compliance. Add captions if missing. |
| Scanned Images | Checks for scanned PDF document files or similar documents with undetectable text. Offers some support for corrections. | Test uploaded and 3rd party vendor content for readable text. Upload OCR corrected files to replace course documents. Work with vendors to provide updated documents or alternative resources. |
| Check presentation files | Checks for missing AltText, insufficient Color/Context. Offers some support for corrections. | Reading Order and embedded videos are not checked. The presentation software's accessibility checker may be useful. Manually check the reading order and the presence of edited video captions. |
Steps to Remediation
Remediation is not intended directly inside Ally. Ally will show you where the problem exists but you have to make those changes in the HTML file or upload a new source file with the corrections made. A simple way to manage live changes is to have the page or source file open in another browser window. Use the second window to make the corrections and save your work there.
False Positive
It is common to find large numbers of Brightspace course pages, that are largely accessible but flag the same issues in every file. These flagged items are often "false positive" reports.
- This HTML file does not have a language set
- This HTML file has no title
Checking an example, we see familiar errors.
(Remember to choose All Issues.)
Check Template
Assuming the Brightspace page template was used to create this page. There is a language and title set, but there is a coding issue in some course files that cause the false reports. These errors can be ignored for that reason. Contact your instruction designer if you suspect the problem is missing templates.
Contrast Example
In this example, the word with contrast issues is highlighted.
Contrast issues reported in Ally offer direct links to common program tutorials you may explore.
Alternative Text Example
Ally will locate images without Alternative Text.
Use Brightspace tools for adding text to images by clicking the image. A menu will open with the image properties icon. Use the open window to add text, size, or mark as decorative if appropriate. Files in other programs have similar options.
Alternative text should not exceed 125-150 characters. Use long text or a text supplement for images that require greater detail.
Scanned PDF Example
This is a scanned image, which is a Tennessee map with points listing all of the public and private colleges and universities in the state and it is 0% compliant. Ally has pointed out this is a document that needs review because it is only a scanned image.
Regardless of the purpose, the document is a blank page to some users. Unless this is decorative, maps pose one of the biggest challenges. A full-text replacement may be necessary if users are expected to study or research information from the map. This could be accomplished in a long text file or a table that groups schools by region or proximity. Again, it would depend on the purpose. The purpose here is to show a complex image and consider how to represent it in different scenarios. The details of the map are not relevant to the purpose.
You can choose the buttons, What this means and How to fix this to learn more from Ally on scanned images
6.14. Ally and Students
Ally and Students
TN eCampus has added Blackboard Ally to your courses to support instructors and students. Ally works seamlessly in Brightspace and automatically checks for gaps in accessibility compliance, but it doesn't stop there. Students may choose accessible Alternative Formats such as:
- audio from text files,
- text from scanned files, and
- electronic braille to name a few.
Everyone Likes Choices
Ally is a support to all students that need choices to access course content on the go, regardless of disabilities. Choosing the Alternative Formats icon is the first step to making content easier to access and more compliant.
This list of choices depends on the original file type. Students may choose an alternative file type from the options presented. See the example list of alternatives for a text file. Choosing an alternative format does not change the original content of the course. Students may view the original content or try another format anytime.
Share with Students
This resource creates more accessible and more useful content for students of all abilities. Please share Ally information with students to increase their awareness of these new features in Brightspace. Students have tutorial information in the TN eCampus Knowledge Books (new window). You may also share a brief video, Blackboard Ally for Students (new window).
6.15. Text/HTML Editor
Text/HTML Editor
D2L updated the Text/HTML editor for Brightspace in 2021. This was a rolling change that now spans all Brightspace tools from Assignments to Rubrics. The first visual change you will notice is the removal of the lower toolbar. Those features were moved to the top bar.
Changes to the Editor
The Check Accessibility, HTML Source Editor, Preview, and Toggle full screen functionalities have now been placed in the top bar. Other changes include:
- More and different formatting options.
- An improved color picker with WCAG compliance checking.
- A full and standard set of Emojis and Symbols
- The move of footer options like 'preview' ' source' 'accessibility checking' and 'expand' to the main toolbar.
- Updates to our font size menu
- A refreshed Accessibility checker
- Increase/Decrease Indent is nest under the List tool
Additions to the Editor
- New Advanced Tables that include sorting options.
- Contextual menus for editing text, links, and images (image editing is not available in all areas still)
- Word Count including character and selection word count
- Advanced Source Code Editor that includes code suggestions and color coding for tags.
- Lato font
- An 'Other Insert Options' menu for overflow items.
- Copy/paste and/or drag and drop images are now available when the consistent evaluation experience is on for assignment feedback.
- Design improvements to enhance the use of the Editor on mobile devices and improve general usability.
- Accessibility improvements – Improved keyboard navigation for keyboard users and toolbar icons are spaced out more in accordance with WCAG standards. LaTex is supported in the editor as well.
Not included in the Editor
These items were not carried over from the classic editor.
- Spellcheck functionality. D2L recommends using your browser's spellcheck functionality.
- Cut/Paste functionality. D2L recommends using your browser hotkeys/menus for this functionality.
6.16. Equation Editor
Equation Editor
The Brightspace Text Editor has updated the Graphical, MathML, and LaTeX equation tools to assist in adding content using the Graphical Equation Editor. Using this feature allows users to insert mathematical and statistical equations into their content in the Brightspace platform tools, such as discussion topics, custom instructions for assignment folders, content topics, and more.
Graphical Editor
The Graphical Editor features a toolbar equipped with a selection of tool buttons. This toolbar provides the necessary elements to construct equations quickly and easily. Each button in the Equation Editor toolbar opens a palette of related mathematical symbols. This editor is the most visual of the three options and it is best suited for those that only write equations occasionally.
LaTeX
LaTeX is a typesetting system based on TeX. Although there’s a bit of a learning curve, it’s compact and efficient once you’re familiar with the commands. Advanced users find that this is the fastest input type.
There are two possible modes for LaTeX entry: text mode and math mode. MathJax supports math mode only. If you add LaTeX using the Equation Editor, allow for the following differences in math mode:
- Most spaces and line breaks are not recognized and have to be specified with special commands such as \quad.
- Empty lines are ignored, only one paragraph per formula.
- Each letter is considered to be the name of a variable and will be typeset as such. If you want normal text within a formula (normal upright font and normal spacing) then you have to enter the text using dedicated commands.
LaTeX Inline Equation (update)
D2L has updated how you can draft scientific and mathematical equations in LaTeX. Equations can be rendered seamlessly without the need to use the LaTeX equation option in the Equation Editor. The Equation Editor is still available. Choose the method that is best for you.
MathML
MathML is a standard adopted by the World Wide Web Consortium (W3C). It uses XML to describe mathematical notation by capturing both its structure and content. This enables MathML to support the visual display and assistive technology access.
Its appearance is similar in structure to HTML. Unlike HTML, MathML is not designed to be hand-written. It is recommended that you compose equations in a visual editor and paste its MathML output into the Brightspace Equation Editor.
Prefer a short video?
6.17. Course Files, Quicklinks, & Outside URLs
Add a File from Manage Files
Manage Files is like a digital filing cabinet; it’s a place where you upload, store, and organize files for later use. To open managed files, select Course Admin from the navbar. Then choose Managed Files from the Course Administration list.
Files can be uploaded from your computer or course content can be created and saved to Managed Files. It is tempting to save files directly into course content, but that method will not propagate to new sections through cloning each semester. All course content should be organized and saved in Managed Files.
If there are files in the Managed Files to link the course's content, select the module's menu where the new file should be displayed and choose Add from Manage Files from Upload/Create.
The Add a File window will open. Select the folder where the file is stored.
Mark the checkbox for the file and select Add.
The document will be added to the bottom of the current module or sub-module and will be titled exactly as it is in the course files. Use the document handle (the three gray lines next to the document title) to drag the document to the correct position.
The document title may be edited by choosing Edit Properties In-place from the menu of the document. Select the Title of the document to edit it.
*Please note, it is NOT recommended to set dates and restrictions on documents, links, or modules in the content section of the course.
Add a description of the document. The text editor will open. Enter the description and choose Update.
Quicklink to an Activity
Choose Existing Activities to link activities into the course. Select the type of activity to be linked to the menu. In this example, a Discussions topic is selected. Add Activity will open. Choose the discussion forum where the topic to link is located.
The topics included in the forum will then be listed. Select the topic to be linked to the module.
After selecting the topic, the window will close and go back to the module in the table of contents. The Module 4 Discussion link is now included in the Activities sub-module.
Create a Link to an Outside URL
Links can be added to any content page, but there are times you may want to use a web resource as a standalone product. Creating a link reserves a spot directly into a module or submodule.
To get started, choose Create a Link from the Upload/Create menu in the module where the link should appear. The New Link window will open. Enter the desired Title and the URL. Choose Create when finished. The window will close and the link will be displayed in the module.
After creating the link, it is recommended that you provide some instructions or description of this web resource to guide students to the desired outcome. Please test all links once they are created to ensure they work properly.
6.18. Pulse App for Brightspace Courses
Pulse App for Brightspace Courses
The Brightspace Pulse app is a companion technology that can help students organize and plan for upcoming course activities through their mobile devices. Pulse can go deeper than you may realize. Students can directly engage in a course because D2L has refined the technology to scale to fit small screens; not just smaller but with improved layouts for tablets and even smartphones. Students can engage directly with course content such as reading announcements, participating in discussions, and reviewing actual content or grades right from their phones.
Course Friendly for Students
Your course can be Pulse "friendly" by setting due dates under the Restrictions. This puts activities on the course calendar making it even easier for students to stay caught up. We don't recommend students take exams or write papers on a smartphone but almost anything is possible.
Pulse for Instructors
Instructors can use Brightspace Pulse too. Just like students, instructors can use many course features in the Pulse App. Instructors can update content, add announcements, and complete assessments directly in Pulse.
Download and Get Started
Students and instructors can get started in 2 easy steps.
- Download Brightspace Pulse available on iTunes (new window) or Google Play (new window)
- Search for TN eCampus or enter the URL: https://gotoclass.tnecampus.org (new window)
Please share these links and this tutorial video (new window) for students.
6.19. Discussion Forums
Discussion Forums
Brightspace uses discussion forums to organize discussion topics into categories. All topics must be nested in a forum. Your course may have multiple forums and topics, but you must create a forum before you can create a topic.
Create a Discussion Forum
All discussions are organized into forums. Select Discussions from the NavBar. Choose New Forum from the New menu on the Discussions page.
Enter the Title and Description.
There are posting options below the description textbox. If students should post their responses prior to reading responses of their peers, select the Users must start a thread before they can read and reply to other threads in each topic checkbox.
*Please note, selecting options at the forum level will apply the setting for all discussions in the forum. This can be a step-saver if the same options are used every time, but it may be confusing and produce unexpected results if a variety of settings are used for individual discussions. It is not recommended to make forum level choices unless all discussions will be the same.
Availability
Availability in Brightspace is synonymous with visibility. Previously, this function in Brightspace used Locking Options. They are now consolidated with the Availability date options. Making availability choices in Forums is discouraged unless all topics will have the same settings. Discussion topic settings cannot be edited once they are set in Forums.
From the Restrictions tab, the Display in Calendar option is now consolidated with the Availability Start Date and End Date options, which adds the start date and end dates to the calendar. Previously, the tool decided which calendar event should be added to the calendar. The Availability Start Date and End Date options and display as the following new options:
- Visible with access restricted before/after start/end. The topic/forum is visible to learners before/after the start/end date, but they cannot access it. Previously, Classic Content was the only tool to make discussions visible without access.
- Visible with submission restricted before/after start/end. The topic/forum is visible to learners before/after the start/end date and they can access it, but they cannot post new threads or replies. This effectively makes a discussion read-only. Previously, this was accomplished with the lock option or unlock dates.
- Hidden before/after start/end. The topic/forum is hidden from learners until the start/end date. This is a new feature. Calendar events for Availability Starts and Availability Ends are hidden until the start/end date. Notifications are also not sent until the start/end date. Previously, the hidden status of a discussion topic was decided by the tool displaying the topic.
Forum Level Settings
While forum settings are universally applied, users will not see the configuration settings at the individual discussion level. Checkboxes and date ranges will be blank, but configurations will be applied through the forum settings. The example below is a discussion with the highlighted topics selected. Each is setting is blank in the discussion, but will be applied as described in the discussion forum settings.
Restrictions
Restrictions may be configured during this stage in the process. Choose to Attach Existing conditions or Create and Attach new release conditions. Choose Save and Close when finished. The page will refresh and return to the discussions list where the new forum will be displayed.
Edit a Discussion Forum
Navigate to the forums list and choose Edit Forum from the menu of the discussion forum to edit. The Edit Forum window will open. Make any changes, then select Save and Close when finished.
Delete a Discussion Forum
Navigate to the discussions list and choose Delete from the menu of the forum to delete. A confirmation window will open to confirm the deletion of the forum. Select Yes to continue.
Restore a Discussion Forum
When a forum is deleted, all topics within the forum are also deleted but can be restored. Choose Restore under the menu for More Options.
6.20. Discussion Topics
Create a Discussion Topic
Discussion topics can be a great way to help build learning communities among students and provide a venue for instructors to interact with students as well. Promoting and facilitating classroom discussions can not only help students learn from one another but also help students understand and retain lecture content better.
UPDATE: Discussion Experience in Brightspace is Changing
The content in the next heading is still accurate for the legacy workflow of Discussions, but just like Assignments and Quizzes the “New Experience” workflow has arrived for Discussions. Discussions have the same 2-panel layout and many of the same options and logical groups as found in Assignments and Quizzes. The steps in the remainder of the tutorial will be handled in the right pane if you choose to remain in the new experience.
Add a Topic
Discussions are nested within discussion forums. From the NavBar, choose Discussions, New and then New Topic.
Or, select Add Topic from a specific forum context menu to create a new discussion for that forum.
Add Details
Enter the Title and Description of the discussion topic in the corresponding text boxes under the Properties tab. If the forum was not selected, it will be chosen from this window.
Right Pane Features
The remaining features for Availability Dates & Conditions, Post & Completion, and Evaluation & Feedback are just a click or two in the right pane of the discussion window.
Availability for Forums and Topics
Choose Availability Dates and Conditions to add Start Dates and End Dates.
Availability in Brightspace is synonymous with visibility. Previously, this function in Brightspace used Locking Options. They are now consolidated with the Availability date options. Making availability choices in Forums is discouraged unless all topics will have the same settings. Discussion topic settings cannot be edited once they are set in Forums.
From the Restrictions tab, the Display in Calendar option is now consolidated with the Availability Start Date and End Date options, which adds the start date and end dates to the calendar. The Availability Start Date and End Date options and display as the following new options:
-
- Visible with access restricted before/after start/end. The topic/forum is visible to learners before/after the start/end date, but they cannot access it. Previously, Classic Content was the only tool to make discussions visible without access.
- Visible with submission restricted before/after start/end. The topic/forum is visible to learners before/after the start/end date and they can access it, but they cannot post new threads or replies. This effectively makes a discussion read-only. Previously, this was accomplished with the lock option or unlock dates.
- Hidden before/after start/end. The topic/forum is hidden from learners until the start/end date. This is a new feature. Calendar events for Availability Starts and Availability Ends are hidden until the start/end date. Notifications are also not sent until the start/end date. Previously, the hidden status of a discussion topic was decided by the tool displaying the topic.
You can learn more from the Brightsapce Community (D2L) regarding
- Availability Start Date Properties
- Availability End Date Properties
- Visibility and Access
Restrictions
Select the Add Release Condition under Availability Dates and Conditions.
Release Conditions and Group can be set on a variety of tools, including discussion topics. The release conditions allow specific actions a student must take prior to the discussion topic becoming viewable or actionable.
(This video from D2L has one change to update in an upcoming version. Locking Options have been replaced by Availability. Please choose Availability Options where the video refers to Locking.)
Release conditions may be applied toward awards, checklists, classlists, competencies, content, discussions, assignments, grades, quizzes, and surveys. Each has other variables to provide specific circumstances to release portions of the course to students. In the next example, a discussion is restricted until the student scores 100% on a quiz.
All conditions must be met is the default choice, but if more than one condition has applied, Any condition must be met could be selected if appropriate.
Groups and Sections may also be restricted. Check the box and add groups or sections as needed. Choose Save to continue.
Grade Book Options
From the main pane, select Grade Out Of and In Grade Book. to enter new values. If the gradebook has already been set up, select the corresponding grade item from the Grade Item drop-down menu. In Score Out Of, enter the maximum possible points for the discussion topic.
*Please note, if you are using a weighted grade scheme, the possible points will always be 100.
Evaluation and Feedback
Expand Evaluation & Feedback to Add a Rubric or Manage Learning Objectives.
Choose Add Rubric to open the rubric list or search by name. Create New can be used here if the rubric was not previously created for the course. Rubric development is covered in another section.
Post Requirements
There are three options for student posts. Users must start a thread before they can read and reply to other threads is typically used, but it may not suit every situation. There are options to allow anonymous posts or require approval before posting. These options are not recommended.
*Please note, if you selected any options at the forum level, those options will automatically apply to all topics within the forum.
A student may also rate discussions by using Five Star, Up/Down Vote, Up Vote Only, or No Rating method.
Edit or Delete a Discussion Topic
Navigate to the discussions list and choose Edit Topic from the menu of the topic to edit.
The Edit Topic window will open. Make any needed changes. This process is very similar to creating topics. Choose Save and Close when finished.
Navigate to the discussions list and choose Delete from the menu of the topic to delete.
A window will open confirming you want to delete the topic. Choose Yes to continue. The discussions list page will refresh and the topic will be removed.
Choose Save and Close when finished.
Discussions Grades are Synchronized in Gradebook
When an instructor enters a grade for a discussion in the standard or spreadsheet view of Grade Book, the grade also appears with the discussion post in Discussions. Previously, grades entered in the Discussion were passed on to Grade Book; however, grades for discussions entered in Grade Book were not passed to the Discussions tool. This has been updated to ensure data consistency between Discussions and Grade Book.
(This video does refer to Locking Options. Locking Options have been replaced by Availability Options.)
6.21. Discussion Evaluation
Discussion Evaluation
The New Discussion Evaluation Experience is part of a redesign of all assessment tools that was finalized in 2022. This allows instructors to better review and evaluate both discussion topics and individual participants, without changing their workflow.
- The name of the activity, navigation arrows, learner name, and profile card appears in the header panel at the top
- The discussion topic and replies appear in the submission panel on the left
- Evaluation tools like Grades, Rubrics, Grading Rubric, and Feedback appear in the evaluation panel on the right
Getting Started
Choose a discussion topic and expand the menu to Assess Topic.
Discussions can be sorted by student or topic by tab. Choose a student or topic to assess and select Topic Score to begin.
If a rubric is attached, you may expand the rubric inline or choose the open the rubric in a new window.
Score and provide Overall Feedback is another way to evaluate.
Mobile View and Brightspace Pulse
The new mobile evaluation experience is more than just responsive, it is fully adapted to smaller screen sizes. While using smaller screens, such as a phone or a smaller tablet in portrait mode, the entire panel from the right side of the screen tucks into a neat and tidy drawer so that you can see and annotate files you’re grading without trying to manage unwieldy horizontal scroll bars.
Brightspace Pulse makes many course features useful to students and instructors alike, even on a smartphone.
Discussions Grades are Synchronized in Gradebook
When an instructor enters a grade for a discussion in the standard or spreadsheet view of Grade Book, the grade also appears with the discussion post in Discussions. Previously, grades entered in the Discussion were passed on to Grade Book; however, grades for discussions entered in Grade Book were not passed to the Discussions tool. This change ensures data consistency between Discussions and Grade Book. Discussion grades are not synchronized when the Discussion tool is updated by the Brightspace API or when Grade Book is exported and imported.
6.22. Groups
Groups Tool
Use Groups to design special work areas where learners can discuss, share, and submit work as a group. The groups tool allows you to create and edit groups and categories. Categories house collections of related groups. Groups subdivide learners.
Why Use the Groups Tool?
The Groups tools can be used for:
- Any group assignment or activity that requires users to interact, submit or share materials within the Learning Environment
- Collaborative activities
- Peer editing and assessment
- Creating smaller or differentiated learning cohorts within a course offering.
Getting Started
Groups can be created before all users have been added to a course, but it is considered a best practice to wait until all users are enrolled. This prevents manual user additions to groups later on. Groups is not on the NavBar, choose More/Course Admin and Groups.
In the Groups tool, create a New Category for this set of groups. As an effective practice, the category is generally the assignment/activity the groups relate to. Choose the Enrolment Type based on the following criteria:
- Will the group enrollment be based on the number of people per group, the number of groups in the class, or both?
- Will you allow students to self-enroll in a group?
- Will you manually assign students to groups?
Depending on the enrollment type, you will be asked for the number of students per group or the number of groups you wish for the class. You will also be asked for a Group Prefix, which will be given to each group in this category and will allow for easier searching.
Additional Resources
6.23. Assignments Creation
Assignment Creation
Brightspace's assignment tool experience has a consistent navigation experience that has been applied to almost all toolsets from Assignments to Rubrics. The classic tabbed view has been transformed into a fully immersive page layout that has been simplified and organized around typical workflows to streamline work.
Assignment Workflow
In the assignment workflow, the page view becomes the workflow hub of the most common features. Most features are accessible within 1 to 2 clicks.
- The primary panel on the left contains frequently used fields that are always displayed. These fields are most relevant to learners and are the core details that include: assignment name, score, due date, instructions, and any attachments or links.
- The panel on the right organizes additional, more advanced options. When these options are collapsed, the summary text provides details about which settings are active. As a result, you can see everything at a glance with little to no scrolling, and without having to navigate through any tabs.
Getting Started
Select Assignment from the Navbar. The Assignment Submission Folders list will open. Choose New Assignment and enter an appropriate name in the Properties tab. Include a description of the assignment and instructions for the student to follow.
Availability Dates & Conditions
Expanding Availability Dates & Conditions exposes calendar entries for Start and End Date. Adding Release Conditions allows you to Create New or to Add Existing if there are previously created conditions. After choosing the Condition Type. Choose the Condition Details that match the need.
(Locking Options were replaced by Availability options.)
You can learn more from the Brightsapce Community (D2L) regarding the following:
- Availability Start Date Properties
- Availability End Date Properties
- Visibility and Access
Dates on the Calendar
It is no longer necessary to explicitly choose "Display in Calendar" while setting updates for assignments. An assignment date will populate automatically, but there is a priority.
- If the Due Date, Start Date, and End Date are used together. The Due Date will be the date added to the calendar.
- If the Due Date is not used, but the Start Date and the End Date are used together. The Start Date will be added to the calendar.
- If the End Date is used by itself, it will be added to the calendar. The use of this date type also limits a student's opportunity to review and should only be used when necessary.
It is recommended to use the Due Date as a minimum choice.
Special Access
Manage Special Access is an important feature to deal with emergencies and to meet accessibility needs. The option to Allow only users with special access is strongly discouraged.
Submission & Completion
There are several choices to make here starting with Individual or Group Assignment. Once selected, choose the category or create a new category. Submission Type includes File, Text, On paper to Observed in Person submission options. Choose the Files Allowed Per Submission and how Submissions are handled. Students may make one to multiple submissions and you may choose to only keep the last one. Enter an email address for Notifications.
Restricting File Extensions for Submissions
Instructors can now specify the extensions of files that learners can upload as assignment submissions. When an instructor is creating a file submission assignment. In this drop-down list, instructors can choose the restrictions they want.
Additionally, Brightspace blocks some files for security reasons. Additional information can be reviewed in the Brightspace Community (D2L). Files can also be blocked for invalid characters in the file name. Now an explanation is provided to clarify why files cannot be uploaded.
You can customize what is acceptable for your assignment that is included in the safe list of files.
Choose Custom File Extensions and enter file extensions that are allowed for file submissions. When this restriction is set, learners are presented with a list of acceptable file extensions for their assignments. When a learner attempts to upload a file submission for an assignment of a file extension type that the instructor has restricted, an error message appears.
For more information, see File types supported by Annotations (Brightspace Community).
Align Assignments to Categories
The new assignment creation experience supports the alignment of assignments to categories. Instructors can add new or existing assignment categories when creating or editing a new assignment.
Evaluation & Feedback
Additional Resources
To learn more visit the full tutorials in Knowledge Books. You may also watch a short video from D2L.
6.24. Assignments - Create a Select Box Item
Create a Select Box Item
With this release, the new assignment creation experience supports creating new select box grade items. Previously, only numeric grade items could be created from the new assignment creation experience.
The following labels have been renamed in the new assignment creation experience:
- Score out of is now Grade out of
- In Grades is now In Gradebook
- Choose in Grades is now Edit or Link to Existing
- Remove from Grades is now Not in Gradebook
New Assignment
When creating a new assignment as an instructor, under Grade Out Of, choose Ungraded. Select In Gradebook, and then select Edit or Link to Existing.
From the Edit or Link to Existing dialog, the following options may display under Create a new grade item:
- If the Grades tool has available grade categories, then choose Grade Category option displays. Clicking this button displays available grade categories for association.
- If the Grades tool has multiple grades schemes, the Change Grade Type & Scheme option displays. Clicking this button displays available grade types and schemes for association.
- Choose OK, and then Save.
6.25. Assignments Evaluation
New Assignment Evaluation Experience
The new Assignment Evaluation Experience is part of a redesign of all assessable tools that was completed in 2022. This experience allows instructors to better review and evaluate both discussion topics and individual participants, without changing their workflow.
The New Assignment Evaluation Experience includes the following features:
- The user context bar includes a menu to choose a learner, and another menu to choose a submission. On the user submission list, files are grouped by submission without repeating comments to make it easier to distinguish between submissions.
- The evaluation pane divider is draggable to suit a user’s preferences and screen size. Rubrics are located at the top of the evaluation panel.
- The overall grade remains as an icon that indicates if that grade is tied to the grade book. Existing outcomes and competency web components are also visible.
- You can provide feedback for the submission by typing in the Overall Feedback box, or uploading an attachment.
Getting Started
No changes have been made to page navigation. The user context bar now includes a menu to choose a learner or to choose a submission.
Choose an assignment to evaluate by expanding the menu to View Submissions.
Choose a student and Evaluate.
Start by opening the student submission. Files can be downloaded if preferred. If the assignment has a rubric, choose the toggle arrow to view it inline or expand as preferred. Use the text editor to give Overall Feedback.
File Conversion
Opening a submission will initiate a conversion of the file to the submission reader. A message appears to users when viewing a file that has been converted to .pdf from a different file type in Assignments. The message states "This file has been converted and may have inaccuracies. This will not apply to files that were already .pdf.
User Profile Card
Use your mouse to hover over a learner's profile in the new Assignment Evaluation Experience, the User Profile card now displays the value of the Org Defined Id field.
Navigation
The evaluation pane divider is now draggable to suit a user’s preferences and screen size. Rubrics are now located at the top of the page, and assignment details are in the ellipsis menu. The overall grade remains as an icon that indicates if that grade is tied to the grade book. The divider is easily accessible via keyboard, meaning that evaluators using assistive technology or keyboard shortcuts will be able to adjust panel sizes without using a pointer.
Inline Rubric
Instead of always opening in another window or dialog, it now expands down the evaluation panel, allowing the evaluator to see both the rubric and the submission at the same time. Instructors with complex rubrics will be able to pop out the rubric into a larger view using the button in the top right of the component.
Preview Assignments in Evaluation Mode
Users who did not have edit permissions for assignments can preview assignments. By choosing the context menu and the Preview Activity option, users can see assignment information such as assignment instructions, start dates, or due dates.
The Assignments viewer includes the Download option. Instructors can download the original file without navigating to the submission list. Instructors can also download the annotated PDF file.
New Mobile View
The new mobile evaluation experience is more than just responsive, it is fully adapted to smaller screen sizes. While using smaller screens, such as a phone or a smaller tablet in portrait mode, the entire panel from the right side of the screen tucks into a neat and tidy drawer so that you can see and annotate files you’re grading without trying to manage unwieldy horizontal scroll bars.
Prefer a Short Video?
6.26. Rubrics
Using the Brightspace Rubric Tool
A rubric is a matrix of criteria and levels used to assess or evaluate student performance and mastery of objectives. Judging each criterion by the level of mastery provides improves instructor objectivity, and provides students the added benefit of knowing what is expected to achieve at a high level. It may also reduce the number of questions students have about their grades.
Getting Started
You may create discussions and assignments first and develop rubrics from those tools. You may also access the rubrics tool from Course Admin (may be located under More) on the Navbar. The Course Administration page will open. Choose Rubrics to continue.
The Rubrics page will open. If you have already created rubrics in your course, they will be listed on this page. Choose New Rubric to start a new rubric.
Steps to Create a Rubric
Name the rubric. Leave it in Draft status while you are developing it, but it will need to be Published before it can be linked to a tool. Additional columns and rows can be added as needed.
Choose the Rubric Type
- Holistic: Single criterion rubrics (one-dimensional) used to assess participants' overall achievement on an activity or item based on predefined achievement levels. Holistic rubrics may use a percentage or text only scoring method.
- Analytic is used when a rubric breaks performance into multiple criteria which are each assessed separately. For an Analytic rubric, set up the number of levels of performance (e.g. Excellent, Meets Expectations, Developing, Needs Improvement) and the number of criteria (e.g. Organization, Grammar, Introduction, Body, Conclusion).
Performance levels can be assigned Points but the performance level points will be the same for each criterion. With custom points, different point values can be set to the levels of each different criterion.
Customize
Customize the levels, criteria, and other details. Notice the new text editor tools highlighted. Name each Criterion Name and describe the details required to meet each criterion.
Copy or Delete Criterion
Activating the triple dot menu offers a choice to copy or delete a criterion.
Print or Save to PDF
You can print or save your rubric in 3 easy steps. From the Edit menu choose Preview.
A copy of the rubric will open. Choose Print Rubric. Your device may default to a printer or PDF. Choose the one you prefer.
Update the Status when it is time to post the rubric. Choose Save when finished.
Additional Resources
Prefer a short video from D2L?
These are older videos. They have good content, but screen layouts may have changed in some places.
Evaluating with Rubrics
Rubrics are embedded directly in the New Evaluation Experience for Assignments and Discussions. This means you can directly access the rubric and use the inline grading tools without leaving the work area. Many recent improvements have been added as well.
Inline Rubric component is now the default option for rubric design and use. Instead of always opening in another window or dialog, rubrics expand down the evaluation panel, allowing the evaluator to see both the rubric and the submission at the same time.
Inline Grading Improvements
Toggling the Rubric arrow expands or hides the rubric in the assessment window. A mouse or keyboard can be used to make selections for each criterion. The arrows at either end of the evaluation slider change the selection.
Enter Criterion Feedback if appropriate and continue to the next criterion
When an instructor using the New Assignment Evaluation Experience opens a rubric in a new window, the Overall Score displays for each rubric. The instructor can override the level if necessary.
Increased Accessibility
To provide a better experience to clients using screen readers, criterion levels now indicate the level name and point value of each radio button when it has the focus. In addition, the mobile view of Rubrics now has radio buttons implemented to describe the level name and point value of each criterion level, consistent with the view on a larger screen.
Grade Tiles
When a rubric is collapsed, instructors can now see if the rubric is complete. If the rubric is complete,
the collapsed rubric shows the overall level of the rubric. Previously, it was only possible to see the overall score of the rubric when the rubric was expanded.
If the rubric is not complete, the number of unscored criteria appears on the tile.
New Experience collapsed tile for completed rubrics (points-based and text-only rubrics)
Additionally, customers using rubrics with the New Evaluation Experiences can see Rubrics Statistics from within the evaluation panel.
Detaching a Rubric
When an attached rubric is deleted from an evaluated assignment, if evaluations of that rubric have
been performed, the user now receives a detach rubric confirmation message for the assignment. This is a serious step and should be considered carefully.
6.27. Annotations for Assignments
Assignment Annotations
Instructors can use the built-in Annotation toolbar in Assignments to provide contextual feedback with highlighting, freehand drawing, shapes, and associated commenting. This allows instructors to complete all their evaluation and feedback work directly in Assignments, without the need to use any external tools or applications. Annotations remain editable until the feedback is published by the instructor. (If there is a need to add additional feedback after publishing, they can update the annotations and re-publish them.)
Choose Annotations for New Assignments
Before saving a newly created assignment, add a checkmark to Make annotation tools available for assessment. Edit previously created assignments the same way to add the annotation tools.
Navigate to the Annotation Tools
Open an assignment. Choose Submissions and select a student assignment.
Tool Overview
After opening a submission, the course’s NavBar disappears to make more room for the grading tools. The new tools are placed directly above the submission. The right side of the window shows information about the submission. The evaluation panel reveals a place to use rubrics, enter grades, and the traditional feedback text and audio tools. The annotation tools can be used separately or in conjunction with the legacy tools.
To accommodate mobile and small screen users, the toolbar will collapse to fit screen space. Choose the Annotations icon (pencil/paper) to open the tools menu to see the expanded set of options typically available on full-sized screens.
The right arrow on the left side of the toolbar acts as a toggle. Many of the tool options will revert to the previous state or offer more options when clicked. This becomes intuitive with a little practice.
In the fully expanded view, you can see the tool groups for Sidebar, Document, and Annotations in this illustration. You may also hover over icons to read the name of the tool.
Sidebar and Document Tools
The Sidebar tools allow users to see the assignment in a Thumbnail or Outline view. Bookmarks may also be added. Clicking the Sidebar icon returns to the 1-page view. The Document tools offer familiar page scrolling and zoom features typically offered in other programs.
Annotation Tools
The Pen (freehand draw) and Highlighter are nested under the Pen icon on the toolbar. Choosing specific tools always opens a submenu to customize options that include color and line thickness.
Annotations are also editable. Choosing Trash will prompt a decision to delete the last item added. Choose OK to delete. The Pan Mode (hand) icon allows users to select any annotation. With items selected, the submenu tools may be applied to simply edit the annotation. The blue line could be changed to a different color or change the opacity for example. It could also be deleted by using the Trash icon.
Selecting Notes opens a list of options in the submenu. Any symbol may be used to start a Note. They remain icons until the mouse hovers over one. The notes window will open to type a message. Notes are editable and can be relocated by choosing Pan, then click and drag to a new location.
Textboxes are very similar to Notes, but they are constantly visible. The submenu has a large set of customizing options as well. Click anywhere on the page and start typing. Text may be edited or deleted as shown previously. The Rectangle icon offers Lines, Arrows, and Rectangles (of course). Select any items and use the submenu tools to add or modify them as needed.
Files and File Types
Evaluators can use highlighting, free-hand drawing, shapes, and associated commenting to provide feedback to learner assignments of the following file types: DOC, DOCX, RTF, ODT, PPT, PPTX, PPSX, ODP, XLS, XLSX, JPG, JPEG, PNG, TIF, TIFF, GIF, and TXT.
The Annotations viewer includes the Download option. When using annotations in an assignment, instructors can download the original file without navigating to the submission list. Instructors can also download the annotated PDF file.
In Conclusion
This is a powerful and user-friendly way to communicate with students about their assignment submissions. Students can see exactly where there are concerns and also kudos in their assignments. Instructors do not need to write a detailed narrative to explain, which is a time saver. The entire product is inside the course and linked to rubrics and the grade book.
6.28. Quick Eval for Assignments
Using Quick Eval
Quick Eval is a tool to help instructors quickly access student products for assessment. Use this tool to find and prioritize learner submissions in one location.
Getting Started
Working from the NavBar, choose Quick Eval. Assignments are listed in Quick Eval’s Submissions or Activities tabs to review unevaluated learner submissions.
Choose Submissions
The Submissions view will list all student submissions regardless of the topic. Conversely, Activities will list all assignments with student submissions. You may the Filter options to narrow the visible list.
The Activities view organizes learner submissions by topic. This view makes it easy to complete all assessments for one assignment, discussion, or quiz, before moving on to the next task. This feature helps evaluators who prefer to evaluate submissions in the context of an activity. Activities view displays indicators to show the progress on submissions, progress on evaluations, and progress on publishing feedback to learners. It also includes links to the evaluation page, submission page, and publish all action.
Evaluation
Make a choice of a submission to evaluate. Expand the rubric if provided. The score is entered on the lower right side of the window. Overall Grade and Overall Feedback can be used along with additional tools at the bottom of the panel, such as Record Audio.
Instructors may Publish to release grades or Save as Draft to finalize at a later time. Choose Back to Quick Eval anytime to go back to the list.
Dismiss Activities
Instructors may remove items from their Quick Eval. Originally, this could be set a specific date or forever. Dismissed items can be restored when there is a new submission. The removed activity appears on the Dismissed Activities list and can be restored at any time. Once a new submission arrives in the Quick Eval list, the previously dismissed activity reappears there. Choose the menu icon above the filter/search to choose Dismissed activities.
If there are no new submissions, "You're all caught up!". As you evaluate submissions, they will disappear from the list as well.
Additional Resources
*Caution, these videos capture the overall use of this tool, but they were created before the New Assignment Evaluation (KB) tool was introduced.
6.29. Turnitin Originality Checking
Turnitin Originality Checking
Turnitin is a strong resource for students and instructors.
Getting Started
Navigate to the Assignments on the NavBar. Open the context menu of an assignment and choose Edit Assignment.
Under the New Assignment Creation Experience in Brightspace, Turnitin features are found under the Evaluation & Feedback panel. Choose Manage Turnitin to enable the features.
Choose Features to Enable
Choose Online Grading and Originality Check to use these features. Choose Allow Students use Turnitin Similarity Scores to give students the opportunity to check their own work. Choose More Options in Turnitin to go into additional settings.
In this window, select any options for Submission Settings, Compare Against, Similarity Report, and Additional Settings. Choose Submit when finished with optional settings.
File Type Restriction
Brightspace already offers limits to file types for student submission. Choose the Compatible with Turnitin option to match files you can use with Turnitin.
Wrapping Up
Choose Save and Close when finished.
When finished, note the updated check marked features.
For more information view the Turnitin Corporate Tutorials.
6.30. Question Library
Question Library
The Question Library stores and archives questions that can be accessed by the Quizzes, Surveys or Self-Assessment tools. Questions can be created directly in quizzes and other tools, but the best practice is to build questions in the Question Library to be used in multiple assessments. Building questions in the Question Library allows you to:
- Share questions between assessment tools and activities within a course.
- Utilize the Random Section feature of Quizzes (see the Quizzes Tool Guide for more information).
Additionally, edits and updates made in the library can be updated to other quizzes simultaneously. To see this in action, take a look at this video.
*Be advised, TN eCampus courses do not support Learning Objects Repository (LOR). If you need to export question content to another course or an MC, file a support ticket (new window) in HelpSpot to make that request.
Start or Edit a Question Library
Select Quizzes from the navbar to access the Question Library. Choose the Question Library tab in the quizzes window.
The question library will open. (In new course development, this area will be empty.) It is recommended to maintain a good organizational structure when creating questions in the question library. This will make it easy to reuse questions in future quizzes.
Sections
Create a new folder or section for questions. Choose New and then Section from the menu. Enter a descriptive Section Name and add a Message if needed. You may create questions directly, but you will lose the organizational opportunity if the library just has lists of questions.
In the New Section, Add a File is a commonly used option. Shuffle questions in this section may also be set on this page, or Add a File can be added individually in each quiz. Review other options and choose Save when finished.
Questions
The New Section page will close and return to the Question Library. The newly created section folder will be displayed below any existing folders. Open the new library. Choose the New menu to create new questions by selecting the type of question to be used.
Find more information in the Brightspace Community on Types of questions in Question Library (brightspace.com). Brightspace also offers a variety of grading options. You can read more on Understanding grading options for question types in Question Library (brightspace.com).
Prefer a short video?
Resources
Question Library for Instructors (new window) Entire video series for quiz questions.
Guide to Question Creation for Quizzes (new window)
Question Library Quick Reference Guide (new window)
Quizzes Tool Quick Reference Guide (new window)
How To's for Quizzes (new window)
6.31. Quizzes: Create with Quiz Builder
Create with Quiz Builder
The Quiz Builder experience is an updated workflow within the existing Quizzes tool for creating, importing, editing, deleting, and reordering questions, question pools, and sections within quizzes. It streamlines the quiz creation and editing process without compromising advanced features.
Getting Started
Navigate to Quizzes from the NavBar. Manage Quizzes will open. Choose New Quiz.
Enter an appropriate Name for the quiz. Use categories to organize your quizzes and graded items. Choose the Not in Grade Book menu to link to existing or add to the grade book. The Description field is available for any information about the quiz. The work area is divided into left and right panes.
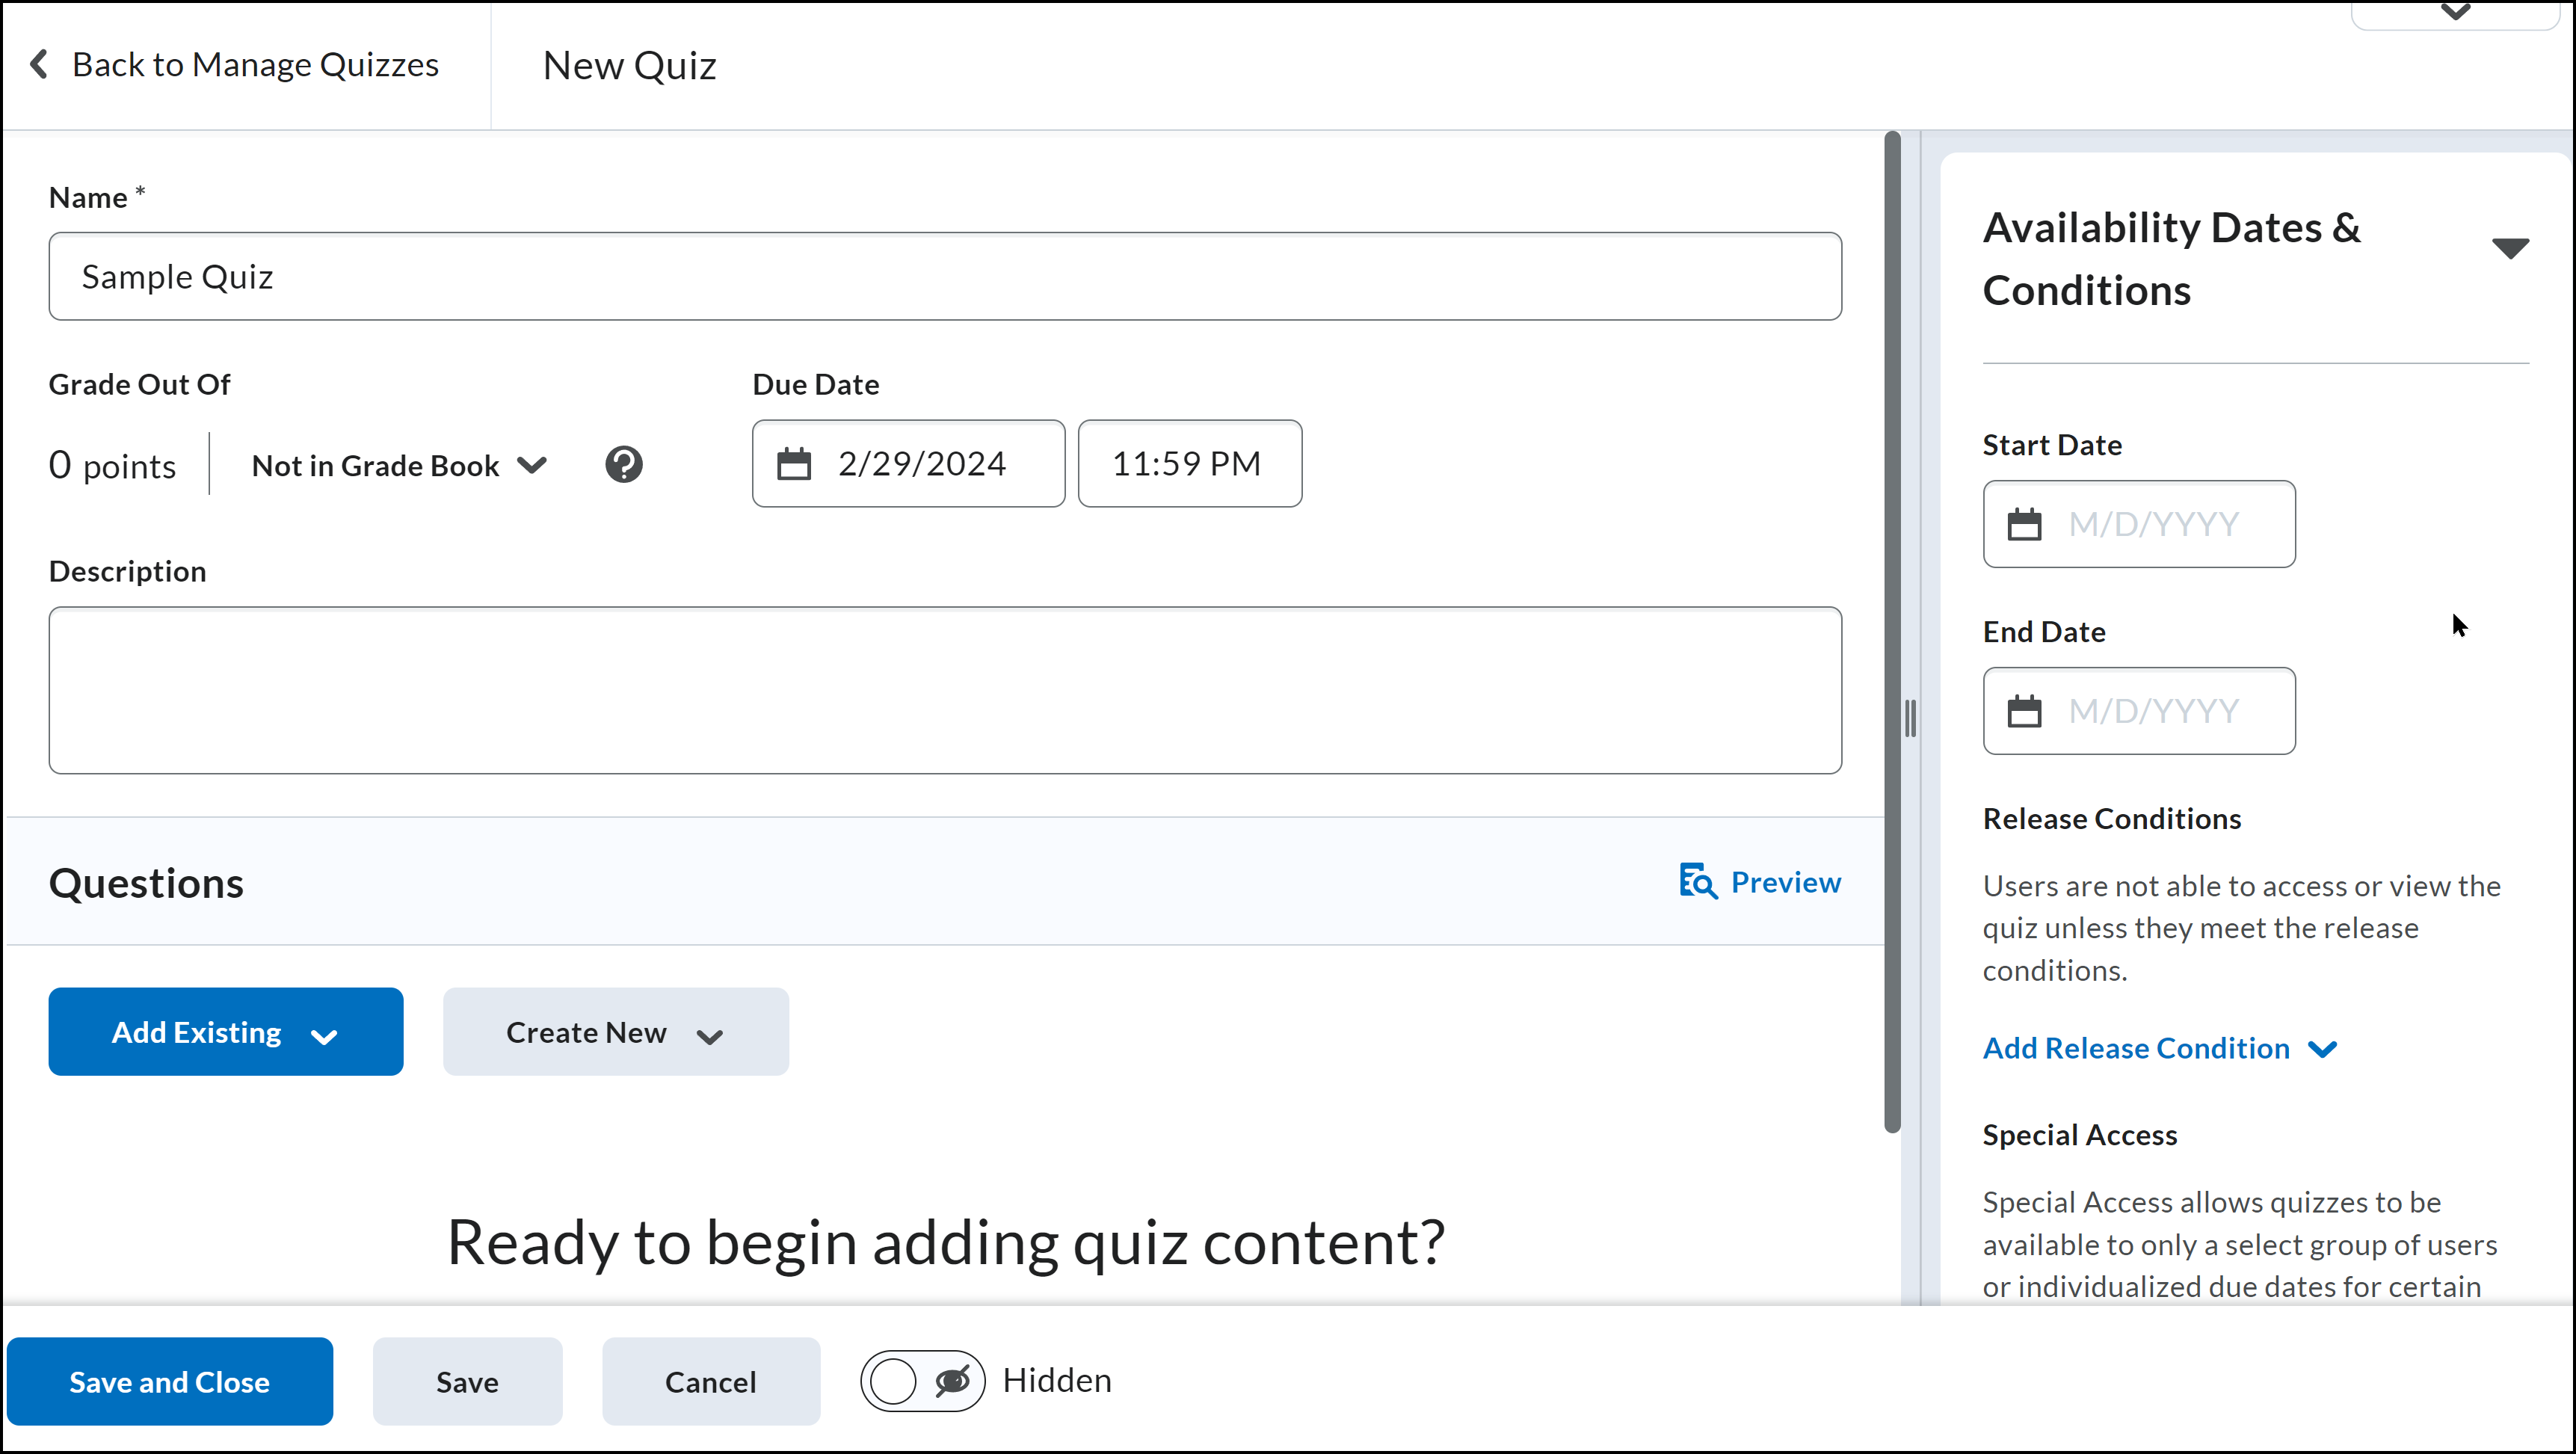
Right Pane Options
The right side scrolls down to allow many important customizations that include visibility dates, release conditions, attempts to complete, and grading options. Almost everything is available in 1-2 clicks. The image below is a compilation instead of separate screenshots.
Update: Spring 2023
Use this check box to add dates to the calendar.
Choose how questions are presented in the quiz.
Quiz Questions
There are 2 pathways to add questions to a quiz. Add Existing or Create New. It is recommended all questions be created in the question library and imported into quizzes. Select New Question to create questions directly in the quiz. It is the simplest way to begin, but consider if this assessment material could be used again. Developing a rich Question Library is a strong solution for detailed assessment development. Question Library is developed in an upcoming section.
There are many question types to choose from. Consider whether you prefer auto-graded questions, such as Multiple Choice or Matching, or question types that will require a human touch, such as Short Answer or Fill in the Blanks.
Options
While creating or editing questions, notice the Options menu. This group of options was moved to a menu to make a cleaner work area. These are important functions that can be accessed or hidden as you need them.
Choose More Actions after selecting 1 or more questions. Questions can also be Deleted here.
The Section and Question Pool options go deeper into the process. Sections can be used to create groups of questions for content topics or they can be associated with learning objectives.
Choosing Question Pool allows users to randomly draw a select number of questions from a pool. Questions must be imported from the Question Library. After the import, users may select the number of questions and set the value if different from the default settings in the question library.
LaTex Math Questions
This feature renders inline LaTex equations in the new Brightspace Editor. As a result, scientific and mathematical equations are rendered seamlessly without the need to use the LaTeX equation option in the Equation Editor.
Browse Question Library or Upload a File
Import is the second half of the question options. Import allows two options: Browse Question Library or Upload a File. See the full tutorial for Question Library (new window) to learn more about creating libraries. It is highly recommended to utilize this feature to organize and efficiently use assessment resources to their fullest.
Choosing Import and Browse Question Library assumes questions have been created in the Question Library. If not, consider developing and organizing questions in the library first. It may seem like an extra step, but it will be a time-saver in the long run.
*Please note, Brightspace now supports import to a Section.
Upload a File is only recommended if the user is very familiar with CSV spreadsheets or zipped course packages. You may download a CSV template to see if creating questions in this manner works best for you, or if you have exported questions in this format. The other methods described above are typically more user friendly to all.
Select Back to Settings (quiz name) when finished. The questions section will close and go back to the Properties tab of the Edit Quiz page. All questions added are listed there.
More Actions and Move To menus offer additional choices to manage individual and bulk edits of selected questions.
Choose Save and Close when finished.
Quiz Preview Update
Creating questions offers an option to review the question. Brightspace offers an option to Preview the quiz directly from the question set window.
Quiz Introduction Field Phased Out
To reduce redundancy in the Quizzes tool, the Introduction field has been phased out. When an instructor creates and/or edits a quiz, the Introduction field is no longer available. If any quiz previously had text in the Introduction field, the text is automatically appended to the Description field. A message appears indicating that these two fields have been merged. Instructors can review the modified quiz description prior to saving the quiz.
6.32. Quizzes: Restrictions & Submission Views
Access Restrictions
Select Quizzes from the NavBar and choose a quiz. Choose the Restrictions tab.
This action will open the Dates and Restrictions section. Use the Hide from User checkbox to temporarily limit. Set date restrictions by marking Has Start Date, Has End Date, and/or Has End Date as appropriate.Select the appropriate date and time. Availability Dates and Due Dates determine posts in the course calendar.
*Please note, the standard start time is 12:00 a.m. and the standard end time is 11:59 p.m.
You can learn more from the Brightsapce Community (D2L) regarding
- Availability Start Date Properties
- Availability End Date Properties
- Visibility and Access
Choose Attach an Existing or Create and Attach to start a new release condition.
To attach an existing condition, expand the tools menu and choose the category of tool that uses the existing condition. Scroll to the existing condition and check it. Choose Attach to complete the transaction.
To create a new release condition use the Condition Type menu to choose the appropriate condition. This example uses Visited content topic. Determine the appropriate content from the Topic menu. Choose Create to add the condition.
If necessary, select Expand optional advanced restrictions. If the exam will require a proctor, enter a Password for the quiz. Time limits must be specified in minutes. Enter the Time Limit. To use the Exceeded Time Limit Behavior options, choose Prevent the student from making further changes. The Grace Period is time in addition to the time limit the student will be allowed before the Exceeded Time Limit Behavior options take effect.
Exceeded Time Limit Behavior options:
- Allow the student to continue - Allows the student to take as much time as needed to complete the quiz, but flags the quiz as late.
- Prevent the student from making changes - Allows the student to complete the quiz, but after the Time Limit + Late Limit expires, they will receive a zero grade for the quiz.
*Please note, the instructor does have the ability to manually grade the quiz to change the zero.
- Allow the student to continue working, but automatically score the attempt as zero after an extended deadline. - the student will be prompted to submit the quiz and will be unable to make any further changes.
*Please note, the auto-submit attempt does not automatically submit the quiz. This option prevents the student from making any further changes and may require the instructor to submit the attempt.
Special Access options are used to Allow selected users special access to a quiz. Select the radio button and then Add Users to Special Access.
*Please note, it is strongly discouraged to select Allow only users with special access to see this quiz because this option will lock ALL students out of the quiz except those specifically selected.
Submission Views
The submission view is the message presented once a quiz is completed. The default submission view displays a message stating the quiz has been successfully submitted and the score earned by the student. The default view content may be edited. Navigate to the quiz and select Submission Views. Choose the Default View to edit the content.
Additionally, restrictions and views can be set for students to either view questions answered correctly or incorrectly, their responses, and the correct answer if desired. In this example, Show all the questions with the user responses and Show question score and out of score are set so the student knows which questions they marked correct or incorrect.
Choose Save and Close to complete the edit.
An Additional View allows an alternative to the default view. This could be set for various reason that typically may include:
- Students need to be able to view the correct answers only after the quiz period is over.
- Students are allowed multiple attempts but are not allowed to view the answers until the final attempt is completed.
Choose Add Additional View to create a new view. Enter a descriptive Name for the view. You may enter an optional Message as well.
6.33. Quizzes: Assessment
Quiz Assessment
Choosing a quiz will open the Edit Quiz page. Select the Assessment tab. Automatic grading and auto export to the grade book is typically set up with quizzes. Check Allow attempt to be set as graded immediately upon completion under Automatic Grade.
Select the grade item to associate the quiz with from the Grade Item menu and check Allow automatic export to grades.
*Please note, if you have not yet set up the grade book, grade items will not appear in the Grade Item drop-down menu. It is recommended that you set up the grade book before creating any quizzes, assignments, or discussion topics.
Enter the number of attempts to be allowed from the Attempts Allowed menu and choose Apply. Choose which grade will be used from the Overall Grade Calculation menu, if multiple attempts are allowed. See the expanded menu for all choices. Advanced Attempt Conditions offers options to apply minimum, maximum, or both scores. Choose Save and Close when finished.
Advanced Attempt
Advanced Attempt provides an opportunity to customize how this feature is used, especially in lower stakes assessments to improve learner outcomes. Choose a Minimum and Maximum range to trigger additional attempts.
Ungraded Questions
To support instructors who need to manually score questions within quizzes, the following quiz status and quiz grading workflow updates are available:
- For quizzes that contain questions that need to be manually scored (such as Written Response questions) AND that have the "Allow attempt to be set as graded immediately upon completion" option disabled, a new Pending Evaluation status appears beside the quiz attempt on the Grade Quiz page.
- While evaluating a quiz attempt with unevaluated questions, the instructor can now select Pending evaluations in the Question View drop-down menu to filter for only the questions that require manual evaluation.
- Instructors can now filter the Users tab by status. The available filters are: Published, Saved as draft, Pending evaluation, and an empty status. The empty status denotes a quiz with auto-scored questions, where all questions are evaluated and there is no question evaluation pending.
The new Pending Evaluation filter appears in the Question View drop-down menu to easily locate questions requiring manual evaluation by the instructor.
6.34. Edit, Delete, or Restore a Quiz
Edit a Quiz
Select Quizzes on the NavBar to edit a quiz. The Quizzes page will open. Select a quiz and choose Edit. Follow the previous steps to Create a Quiz (same frame) and make any necessary changes.
Editing Quizzes with Previous Attempts
Points for all past quiz attempts are no longer modified when edits are made that affect the overall points and/or the grading calculations for a quiz. Now, all previous quizzes with attempts will display the quiz and grading calculations that appeared to the learner at the exact time they made the attempt. Quizzes — User Experience with Previous Attempts (new window)
Setup Reports
The Report Setup tab on the Edit Quiz page is now available on the context menu of a quiz and reads as Setup Reports. The Reports option available on the quiz context menu is also updated and reads as View Reports.
Delete a Quiz
Navigate to the quiz list. There are two methods to complete this process. Select the context menu of the quiz and choose Delete, or mark the checkbox of a quiz or quizzes to delete and choose More Actions. Choose Delete from the list. Either method will prompt a Confirmation window to open. Choose Delete.
Delete the Wrong One?
You can restore a deleted quiz. Go to the More Actions menu.
Choose the quiz to Restore. The quiz will repopulate your list.
6.35. Quizzes: Retake Missed Questions
Retake Missed Questions
This feature introduces a new option for Quizzes Attempt settings that allows students to only retake their incorrectly answered questions from previous quiz attempts. Instructors can select this new option in the Assessment tab of a quiz. When the Retake Incorrect Questions Only check box is selected for subsequent quiz attempts, each learner only sees the questions they had previously answered incorrectly in the same order as the initial attempt (including quizzes with random sections and random questions).
Attempts Allowed must be 2 or greater for this function to work. It is greyed out until the number is applied.
When grading a Retake Incorrect Questions Only quiz attempt, the instructor can only provide a score for the questions answered on this attempt.
A learner's score for a Retake Incorrect Questions Only attempt remains at a minimum, the score they had on the previous attempt. Correctly answered questions on the Retake Incorrect Questions Only attempt add to the learner's attempts score.
The Quiz Overall Score is calculated using the existing Highest/Lowest/First/Last/Average aggregation functions. The "Average" aggregation function can be used to give the student partial marks for questions that were not answered correctly on the first attempt.
Resource
Retake Incorrect Questions Only (brightspace.com)
6.36. Quizzes: Attempts in Progress, Resetting Quiz Attempts
Find and Submit a Quiz Attempt in Progress
Sometimes there can be a malfunction and a quiz attempt gets "stuck". Follow these steps to locate and submit the attempt. Navigate to the quiz list and select Grade from the quiz menu.
Choose Users with attempts in progress from the Restrict to menu. Enter a name in the Search field. The list will show quiz attempts in progress. Select the Impersonate icon next to the student's name. Choose Yes in the confirmation window to continue.
The quiz will open as it would for a student. It may be necessary to navigate to the last page. Scroll to the bottom and choose Go to Submit Quiz. A confirmation window will open to confirm. Choose Submit Quiz when finished.
The page will refresh and return back to the Attempts tab and display the completed attempted. Choose Save and Close to return to the quiz list.
Reset a Quiz Attempt
The quiz period is often passed by the time an instructor is notified a student has experienced technical difficulty or needs help. Please be aware of this and make sure to reset the quiz attempt AND grant special access for them if the quiz period has passed. If BOTH steps are not completed, the student will NOT be able to access the quiz.
Navigate to the quiz list and select Grade from the menu for the quiz.
Select Search to view a list of students who have completed an attempt. Select the checkbox next to the quiz attempt to be delete and choose Reset to finish.
A confirmation window will open. Choose Yes to confirm. The page will refresh and the attempt will be deleted.
6.37. Grades and the Grade Book
Create a Grade Book
A grade book contains your grading system, grade calculations, grade scheme, grade items, and view and display options. Grade items in your grade book represent all the work that you want to evaluate users on in a course. You can evaluate specific tasks such as assignments, tests, and participation, and you can also create grade items and associate them with course objects such as assignments and quizzes.
A grade book must be created before you can use the Grades tool. TN eCampus courses have a headstart in each Master Course. The Grading System is set to Points. The Grade Scheme is set to Percentage. The Final Grade is set for Manual Release. The grade book still needs further course customization by creating Grade Categories and Grade Items.
*Please note, other changes are possible to the grade book, but the Final Letter Grade should not be altered or removed from any course. This field is crucial to reports sent to campuses.
Create Grade Categories
Gradebook categories enable easy organization of the grade book which enables both students and instructors to easily locate specific grade items. Navigate to the grade book by selecting Grades from the navbar. Choose Category from the New menu.
Use a descriptive Name for the category, such as Assignments, Discussions, Essays, Exams, or Quizzes. As grade items are created, they will be associated with the categories created in this step. Add a Description and check the student view optional. The Short Name feature is discouraged, but if it is used, make it descriptive and consistent with the other names.
Check Distribute points across all items if the points for the grade items to be included in the category vary from other grade items. It is recommended that nothing is marked under Display Options. Choose Save and Close when finished.
*Please note, while the Restrictions tab has options to set Visibility dates and Release Conditions, these options should not be used on Grade Categories or Grade Items.
Create a Grade Item
Choose Item from the New menu to create a grade item. There are several types of grade items to choose from, but the most common is numeric. In this example, we will select Numeric from Choose a Grade Item Type.
Enter a descriptive Name for the grade item. Select the appropriate Category for the grade item from the Category menu. Only categories created will be listed in the Category menu. Categories may be created here, but it is recommended to set them up in advance in the grade book to keep everything logical and consistent.
Add Categories for Grade Items--Update
Categories may be added for text, calculated, and formula grade items. This feature enables faculty to better organize the grade book. This improved organization does not impact the calculation of the category these grade items are in. The totals in these categories do not contribute to the final grade.
If Distributed points across all items is set when the category is created, there will not be an option to change the Maximum Points. Set the appropriate point value in Maximum Points, if not previously set up.
Grade Scheme and Rubric information may be adjusted in this section as well. Select Save and Close when finished. The New Item window will close and return to the grade book with the newly created grade item displayed under the category.
Bulk Edit
You can make edits across selected items using Bulk Edit.
- In a course offering, access the Grades tool
- From Manage Grades, create a few grade items of different types (numeric, text, formula, calculated)
- On the Manage Grades screen, select the checkboxes next to the grade items
- Click the "Bulk Edit" option
- See that the Category column does not have the option to edit in bulk screen. Other items are editable as well.
Brightspace Grades Playlist
Delete a Grade Item or Category
IMPORTANT
The Final Letter Grade - Do Not Remove grade item should NEVER be removed from ANY course. This is where the instructor will enter the final grade for each student and TN eCampus will pull the grade reports to be sent to the campuses from this field.
Navigate from Grades on the navbar to the Manage Grades tab in the grade book. If a grade item is tied to an activity, it must disassociate that activity with the grade item before it can be deleted. The Association column of the grade book will indicate the tool the grade item is associated with if it is linked to an activity.
Select Delete from the More Actions menu.
Mark the checkbox next to the grade item or category to be deleted and select Delete to remove. A Confirmation window will open. Select Delete to finish and return to the manage grades tab.
Manually Entered Grades
Question types with selectable answers may be graded automatically. Written response question types must be graded manually. If you quiz or assessment has a mixture of question types, the final grade cannot be processed without instructor input. To get started choose an item to grade.
Choose the item and the appropriate Attempt.
To support instructors who need to manually score questions within quizzes, the following quiz status and quiz grading workflow updates are available:
- For quizzes that contain questions that need to be manually scored (such as Written Response
questions) AND that have the "Allow attempt to be set as graded immediately upon
completion" option disabled, a new Pending Evaluation status appears beside the quiz attempt
on the Grade Quiz page. - While evaluating a quiz attempt with unevaluated questions, the instructor can now select Pending evaluations in the Question View drop-down menu to filter for only the questions that require manual evaluation.
- Instructors can filter the Users tab by status. The available filters are: Published, Saved as Draft, Pending evaluation, and an empty status. The empty status denotes a quiz with auto-scored questions, where all questions are evaluated and there is no question evaluation pending.
Troubleshoot Final Grades
6.38. Grade Systems
Grading Systems
Selecting a grading system is the first step in setting up your grade book.
Weighted
The weighted system calculates grade items as a percentage of a final grade worth 100%. The maximum points you assign to individual grade items can be any value, but their contribution towards the category they belong to and the final grade is the percentage value (weight) assigned to them.
Grade items in a category count as a percentage of that category, not of the final grade. Therefore, grade items in a category should combine to a weight of 100%.
For example, if you have a category worth 10% of the final grade with two equally weighted grade items, the weight of each grade item is 50%, (its contribution to the category), not 5% (its contribution to the final grade).
Since it's a category’s weight and not an individual grade item’s weight that counts toward the final grade, the final grade is inaccurate until all the items in the category are graded. If you want to release final grades to users before all the items are graded, you can drop ungraded items from the calculation until the end of the course when you want all grade items to be considered. Otherwise, the final grades might be misleading.
If your grade items do not add up to 100%, you will receive a warning message. You can ignore this message if you choose; a balanced grade book is not required. If the weights assigned to grade items do not sum to 100%, the tool adjusts the weight of each item. For example, if you have three grade items with a weight of 25% each, each item is actually calculated as 33%. This is true for categories and the final grade.
Points
Use the points system when you want the maximum points assigned to a grade item to be equal to its contribution to the final grade. Final grades are calculated by adding a user’s score on all grade items together and dividing by the sum of the maximum points values. The sum of the maximum points values for all grade items does not need to equal 100.
With the points system, you do not specify a category’s weight or total points. It is the maximum points assigned to an individual grade item that counts toward the final grade.
Make sure the maximum points assigned to grade items reflect how much you want them to be worth. For example, don’t grade each of your 20 homework assignments out of 50 points and then your final exam out of 80 points.
Another option in the point system is to exclude an item from the final grade calculation. This enables you to evaluate a grade category, numeric grade item, selectbox grade item, or pass/fail
grade item without including the grade in users’ calculated or adjusted final grades. The New/Edit Item page and the New/Edit Category page both include an Exclude from Final Grade Calculation check box.
You can achieve similar functionality in the weighted system by setting the grade item or category’s weight to 0%.
Formula
Use the formula system when you want to calculate final grades using a custom formula that allows for conditions. The formula system is based on the points system, but allows you to set conditions around grade items to determine the final grade. For example, you could require that users receive at least 50% on their midterm and final exam to pass a course.
The formula system might not be available at your organization. If you do not have this option, you can release the adjusted final grade and calculate your custom formula manually, or you can contact your site administration about getting access to this functionality.
Source
This document is available from Brightspace Community (D2L.com).
6.39. Grades – Automatic Zero for Missing Submissions NEW
Introduction
The Automatic Zero feature allows a score of zero (0) to be automatically applied to unsubmitted learner activities after the due date passes. Applying the Automatic Zero feature eliminates the need for instructors to manually set missing submissions to zero. Additionally, learners receive a more accurate view of their grade calculations for individual activities and for the overall course.
Supported submissions include file and text-based assignments, quizzes, and LTI tools. All activities must have grade associations. It should be noted that Discussion submissions are expressly NOT included in this feature.
Instructors can select between system-added and manually-entered zero scores. Automatic Zero applies to both individual and group assignments and respects any exemptions and release conditions set for an activity. Automatic Zero is triggered within one minute of the due date and is based on local time zones for both instructors and learners. The feature follows the same rules as existing due dates.
Navigate to the Settings
From Grade Calculations, check the Automatic Zero for Missing Submissions to employ this feature.
Instructors see an automatic zero applied to a missing submission with an explanatory tooltip.
Please Note: There are no changes to Grades data sets, as methods for identifying system-entered grades already exist.
6.40. Grades: Final Letter Grade Display
Final Letter Grade Display
A recent change in D2L has caused manually entered Final Letter Grades (FLG) to report as No Final Grade (NFG). There is an easy fix that should be applied to Mastery Copy (MC) course and Accelerated Mastery Copy (AMC) courses. Open Grades from the NavBar. Choose the Gear/Settings icon.
Select the Org Unit Display Options tab. Under Managing View Display Options, enter 5 in Number of decimal places to display. Choose Save to finish.
6.41. Course Content Statistics
Course Content Statistics
Course statistics can display the total number of users, the number of users who visited course content, and the average time users spent viewing content. You can view overall course content statistics, specific statistics for individual topics, and specific user statistics.
To view course content statistics, as an instructor, navigate to Content, and then select Table of Contents. Choose the menu Related Tools and View Reports.
Topics Displayed
Course statistics can display the following:
- Total Number of Users
- Number of Users who visited course content
- Average time users spent viewing content. You can view overall course content statistics, and specific statistics for individual topics.
Available To column displays the number of users (from the class list) that the content is available to. This value takes into account the following:
- Release conditions
- Special access (assignments and quizzes)
- Group access (assignments and discussions)
- Availability dates
- Hidden/visible state
- If module parent is "available"
Modules
For modules, the following information displays:
- Available To
- Users Visited
- Average Time Spent
*Please note the following:
-
- A user who visits multiple times is only counted once.
- A user whose connection timeout or drops will not count.
- The total number of users counted in statistics does not include users who have permission to Manage Content.
- Calculated time users spent viewing overall content or individual topics does not include user session timeouts and users currently visiting content and topics as you view statistic details.
Reset Course Statistics
- From the Table of Contents page, choose
View Reports from Related Tools
- Choose
Statistics
- Choose Reset Statistics
- Choose Delete
Export Course Statistics
You can export statistics to a CSV file.
- On the Table of Contents page, choose
- Choose Statistics
- Choose Export Statistics
- Choose the CSV file to begin download
6.42. Checklist
Create a Checklist
Select Course Admin from the navbar and choose Checklist from the page that opens.
Choose New Checklist to start a new list.
Enter a Name for the checklist and an appropriate Description in the textboxes. Check New Window to have the checklist open in a New Window.
Select Save to finish.
The page will refresh. Scroll to the Categories and Items section. Categories (examples highlighted in yellow) will enable grouping of checklist items like reading, assignments, or research. Items (examples highlighted in green) are the tasks on the checklist that can be marked as complete. Items are indented as a subset of each category in this layout.
Choose New Category to create a category.
Enter a Name for the category and select Save.
The page will refresh with the new category. Select New Item to add items for the checklist.
Select the Category context menu to associate the item with the new category.
Enter a Name for the new checklist item and any relevant description or instructions.
*Please note, links should not be placed in the description textbox. When master courses get updated, links in the checklist tool often get overlooked and cause trouble for students. Use the content section of the course to link materials instead.
Below the description is an option to set a Due Date. If a due date is set, it will be displayed in the course calendar. Be careful when using the checklist item due dates as it can become confusing when dates are appropriately set in the assignment, discussions, and other areas.
Select Save to finish.
The Restrictions tab provided options to create and attach Release Conditions. Choose Create and Attach to start a new release condition. Choose the Condition Type from the menu and other Condition Details as appropriate. Choose Create then Save and Close. This process is very similar to other restrictions throughout D2L.
Edit a Checklist
To edit a checklist item or category, mark the checkbox next to the item/category, and choose Edit. The process to edit an item or category is similarly creating a new item or category.
Delete a Checklist
To delete a checklist item or category, mark the checkbox of the item or category, and choose Delete.
A confirmation window will open. Choose Delete to finish.
*Please note, if a category is selected to be deleted, all items within that category will also be deleted.
6.43. Grant Special Access
Special Access to Assignments
Special access allows the instructor to set different parameters for individual students without affecting those set for the class as a whole. This tool can be used to extend the deadline on a quiz or assignment and may be used to provide ADA accommodations such as extended testing time.
Steps to Adjust Access
To grant special access to an assignment, navigate to Assignments on the NavBar, and select Edit Submission Folder from the context menu of the appropriate assignment.
From the Edit Folder page select Restrictions.
Find the Special Access options. Make sure the Allow users with special access to submit files outside the normal availability dates for this folder option is selected. Select Add Users to Special Access.
Under Availability, check the date in the Has End Date field and add any needed extra time.
Under Users, locate the student that requires an extension of the date and mark the checkbox next to the student's name. There is a search box if there is a long list. Select Save to finish.
The page will return to the Restrictions tab. Scroll to the bottom of the page to see the student granted special access is listed below the Special Access options. Select Save and Close to finish.
Special Access to a Quiz
Navigate to the Quizzes list from the navbar. Manage Quizzes will open with the list of quizzes. Choose the menu of the appropriate quiz and select Edit.
Select Restrictions to set up special access and additional quiz attempts.
From Special Access the default choice is Allow selected users special access to this quiz. (The other option is not recommended.) Select Add Users to Special Access to add special access.
Set the Date Availability to grant an extension.
If a student requires additional time to complete a quiz, mark the Assign a special time limit checkbox and enter the minutes in the Time Limit textbox. Enter the Grace Period and Late Submissions options, if applicable.
*Please note, any options not set in the Special Access properties will assume the settings previously applied to the quiz.
Attempts Allowed can be checked and values set if additional attempts are needed. Under the Users section, select the checkbox next to the student needing special access. Then, select Add Special Access to continue.
The Special Access Properties page will close and return to the Restrictions tab of the quiz. Scroll to the bottom of the page and you will see the student granted special access listed under the Advanced Availability options and the access information.
Select Save and Close to finish.
This video covers restrictions and special access for assignments.
6.44. View User (Student) Progress
View User (Student) Progress
The Class Progress page lists the learners enrolled in a class. Instructors may view performance indicators to view and compare learners' progress at a glance.
Choose Class Progress from the navbar to begin.
The Class Progress page displays 4 of 9 available indicators. In this example, Content Completion, Objectives, Login History, and Grades Performance summary indicators are displayed. Indicators for assignment submission folders, checklists, discussions, quizzes, and surveys are also available.
Place your mouse over indicators to get more detailed information. Choosing a student opens the User Progress report.
Navigate the report by choosing Summary, or one of the indicators listed on the left side.
Select Settings to change which indicators are displayed and the order displayed. Open the context menu and choose Move or Replace to replace an indicator.
In this example, choose one of the remaining indicators to replace the previous selection.
In this view, Assignments Performance Summary is updated as one of the 4 indicators which replaced Content Completion. Choose Save and Close to complete the update.
Optional Resources from D2L
6.45. Email Communication in Brightspace
Brightspace Email
One of the advantages of online teaching and learning is that nearly everything communicated between faculty and students is automatically documented, whether in course communication (announcements, activity directions, or other content information) or course email. This documentation is valuable for both student and instructor to understand and to review communicated information and may be useful as documentation if any problems arise.
Use Course Email
D2L provides a means of communication by email (course email in D2L) within the course, but this is a closed email system. Instructors and students are highly encouraged to use the internal communication platform instead of external sites, such as Yahoo, Gmail, or Outlook.
Getting Started with Brightspace Messages
A direct link to your Brightspace email is provided at the top of your course homepage located on the minibar. Select Email from the expanded menu.
Email Preference Settings
Before getting started sending and receiving messages, setup Email Settings by choosing Settings with the gear icon.
*Please note, in a previous version of Brightspace, there was an option to save Sent Messages by checking the preference. That is a default option and requires no changes by the user.
Once this feature is activated, it is very easy to check the message activity. Select a sent message and choose View Recipient Activity. The date, time, and action will populate in a new window.
Compose or Read Messages
This system works much like other email products. Choose the Compose button to start a new message or select a message to read from the list.
Message to Class
Messages can easily be sent to individuals from the email tool. To send messages to the entire class, instructors may use the Classlist tool to send group messages. The Classlist tutorial is also found here in the Knowledge Book pages.
Using External Email
The preferred method of communicating with students is directly in the course through course tools. There are times when a student has not logged into the course for the first time or is not active in the course. Those are good reasons to use an external email to make contact in the interim.
This information can be difficult to access if the student is not on your home campus, but Brightspace has a solution to access external email addresses if provided. Open Classlist and check the Email box.
In addition to Names and Usernames, Email will populate if the home institution entered it in the student account. It is necessary to copy the email address from the Email column.
*Please note, clicking a student's name will open an email window, but it will populate the Brightspace message address, not the external email.
If there is not a private email and you are unsuccessful contacting the student, take advantage of the Report it Now button found on the course homepage. You can learn more about it through a short tutorial Escalate Student Success Concerns (Knowledge Books)
6.46. Video Note Recording
Brightspace Recording with Video Note
Video Note is a built-in video recording tool that makes it easy to personalize the learning experience with video-based course content, instructions, student feedback, and general message. This tool is available in any feature that supports the Insert Stuff tool. That includes tools such as Content, Calendar, Discussions, and Assignments. Video Note offers 30 minute recording times and better than average automatic captions for accessibility compliance.
*Pro-tip: Video Note is a great way for an instructor to quickly and easily introduce themself to the class.
If you start with a video on a new page or resource, choose Upload/Create to begin.
Select Create a File to start a new course file.
If you have a page or resource you want to use or use a newly created page, choose Insert Stuff from the toolbar.
Choose Video Note.
Brightspace will initially confirm the camera and microphone. (Check Remember this decision to stop this check for future recordings.)
A prerecorded video file can still be added through Upload File, but the live image will open by default. Choose New Recording to begin. Choose Stop Recording when finished. Cancel will end the process and not save the recording.
Give the video and Title and Description. Be sure to check Automatically generate captions from audio. Choose Next to continue
You may Refresh Preview to review the video or choose Insert to add to the course file. Even short videos may take a few moments to a few minutes to process and be available.
The video and any other content is ready to Save and Close.
Video Captions
Creating videos is ultimately easy and fast. To make videos for all users or users in all environments, captioning is very important and also pretty easy. Choosing the gear icon to choose Captions. Captions are off by default but it toggles each time selected.
The caption processing is good in Brightspace, but like any automated process, it is still important to review the result. You will likely see a few words that were not captured correctly. Likewise, capitalization and punctuation will need some editing as well. Save the file with captions on. Choose the gear icon in the upper right. Choose Video Note Captions.
This will open a list of video recordings. Search by title and author to find the exact video. Select the video to open it.
The captions will open if auto-captioning was set and captions are on default in the video. Notice the highlighted areas. These captions were close to the actual word, but they can be easily corrected in each line. Make the edits and choose Save Captions. Only use Delete if you want to type all of the captions by hand. This is not recommended.
Please provide and edit captions in videos. Many learners with and without disabilities depend on them.
Prefer a short video?
6.47. Release Conditions
Release Conditions
Release conditions can be set on discussion topics, quizzes, assignments, and even content modules. Release conditions allow you to create a custom learning path through the materials in your course. When you attach a release condition to an item, users cannot see that item until they meet the associated condition.
Examples of Using Release Conditions
- Release conditions may be set on discussions that require a post or a reply to a post to continue.
- Release conditions may be set on modules so that subsequent modules do not become viewable until the student has viewed the current module.
- Release conditions may be set on a quiz to prevent students from accessing the quiz until they have visited all topics in the corresponding content module or have submitted an assignment to the assignment folder.
- Release conditions may be used to restrict access to prevent access to any course object until the student achieves a specified score or makes an attempt on a quiz.
- Release conditions can also be added to intelligent agents to create email notifications for users.
Additional Resource from D2L
(This is the most current video. Some of the menus have been renamed but the functionality of restrictions may still be helpful.)
Add Restrictions to an Assignment
Select Edit Submission Folder from the menu of the assignment.
Select the Availability Dates and Conditions pane. Choose the Due Date if the assignment should be displayed in the course calendar but not accessed until it is time. Select the appropriate Start and End Dates for the assignment to open and close. Choose Add Release Conditions. Release Conditions by choosing Create New or Add Existing.
Choose the Condition Type and Condition Details.
*Remember: you can create multiple conditions and details can have negative or positive actions from the student. Plan very carefully how you setup conditions and deploy complex actions.
Choose Save and Close when you are finished. Toggle Hidden when you are ready to reveal.
Add Restrictions to a Discussion
Restrictions include Release Conditions and Group and Section Restrictions. Release conditions can be set on a variety of tools, including discussion topics. The release conditions allow specific actions a student must take prior to the discussion topic before the next discussion becomes viewable or actionable. When Group and Section Restrictions are enabled, only members of the specified groups or sections will have access to this topic.
Release conditions may be applied toward awards, checklists, class lists, competencies, content, discussions, assignments, grades, quizzes, and surveys. Each has other variables to provide specific circumstances to release portions of the course to students. In the next example, a discussion cannot be accessed until the student scores 100% on a quiz.
All conditions must be met is the default choice, but if more than one condition is applied Any condition must be met could be selected if appropriate.
Groups and Sections may also be restricted. Check the box and add groups or sections as needed. Choose Save to continue.
Add Restrictions to a Quiz
Select Quizzes from the navbar and choose a quiz.
Choose Add Release Conditions. Release Conditions by choosing Create New or Add Existing.
Either choose an existing release condition or choose Create and Attach to start a new condition. A window will open. Use the Condition Type menu to choose the appropriate condition. This example uses Visited content topic. Then choose the appropriate content from the Topic menu. Choose Create to add the condition.
If necessary, select Expand optional advanced restrictions. If the exam will require a proctor, enter a password for the quiz in Password. Time limits must be specified in minutes. Enter the Time Limit. To use the Exceeded Time Limit Behavior options, select Prevent the student from making further changes. The Grace Period is time in addition to the time limit the student will be allowed before the Exceeded Time Limit Behavior options take effect.
Exceeded Time Limit Behavior options:
- Allow the student to continue - Allows the student to take as much time as needed to complete the quiz, but flags the quiz as late.
- Prevent the student from making changes - Allows the student to complete the quiz, but after the Time Limit + Late Limit expires, they will receive a zero grade for the quiz.
*Please note, the instructor does have the ability to manually grade the quiz to change the zero.
- Allow the student to continue working, but automatically score the attempt as zero after an extended deadline. - the student will be prompted to submit the quiz and will be unable to make any further changes.
*Please note, the auto-submit attempt does not automatically submit the quiz. This option prevents the student from making any further changes and may require the instructor to submit the attempt.
Customize grading from the Assessment tab. Grades may be provided instantly by checking Allow attempt to be set as graded immediately up completion. Add a Grade Item by selecting from the menu or use [add a grade item]. To populate grades automatically in the grade book check Allow automatic export to grades.
Students may have multiple attempts to complete a quiz. Set the number in Attempts Allowed and choose Apply. The Overall Grade Calculation can be determined by highest, lowest, average, first, or last attempt. In this example, this quiz has two attempts and the highest grade will be used for the grade book.
Advanced Attempt Conditions are optional and will not apply if left blank.
Choose Save and Close to complete the choices.
Special Access
Special Access options are used to Allow selected users special access to a quiz. Select the radio button and then Add Users to Special Access.
*Please note, it is strongly discouraged to select Allow only users with special access to see this quiz because this option will lock ALL students out of the quiz except those specifically selected.
6.48. Release Condition Types
| Condition Type | Description |
| Awards - Awards | The user must have earned a specific award in order to fulfill the release condition |
| Checklist - Completed checklist | The user must complete all items on the selected checklist in order to fulfill the release condition |
| Checklist - Incomplete checklist | The user must not complete one or more items on the selected checklist in order to fulfill the release condition |
| Checklist - Completed checklist item | The user must complete a specific item on the selected checklist in order to fulfill the release condition |
| Checklist - Incomplete checklist item | The user must not complete the specific item on the selected checklist to fulfill the release condition |
| Classlist - Group enrollment | The user must be enrolled in a specific group in order to fulfill the release condition |
| Classlist - Org unit enrollment | The user must be enrolled in a specific org unit in order to fulfill the release condition |
| Classlist - Section enrollment | The user must be enrolled in a specific section in order to fulfill the release condition |
| Classlist - Role in current org unit | The user must either:
|
| Classlist - Date of enrollment in current org unit | The user must be enrolled in the current org unit for a specified number of days in order to fulfill the release condition |
| Competencies - Competency achieved | The user must complete a specific competency in order to fulfill the release condition |
| Competencies - Competency not yet achieved | The user must not complete a specific competency in order to fulfill the release condition |
| Competencies - Learning objective achieved | The user must complete a specific learning objective in order to fulfill the release condition |
| Competencies - Learning objective not yet achieved | The user must not complete a specific learning objective in order to fulfill the release conditions |
| Competencies - Score on associated rubric | The user must achieve a specified Score and Threshold level on a learning objective, based on an associated rubric, in order to fulfill the release condition |
| Content - visited content topic | The user must visit a specific content topic in order to fulfill the release condition |
| Content - Not visited content topic | The user must not visit the specified content topic in order to fulfill the release condition. Depending on your organization's security configurations, especially if the d2l.Tools.ManageFiles.UseContentRestrictedSecurity configuration variable is set to ON, users may not be able to access specified content topics at all when this release condition is set |
| Content - Visited all content topics | The user must visit all content topics in the course offering in order to fulfill the release condition |
| Discussions - Posts authored in topic | The user must author a specified number and type of posts in a designated module or topic in order to fulfill the release condition |
| Discussions - No posts authored in topic | The user must not author any number or type of post in a designated module or topic in order to fulfill the release condition |
| Discussions - Reply to a post authored in topic | The user must not author a reply to post in a designated module or topic in order to fulfill the release condition |
| Discussions - Score on associated rubric | The user must achieve a specified Score and Threshold level on a discussion module or topic, based on an associated rubric, in order to fulfill the release condition |
| Assignments - Submission to Assignment submission folder | The user must make a submission to a specified assignment submissions folder in order to fulfill the release condition |
| Assignments - No submission to Assignment submission folder | The user must not make a submission to a specified assignment submissions folder in order to fulfill the release condition |
| Assignments - Receive feedback on Assignment submission | The user must receive feedback on a submission to a specified assignment submissions folder in order to fulfill the release condition |
| Assignments - Score on associated rubric | The user must achieve a specified Score and Threshold level on an assignment submissions folder submission, based on an associated rubric, in order to fulfill the release condition |
| Grades - Grade value on a grade item | The user must achieve a specified grade value on a grade item in order to fulfill the release condition |
| Grades - No grade received | The user must not receive a specified grade value on a grade item in order to fulfill the release condition |
| Grades - Score on associated rubric | The user must achieve a specified Score and Threshold level on a grade item, based on an associated rubric, in order to fulfill the release condition |
| Quizzes - Score on a quiz | The user must achieve a specified score on a quiz in order to fulfill the release condition |
| Quizzes - Completed quiz attempt | The user must achieve a specified number of attempts of a quiz in order to fulfill the release condition |
| Quizzes - Score on selected questions | When a quiz has a learning objective with associated questions and an assessment method attached to it, the user must achieve a specified grade value on the learning objective in order to fulfill the release condition |
| Quizzes - Score on associated rubric | The user must achieve a specified Score and Threshold level on a quiz, based on an associated rubric, in order to fulfill the release condition |
| Quizzes - No completed quiz attempt | The user must not complete any attempt on a quiz in order to fulfill the release condition |
| Surveys - Completed survey attempt | The user must achieve a specified number of attempts of a survey in order to fulfill the release condition |
| Surveys - No completed survey attempt | The user must not complete any attempt on a survey in order to fulfill the release condition |
Best Practices For Setting Release Conditions (new window)
6.49. Accommodations – Quiz accommodations | New
Quiz Accommodations
Quiz Accommodations enable instructors to deploy accommodations throughout the course. Accommodation options currently include more time to complete quizzes at the course level and the ability to bypass right-click restrictions in quizzes. The right-click restriction in quizzes is the ability for learners to right-click in a quiz while in progress. Changes made will apply to all quizzes.
Getting Started
From the Classlist, there are several search options that include Users with Accommodations. Use that search criterion to narrow to previously edited students or go straight to the list to update students.
Choose Edit Accommodations for the student selected. Once granted, these accommodations apply to all quiz activities in a course for that learner. The additional time can be applied in terms of quiz time by multipliers or extra minutes on every quiz in a course.
After edits are made, notice the new icon for Accommodations.
Quiz-specific special access can overwrite an accommodation for any user on a quiz-by-quiz basis. When you overwrite an accommodation and then click Save, a warning describing the impact of overwriting an accommodation appears. Further accommodation options and enhancements are planned for this year.
6.50. Availability, Visibility, and Access Options
Availability, Visibility, And Access Options
The Availability Start and End Dates will each have a set of three options. You will be able to select one option for each date. By choosing an option, you are deciding whether learners can see the assignment and access it. The options are:
- Visible with access-restricted (before start/after end)
- The assignment will be visible to learners before the Start Date or after the End Date, but they cannot click or open it.
- This behavior is consistent with how Classic Content, Assignments, and User Progress treat assignments outside of availability dates currently.
- With this setting, learners can see the name, dates, and restrictions. Learners cannot see the assignment description or attachments.
- Visible with submission-restricted (before start/after end)
- The assignment will be visible to learners before the Start Date or after the End Date and they can click or open it, but they cannot submit or mark it as complete.
- With this setting, learners can see all details about the assignment including description, attachments, and rubrics, but they cannot upload files, enter comments, or mark the assignment as complete (for observed in person/on paper submission).
- Hidden (before start/after end)
- The assignment is hidden to learners until the start date is reached or after the end date passes.
- Learners will not see the assignment anywhere across Brightspace, including corresponding Calendar events and Notifications.
6.51. Intelligent Agents
Intelligent Agents
Intelligent agents are messages that can be customized and automatically emailed to individual learners. Messages could be released when a student fulfills a particular task or misses an opportunity. For example, an instructor may choose to set an intelligent agent to let a student know when they have missed a deadline on an assignment or want to acknowledge a student who achieved an exceptional score on a quiz. Intelligent agents require a small initial setup, then they work all on their own, in the background of a course.
Consider the benefits of using agents.
- Instructor Presence: Student engagement deeply depends on instructor presence. IA can broaden the reach of the instructor and spark further interaction and connection with students.
- Immediate Feedback: Intelligent Agents are working anytime students are working, including nights, weekends, and holidays.
- Outreach Tool: Students that are disengaged or falling behind can really benefit from a reminder. You can set a variety of release conditions to flag when a problem has reached a threshold without constantly researching the progress of your students.
- Increase Student Success: All of these benefits encourage the best from our students. Staying on track, recognizing problem areas, and acknowledging achievement are all important to student success.
You can also hear from an expert, Dr. Cathy Rhodes, "Using Intelligent Agents for Success" (YouTube) for real-world advice using agents.
Getting Started
To access intelligent agents, select Course Admin from the NavBar. (It may be located under More.) Choose Intelligent Agents from the Course Admin page.
Select New from the Agent List page. Give the agent a descriptive name in Agent Name. The Description is optional, but this can be helpful information to keep track of multiple agents. For this example, the agent created will send an email to students who score below 85% on the Second Essay Exam. Instructors may include a link to review material here.
Check Agent is enabled under the Status option.
In the Agent Criteria section, it is not recommended to use the Login Activity criteria as the emails are sent to D2L email addresses. Course Activity criteria are more useful because they will initiate an email to students who have logged into D2L but have not accessed the course for the specified number of days.
Release Conditions enable a set of very specific conditions for the intelligent agent. Choose Create and Attach to develop new conditions.
Replace Strings
Replace strings help personalize the message being sent, such as addressing the email to the learner’s first name or indicating the date that a specific user last logged in the course. There are several replace strings that can be used in Intelligent Agents. You can view the complete list (D2L.com). It is important to note, that some can be used only in the body of the message while others can also be used in the subject.
In this example, the purpose of this agent is to send review materials to students who score below 85% on the Module 2 Quiz by selecting Grade Value on a Grade Item from the Condition Type menu. The steps are as follows:
- Choose the Module 2 Quiz grade item from the Grade Item menu.
- Choose the Less Than symbol (<) from the Criteria menu.
- Enter 85 in the Grade textbox, then select Create.
The Create a New Release Condition window will close and the new release condition will be displayed. The following steps are necessary to complete the agent.
- Under Actions, choose whether the intelligent agent should take action only the first time the criterion is met by a user or every time the criterion is met by a user.
- In the To: textbox, enter the replace string {InitiatingUser} so that the email address of the student who scores below 85% on the second essay exam will be placed in the field.
- Enter an appropriate email Subject. Then, enter the Message content. Personalize the message by entering the replace string {InitiatingUserFirstName} or similar. (See more information on Replace Strings at the end of this tutorial.)
- Choose the HTML option selected under the Email Format options.
Video Instead of Text
Want to give your learners a break from reading yet another email? Why not record yourself delivering a message using Video Note (through Insert Stuff in the body of the email). This can help the learner feel even more connected.
Schedule Delivery
The Schedule option may be used to send reminder emails to students about projects or assignments. Check Use Schedule and the Update Schedule button. The Update Agent Schedule window will open. Choose the options for how often the reminder should repeat. Choose Update when finished. Select Save and Close to finish the agent setup.
The New Agent window will close and the newly created intelligent agent will be displayed in the agent list.
Updates Summer 2022
Intelligent agents have had a minor update. Updates can now be scheduled as often as hourly. (Setting No Schedule means the agent will run by default every night.) Agents can be categorized just like assignments and quizzes. This is very useful if you use several agents. Categories will help to organize them. Agents also have long lists of feature options. Those can be minimized by clicking the section arrow. See the highlighted areas of the next image for more detail.
Replace Strings (Brightspace Community)
| Organization replace string | Description |
|---|---|
| {OrgId} | ID number of the organization |
| {OrgName} | Name of the organization |
| Org Unit replace string | Description |
|---|---|
| {OrgUnitName} | ID number of the organization unit |
| {OrgUnitId} | Name of the organization unit |
| {OrgUnitCode} | Code for the organization unit |
| {OrgUnitTypeID} | ID number of the type of the organization unit |
| {OrgUnitPath} | Path to files for the organization unit |
|
User replace string (Unavailable in the Content tool) |
Description |
|---|---|
| {UserId} | ID number of the user. This value is used internally by the system |
| {UserName} | Full name of the user or the username entered to log on |
| {OrgDefinedId} | Organization ID. This is an identifier specified by the campus for the user |
| {FirstName} | First name of the user |
| {LastName} | Last name of the user |
| {Email} | User's internal email address |
| {ExternalEmail} | User's external email address |
| {InternalEmail} | User's internal email address |
|
Role replace string (Unavailable in the Content tool) |
Description |
|---|---|
| {RoleId} | Internal ID number for user's role |
| {RoleCode} | Code for user's role |
| {RoleName} | Name of user's role |
| Mail Template replace string | Description |
|---|---|
| {HelpDeskEmail} | Email address of the Help Desk |
| {HelpDeskName} | Name for the Help Desk |
| {LoginPath} | URL of the login path for this site |
| {PasswordResetLink} | Link for users to reset their passwords |
6.52. Brightspace Community
Brightspace Community
D2L has created the Brightspace Community (D2L.com) to support users of our LMS. These resources can be found at community.brightspace.com (new window). There you will find:
- discussions posts to collaborate and engage with other users,
- tutorial videos,
- tech support,
- and many other resources.
Instructors and administrators may view content, but you are invited to join the Community for deeper access. Members may contribute to discussion posts, suggest improvements, and take advantage of training opportunities.
Have Your PIE and a Better Brightspace Too
One of the sweetest parts of the community is PIE or the Product Idea Exchange. It is a feature worth checking out and does require an account to participate. D2L has developed a robust site and a dedicated team to encourage, gather, and develop great ideas to improve Brightspace for everyone. The snapshot image has 8 of more than 8,000 ideas under consideration. Consider becoming a member of the community and adding your voice for an even better LMS.
6.53. Activity Feed
Activity Feed
Use Activity Feed to create a central place for users to engage and stay up-to-date on what's happening in a course. This is similar to posting course announcements, but Activity Feed is more like a social media feed where the instructor can share information and students can comment as well. This creates a conversation opportunity instead of just a static message to the group.
Create a Message
Choose Message to open the Create a Message window. Add message text and/or an attachment if needed. The feed can be posted immediately or choose a release date.
Also note, the attachment icon actually expands the attachment choices that include File Upload, attach an Existing Link, attach a Web Link, or attach Video from the Web.
Use the Allow Comments check box if you want students to comment on your post.
Create an Assignment
Assignments can be created in the tool, or an existing assignment may be utilized. Starting from scratch provide the following:
- Assignment Name
- Instructions
- Due Date
- Add to Grades
- Submission Type
- Allow Comments
- Add an attachment
The feed can be posted immediately or choose a release date.
Date and Time may be selected for Post Later.
Prefer to watch a short video?
7. Developer Support and Information
7.1. Textbook Adoption
Textbook Adoption Verification Form
Developers are responsible for choosing textbooks and other course materials. Working hand-in-hand with the bookstore, developers can ensure students have the right textbooks and materials on time for each course launch. You are asked to complete this form each semester to confirm your selection with the bookstore.
Textbook Adoption Verification Form (Google)
7.2. Simple Syllabus
Simple Syllabus
TN eCampus has partnered with Simple Syllabus to drive an important student communication innovation. Simple Syllabus makes it possible to ensure consistent messaging around class schedules, office hours, textbooks to be used, policies, instructor bios, and even content sensitive to accreditation such as learning objectives and the course outline for the entire course catalog.
Key Changes
The process for managing and updating Simple Syllabi each semester is determined by roles:
- TN eCampus Admins -- manage the population of syllabi and information that is specific to the course that does not change frequently such as Course Title, Course Outcomes, and Pre & Co-Requisites, as well as Course Developer assignments for Master Courses
- Course Developers -- update key areas in their Simple Syllabus master every semester, including:
- Required textbooks and Additional Materials which have multiple sections to improve detail and clarity for students (pay close attention to the Help Text)
- Participation & Grades area is populated, and CDs must review and update if needed, and complete the proctoring statement
- Assessments and Projects information has space to provide detailed description for course assessments and projects
- Course Instructors -- only update their contact information in section copies (all other syllabus areas are locked)
Syllabus Migration
Migration to the new Simple Syllabus has been completed by the TN eCampus instructional designers. As a Course Developer, you will not need to update items such as Course Title, Course Outcomes, or Pre & Co-Requisites.
We do need you to update the content specifically to your role as Course Developer for the upcoming term. This includes updates to the following sections for your master course syllabus (if needed):
- Required Textbooks and Other Course Materials
- Participation, Assessments, and Grading
- Assessments and Projects
- Participation and Late Policy Requirements
Finally, Simple Master Syllabus auto-populates the related section Simple Syllabi every semester.
Logging in to Simple Syllabus as a Course Developer
In your D2L Master Course, you will see a submodule in your "Getting Started" module called “Course Syllabus” with the “Simple Syllabus” tool link, which is only for section instructors and students (and not for course developers). Please do not remove this submodule or move the new Simple Syllabus tool link from that submodule.
As the Course Developer, you will need to access and update and submit your Simple Master Syllabus by logging directly to the Simple website as explained below.
To update your master syllabus, you will NOT go into your D2L course. Instead, you must log into TBR Simple Syllabus website directly using your Simple credentials (you can click on “Forgot Password” if needed).
The dashboard/homepage will show you a To-Do list on the left and a Completed list on the right. Your course masters will be in the “Completed” list by default, since we copy the content from your previous master syllabus.
To list your course masters, click on the “Course Masters” tab on the top right, and make sure you select 2025 Spring from the term dropdown box. You will see all your 2025 Spring course masters under the “Completed” list (if you are the course developer for multiple courses, all masters will be listed).
Getting Started in Simple Syllabus
Click on the Edit button under the course title to begin reviewing and updating. Please notice the Help Text presented for each section. This will guide you through successfully completing each section of the Simple Syllabus and point out potential trouble spots. Several sections request you add “No ___ Required” if your course does not use a feature. This ensures there is nothing left blank accidentally, and it also clearly communicates that information to students.
Course Developers Updates
Please see the Help Text for instructions for Required Textbooks.
Help Text: Please include all required course textbooks in this section by clicking the pencil icon. Add the name of the textbook in the Title field and fill in the Author, Publisher, Year, and ISBN fields. If the textbook has multiple versions (e.g., print, eText, loose-leaf), put the details for those versions in the Additional Information box.
- *If there is no textbook required, please put "No textbook required" in the Title field.
- If you require a book, you can search Google for the details by typing the title, author, ISBN, or any other detail about the book you are looking for into the 'Book search' bar above the Title field. The Simple Syllabus software will retrieve all data on that book as well as a photo to include in the syllabus. Details for most published textbooks will populate automatically and can be edited as needed. You may also replace or remove the photo.
- To add additional textbooks to the list, click the pencil icon after each textbook is entered.
Add Other Course Materials in the textbox. If none are required, please enter, “No additional materials required.”
Add Hardware and Software Requirements as appropriate. If none are required, please enter, “None required.”
Check the Assigned Grade and Graded Items and update the last statement on proctoring.
Please note, that in your “Participation, Assessments, and Grading” as well as “Assessments & Projects” sections, you will see 4 different tabs if you maintain a course in multiple term lengths. The help text to the right explains which tab is for which term.
- Be sure to update the tab that corresponds to each term length your courses run in.
Add Assessments and Projects along with description information here.
Define Class Participation requirements for the class in the text field.
Define the Late Policy for the class in the text field.
Don't Forget to Submit!
Please make sure to click on “Submit” when you are done, otherwise, your syllabus will stay in draft mode, and instructors and students will get an error when they try to access Simple Syllabus in the semester sections.
Help Resources
If you have issues with updating your Course Master/s in Simple, email tnecampus@tbr.edu with your question/s and if possible, a related screenshot.
7.3. Successful Publisher Integration
5 Steps for Successful Integration
Publishers, such as Cengage, MGH Connect, Lumen, Pearson etc., offer wonderful resources and content to enrich your course, and many of our faculty use these resources to enhance their Brightspace course in one or more of the following ways:
-
Adding a link to your publisher course within your Brightspace course allows students to go directly to the publisher dashboard from Brightspace.
-
Enabling Gradesync allows the grades to flow from the Publisher site to Brightspace, so students can see their grades within their Brightspace course.
-
Adding deep links to publisher content and assessments in Brightspace, so students have direct access to everything within their Brightspace course.
Only You Can Prevent Integration Disintegration
On a serious note, it is very important to make sure you go through the necessary steps, which can be quite different across publishers, to set up a publisher integration correctly in Brightspace. Integration problems at semester start are a major so that you and your students have a smooth start to the semester. Read on to learn how to integrate publisher content with your course in five key steps:
-
Set up Your Publisher Course
-
Pair/link your TN eCampus Brightspace Course with your Publisher Course
-
Enable Gradesync Check Brightspace Gradebook to Ensure No Errors
-
Add Deep-links to Publisher Content and Assessments (if applicable)
-
Add/update Student Instructions to Access and Use Publisher Materials
Step 1. Set up Your Publisher Course
-
Make sure you have an instructor account with the publisher site so you can create, edit, and delete content in your publisher course.
-
If you are a section instructor, you may be able to "copy from an existing course" using the course key shared by the course developer.
-
Create/copy/update your publisher course for the current semester. Ensure appropriate course start/end dates and assessment open/close dates.
-
Once your publisher course is set up for the current semester, you are ready for Step 2.
Step 2. Pair/Link your Brightspace Course with your Publisher Course
-
When you are ready to pair/link your Brightspace-Publisher courses, log in to TN eCampus D2L Brightspace using your Instructor account (NOT Developer account).
- Next, locate the External Learning Tool for your publisher. Typically, the external learning tool link or widget is already made available for your course, and can be found in one of the following areas within your Brightspace course:
- Course Home-page widget (e.g. Pearson MyLab Mastering)
- Course Admin > Course Builder (e.g. Cengage Learning tool, Cengage WebAssign tool, Pearson deep linking tool, etc.)
- Content area > Appropriate content folder for publisher materials > Specific tool for your course (e.g. MGH Connect, VHL etc.)
- Note: If you don't see the correct external learning tool for your course, please open a HelpSpot ticket and we will enable it for you.
-
Click on the appropriate tool for pairing and login with your publisher account credentials. This will establish a Single Sign On (SSO) between D2L Brightspace and the Publisher site, which means that the next time you click on the tool link from Brightspace, you will automatically be signed into the publisher site as well. The same will happen for your students once they link their Brightspace-Publisher accounts.
-
Once you have established the SSO, make sure you locate the current semester's publisher course that you have prepared and established pairing with it. Step-by-step video tutorials for each publisher integration is shared below in the Quick-reference section. You can also request a meeting with the publisher rep to help you with the pairing (see Request Help section below).
Step 3. Enable Gradesync and Check Brightspace Gradebook
-
You must enable Gradesync after you have paired your Brightspace-Publisher courses so that student grades flow seamlessly from the Publisher grade book to the Brightspace grade book.
-
Enabling Gradesync is especially important if you have graded assessments in your publisher course. If you don't enable Gradesync, students may not realize that they may be missing assessments on the publisher site, and it can give them an inaccurate grading score when they look at their Brightspace Gradebook.
-
Remember that the direction of the grades flow is one-way, which means if a student's grade is updated on the publisher site, it will be updated within Brightspace (if Gradesync is enabled). But, if you update a student's grade in Brightspace, that doesn't automatically update the grade in the Publisher site, so you must update it there as well.
-
Finally, remember to check your Brightspace Gradebook and make sure that the total number of categories and items as well as points or weights match what you have stated in your Syllabus grade distribution.
Step 4. Add Deep-links to Publisher Content and Assessments (if applicable)
- The following publishers allow deep links to publisher content and assessments directly within Brightspace: Cengage Learning, Cengage WebAssign, MGH Connect (deep integration), Pearson MyLab & Mastering, TestOut LabSim, VHL. You can add deep links in one of the following ways:
- Go to Course Admin > Course Builder and use the widget for your respective publisher, and then choose the publisher items to link to from a list. (e.g. Pearson, Cengage)
- Use the deeplink external learning tool itself to pair your Brightspace course with your Publisher course and allow deploying of assessments from publisher to Brightspace. (e.g. MGH Connect, VHL)
-
The following publishers don't allow deep-linking at this time: Pearson REVEL, EVIA Learning.
-
Note: Some publishers and OER providers require a full course package import (e.g. Lumen Learning, Paradigm Cirrus, QuickBooks, etc.) which should be requested in advance by creating a HelpSpot ticket.
Step 5. Add/Update Student Instructions to Access and Use Publisher Materials
- You have worked hard to pair your Brightspace-Publisher courses so your students can have a smooth learning experience. But, they won't know this until you share updated instructions on how they can access the publisher content, and what they are expected to do once there.
- The Course Developer may already have an instructions page for the students that you can review and update if needed. Often, the Publisher site will include student registration instructions that you can share with your students as well.
- TN eCampus Instructional Designers are available to help you create custom student instructions for your course if needed.
Quick-reference - Guides & Tutorials
- Cengage - Integrate MindTap With Your D2L Brightspace Course
- Cengage - Integrate WebAssign With Your D2L Brightspace Course
- Cengage MindTap-D2L Brightspace Training Resources
- McGrawHill Connect-D2L Brightspace Integration Video
- Pearson MyLab-D2L Brightspace - Get Started Guide (PDF)
- Pearson MyLab-D2L Brightspace Integration Video 1 - Pair, Onboard, Enroll
- Pearson MyLab-D2L Brightspace Integration Video 2 - Gradesync, Assess, Renew
- Pearson REVEL-D2L Brightspace Integration Video - Pair & Gradesync
- Working with a Publisher (Knowledge Books)
On the Struggle-bus? Request Help
- We are committed to getting you off the struggle-bus when it comes to publisher integration in your course. To request help, open a TN eCampus HelpSpot ticket and select Category as Instructional Support > Publisher Integration.
- Make sure to include your course and section number, the more detail the better!
- If you are getting an error please include a screenshot for faster resolution.
- We have excellent publisher representatives who can walk you through the Pairing-Gradesyncing-Deeplinking Process in a virtual meeting. If you need this service, please request it in advance since the publisher reps tend to get very busy right before and after the semester launch.
7.4. OER Resources
Using Open Educational Resources
Open educational resources (OER) are freely available, openly licensed materials that can be used for teaching and learning. OER may take the form of a free online textbook or could be a reusable learning object.
Watch this award-winning video on why “Open Education Matters: Why is it Important to Share Content (new window).”
OER Resources
Free, peer-reviewed, high quality e-textbooks are available from projects such as:
- OpenStax College (new window)
- Connexions (new window)
- Community College Consortium for Open Educational Resources (new window)
- OER Commons (new window)
- Project Gutenberg (new window)
There are many others available!
- The College Open Textbooks Collaborative (COTC) (new window) has adapted a set of criteria for evaluating open textbooks.
7.5. Creating a Pulse Friendly Course
TN
In order to make sure your course activities show up in the Brightspace Pulse app, make sure you set due dates for each dropbox or discussion.
Brightspace (D2L) has provided a quick tutorial on how to make your course Pulse friendly below.
7.6. Course Clean Out Procedures
Course Clean Out Procedures
In some circumstances, it is necessary to remove all elements of a course back to the basic shell. This document serves as a checklist. Following the steps in order will ensure complete removal and save steps. For example, grades cannot be removed until associated items like discussions and quizzes have been removed.
Announcements
Select Announcements on the course homepage. The announcements page will open. Choose the Select All (top checkbox). This will select all checkboxes at one time. Select Delete to remove all visible announcements. If there is more than one page of announcements, the screen will refresh and display the next page. Repeat until all items are deleted.
*Please note: for very long lists, the setting to display up to 200 items per page (located at the bottom of the page) can be used to reduce steps. This applies to other tools discussed in this tutorial as well.
Confirm the deletion by choosing Yes. The announcements page will display a message when all are deleted.
Content
Open Content from the NavBar. Select the Table of Contents module at the top of the content listings. From the Table of Contents menu, select Delete All Modules.
It is critical to choose Permanently delete all modules, topics, and all associated files and activities from the course. The other option does not remove all files.
Discussions
Open Discussions from the NavBar. Open the More Actions menu and choose Delete.
Choose the Select All check box, which will check all forums and topics. Select Delete to complete the task.
Quizzes
Open Quizzes from the NavBar. Choose the Select All check box. From the More Actions menu, select Delete. In the confirmation window, select Delete.
Choose the Question Library after deleting all quizzes. Choose the Select All checkbox and then select Delete. Repeat these steps until all questions are removed.
*Please note: for very long lists, the setting to display up to 200 items per page (located at the bottom of the page) can be used to reduce steps. This applies to other tools discussed in this tutorial as well.
Assignments
Open Assignments from the NavBar. Select the Select All checkbox. Choose Delete from the More Actions menu. Select Delete in the confirmation window.
Grades
Open Grades from the NavBar and select Manage Grades.
*Please note: before taking any further action, check the Association column. A grade item cannot be deleted if it is associated with an activity. To delete a grade item associated with an activity, leave Grades, and open the specific tool to make changes either remove the association or delete the activity item. (Delete is the preference for this process.)
Choose Delete from the More Actions menu if all associations are removed.
In other tools it is necessary to check Select All items first, but for grades, items are checked after choosing Delete.
Surveys
Open Surveys from the NavBar and select Delete from the More Actions menu.
As with grades, it is not necessary to select items before choosing Delete. Choose the Select All checkbox after choosing Delete. Choose Yes in the confirmation window.
Course Files
Open Course Admin from the NavBar or open More if the screen is not full-sized. Select Manage Files from the tools list.
Choose the Select All check box. Select the Trash icon. Confirm Yes in the next window.
Calendar
Open Content from the Navbar. (It might seem logical to start with Calendar, but items cannot be removed here. Additionally, past and future events require more effort to view. There may be more than one calendar available as well.)
Select Course Schedule and then Full Schedule.
Any manually entered calendar dates will be displayed. These must be removed one by one as there is no way to bulk delete them. If nothing is displayed, then the calendar is empty. Select Delete Event from the item menu.
Choose Yes to confirm. Repeat steps until all entries have been deleted.
Checklist
Starting from Course Admin, open Checklist. Select More Actions and choose Delete.
Choose the first checkbox to select all items. Choose Delete Selected.
Groups
Open Course Admin from the Navbar. Select Groups from the list of tools.
Choose the Select All checkbox. Select the Trash icon. Select Delete Groups/Categories from the confirmation window.
Rubrics
Open Course Admin from the Navbar. Select Rubrics from the list of tools.
Choose the Select All checkbox. Select the Trash icon. Select Delete in the confirmation window.
Wrapping Up
If you have worked through the list to this point you have tackled the most likely areas to clean up. This image highlights some additional tools you may have used in the course. If so, open each to select and delete any remaining objects.
Following all of these steps will return a course to the initial shell status. It is a good idea to make a quick review of the tools from the NavBar and Course Files to be sure all items are removed.
8. Accessibility
8.1. Accessibility in Higher Education Video
8.2. Accessibility or Accommodation?
What is Accessibility?

Almost everyone knows the frustration of open packages. There are many tools to make this easier and safer, but there is another kind of accessibility that concerns web content.
"Accessible" means that individuals with disabilities are able to independently acquire the same information, engage in the same interactions, and enjoy the same services within the same time frame as individuals without disabilities, with substantially equivalent ease of use. A few examples of accessibility include accessible web pages, accessible instructional materials, accessible apps, and an accessible eReader.
Distance Learning (DL) specific and compliant:
- Content is usable without additional modifications.
- Appropriate functionality is designed into the content, learning object, application, media, etc.
What is an Accommodation?
“Accommodations” are reasonable academic adjustments or auxiliary aids that provide equal access to programs and services on an individual basis. A few examples of reasonable academic adjustments or auxiliary aids include extended time on tests, taking an exam in a minimal distraction area, recording a lecture, and having a note-taker.
DL specific and non-compliant:
- Content requires additional modifications before use
- Provided "ad-hoc; after-the-fact"; and may involve a delay as to when content is available for actual use
What is the difference?
Accessibility is achieved through the use of identified standards to design environments to be used by everyone, including persons with disabilities, and oversight is often provided by an accessibility manager and/or ADA coordinator.
Accommodations are requested by a person with a disability and determined to be reasonable on an individual basis by an appointed representative, often, in a disability services office. Accommodations may be needed beyond an accessible environment for equal access to programs and services because of the individual nature of the disability not due to an environment’s inaccessible design.
8.3. Tips for Accessible Online Content
Basic Tips for Accessibility
Everyone learns and engages with course materials differently. Following UDL principles and access guidelines promote a universally designed environment facilitating opportunities for student success no matter the student's abilities. However, there are some common things to consider in developing accessible course content and improving usability for all students.
Accessibility Help
If you need assistance in developing/selecting accessible materials, please contact the TN eCampus Help Desk:
- E-Mail: tnecampus@helpspot.com
Or check with your eLearning office for assistance. The World Wide Web Consortium (W3C) has developed Web Content Accessibility Guidelines (WCAG) that are the TBR standards for web content. More information about the Web Accessibility Initiative can be found at the W3C’s Web Accessibility Initiative site (new window).
Creating Web Content
Brightspace allows the creation of HTML content pages within your course. This is often done with a text editor that includes HTML editing tools. This is also known as a WYSIWYG editor, or “what you see is what you get.” It is possible to copy some content directly into the editor, but it is also possible to add unexpected formatting code that does not appear on the screen but potentially confuses screen readers. If you want to copy and paste text change it to plain text first using TextEdit or Notepad and then paste it into the text editor. Format the content using the tools in the Brightspace text editor.
We strongly recommend that you use Browse for Template to take advantage of the pre-formatted Brightspace pages available to you.
Refer to the tutorial for Document Templates and Headings (Knowledge Books).
Basic Content Structure
Course Templates
A key aspect to accessibility and creating a clean consistent look in a course is to use document templates. Templates define fonts, styles, and other aspects behind the scene. When done correctly, screen readers and other assistive technologies will respond more accurately to users.
Refer to the tutorial for Document Templates and Headings (Knowledge Books).
Navigation
Not everyone can use a mouse. As much as possible, make sure that students can use applications or navigate through pages using a keyboard or assistive navigation device. Keep navigation simple with as few buttons as possible. Avoid activities that require the use of a mouse, such as drag and drop activities. An assistive technology specialist can provide guidance if needed.
Refer to the reference page, Keyboard Navigation (WebAIM) for more information.
Headings
Good heading structure helps readers to understand how the document is organized. Assistive technology users can move between headings, which makes navigation usable and more efficient than without headings. Headings and subheadings should be identified as such using the built-in heading features of the authoring tool. Headings should form an outline of the page and be used in the table of contents (TOC) for long documents:
- Heading 1 (H1) for the main heading (Page Title)
- Sub-Heading 2 (H2) (Main Idea)
- Sub-Heading 2 (H2) (Main Idea)
- Sub-Heading (H3), 4, 5, etc. (Supporting Idea/ Content Emphasis)
- Sub-Heading 2 (H2) (Main Idea)
Refer to the tutorial for Document Templates and Headings (Knowledge Books) for more information.
Lists
Lists are an excellent way to convey potentially complex information. Even accessible tables can be challenging to users. Consider lists over tables for simplicity where it is appropriate and effective.
Lists can be inaccessible if they are not created properly. Typing stars and hyphens to make lists by hand is a common mistake. Use the tools of the editor in your application. Use lists for the purpose for which they are intended. Numbered/Ordered lists convey sequence and Bulleted/Unordered lists can be reordered and not change the meaning of the listed items.
Refer to the tutorial for Tips for Accessible Online Content (Knowledge Books) for more information.
Links
Make sure that linked text is descriptive of the target location or site and could point the user to the target. Links should make sense out of context. Avoid using links that say, “click here” or “more.”
Refer to the reference document, Accessible Hyperlinks (download) for more information.
Audio, Image, and Video Description
Images
When inserting images into your course, be sure to include an “alt text,” or alternative description, that is descriptive of the image. Alt text descriptions help students use screen reader software to know what is displayed on the screen. There is usually a space for you to add this when you are uploading the image. Make sure your alt tag clearly describes what is in the image, such as “photo of a group of young children playing in a dusty street with a soccer ball” or “portrait of George Washington standing in a boat, surrounded by other soldiers holding up a flag as they cross the Delaware river” as opposed to “image” or “children.”
Refer to the reference document, Alternative and Descriptive Text (download) for more information.
Refer to the tutorial for Decorative Images in Brightspace for more information.
Video
All video material should be captioned and include video description or descriptive transcripts. Captioning benefits many different learners and environmental disabilities (watching video in a library quiet area) including cognitive disabilities and English Language Learners (ELLs). YouTube tools for adding or editing captions (new window). More information about captioning and transcripts can be found on WebAIM’s Captioning Techniques [new window] page.
Refer to the reference document, Captioning Video (download) for more information.
Audio
Transcripts also allow anyone that cannot access content from either web audio or video (or both) to read a text transcript instead. For content that is audio-only, a transcript will usually suffice.
Read more at WebAIM: Captions, Transcripts, and Audio Descriptions (new window)
Flash
Using content created using Flash is not permitted. HTML5 is a good alternative to Flash.
Color and Fonts for Readability
Colors
Students with cognitive or visual disabilities and others without disabilities may have difficulty reading text that is against a patterned/colored background. Provide good color contrast; black text on a white or light background is the most readable. Do not use color alone to convey meaning or emphasis as some students may not be able to see them.
Refer to the reference document Color and Contrast (download) for more information.
Fonts
Keep the use of fonts in materials consistent. Sans serif fonts such as Arial or Helvetica are easier for many people to read on-screen. To maintain consistency, we strongly recommend the use of the pre-designed page templates available for your use.
Read more at WebAIM: Typefaces and Fonts (new window) for more information.
Forms and Tables for All
Tables
Screen reading software reads tables by going across cells top-to-bottom, left-to-right, and by using keystroke commands. It is essential tables have consistent even rows and columns. You should avoid:
- splitting or merging cells that create uneven columns
- putting bullet points or numbered lists within cells. Lists should be used outside of a table.
- Using tables for layout. Tables should really only be used for tabular data. If you are using tables to display data, make sure that table headers are defined for all columns and rows, and a very short summary is provided in the Alt Text description field to identify what the table covers.
Refer to the reference document, Accessible Tables (download) for more information.
Forms
If you have forms for students to download and fill out, make sure they are in an accessible format and clear directions are given for submitting them. Some students may not be able to complete a form that must be filled out in writing.
Refer to the reference document, Accessible Forms (download) for more information.
Accessible File Types
This section adds some insight to 3 of the most commonly used files. While each of these can be made more accessible using built-in tools you are encouraged to consider transferring content to HTML through the Brightspace Editor. The Editor is simpler to use and is more likely to provide accessible results. In addition to the Brightspace accessibility checker, TN eCampus has added Blackboard Ally to all eCampus courses.
PowerPoint
is perhaps the most popular tool for creating slideshow presentations or online lectures, but PowerPoint files may have many accessibility problems and it can be tedious to catch and correct problems. It is also important to consider the right tool for the job. PowerPoint was designed to be a presentation tool for face-to-face presentations, not a tool for developing multimedia web content. The use of PowerPoint is strongly discouraged. If you feel that PowerPoint is essential to your course, review WebAIM PowerPoint Accessibility (new window) tips.
Refer to the reference document, PowerPoint Accessibility (download) for more information.
Contact your instructional designer or accessibility specialist if you need further assistance.
PDF Files
are typically created from other files such as Word and PowerPoint. Converted PDF files are only as accessible as the document they are based on. In some cases they may lose accessibility improvements in the way the file was converted. Be aware that PDF files created as a scan of an original document are actually images, which are not accessible to screen reader technology. To be fully compliant, convert a PDF file to HTML, if possible. Tools such as Equidox [new window] can help you to translate PDFs to accessible HTML that meets WCAG standards.
Refer to the reference document Acrobat PDF Files (download).
Word Files
Word documents are widely used and synonymous with text documents. The built-in accessibility features are fairly easy to use. Word documents are easily recreated or transferred to HTML pages, which can be even more accessible and do not require special software or conversion. Consider if separate files are needed. Moving content directly to HTML adds to ease of use for all students. Use the built-in accessibility and formatting tools if you do need a separate document.
Refer to the reference document, Making Word Files Accessible (download) for more information.
Accessibility Checkers
There are many types of accessibility tools to help improve web pages and files. This is important because most people are not accessibility experts and many compliance issues are not easy to see or catch by simply looking at your content. These tools are an important help and assistance, but they cannot replace content created as accessible as possible from the start. In fact, checkers may report a false positive for content that is poorly created.
In Brightspace, you will find an accessibility checker in the text editor. It is quick and easy to use. Blackboard Ally is also integrated with the TN eCampus Brightspace instance. The Ally Course Report is located under the More button on the NavBar. You will also notice small speedometer icons on course pages. You can open these icons (red, yellow, and green) to see the status of individual pages.
Refer to the tutorial for Brightspace Accessibility Checker (Knowledge Books) for more information.
Refer to the tutorial for Ally Instructor Overview (Knowledge Books) for more information.
8.4. Tips for Social Media
Tips for Social Media
Many of the same concepts for web pages and documents apply to social media. Also, consider the following:
- Use Text With GIFs. Most social media platforms do not allow adding alt text to GIFs. Alternatively, you can add captions or text to describe the GIF.
- Use Accessible Text. Screen reading technology does not do well with copy that includes emojis, special characters, or full caps. It is best to limit the use of these in your social media posts.
- Use emojis appropriately. Emojis can have a negative effect on your social media posts. Avoid the overuse of emojis, and solely relying on emojis to convey meaning. The intent can become confusing and not all platforms and devices display them the same way.
Unique to Twitter
Some accessibility concerns are unique to the format.
- A Twitter hashtag such as #maketwitteraccessible is a bit hard to read visually, but for a person using a screen reader, it's just gobbledygook. Add capital letters for each word and the screen reader will read each word. #MakeTwitterAccessible is easier for everyone to read. This is sometimes referred to as CamelCase (new window).
- Consider placing the main content first and adding (#) hashtags and mentions at the end. This will give screen reader users the chance to evaluate if that content is of interest before wading through the links.
8.5. Accessible Course Facilitation
Student Accommodation Procedure
You may have a student who needs a specific accommodation. Common accommodations in online courses include extended time on tests or assignments, material in alternate digital formats, closed captioning or described video, or text-to-speech, and screen reader accessibility. Students are responsible for getting an accommodations letter from their disability services office. This letter will detail the accommodations that should be provided to the student. Students are not required to reveal the nature of their disability. Contact the disability services office, if you have questions about implementing a student’s accommodation.
Accessibility in Brightspace
Follow this checklist to help ensure that your course is accessible in Brightspace.
- To better manage an accessible course experience for the student, use the Brightspace tools (email, discussion, etc.) to create and edit content. Tools used outside of Brightspace may not be accessible.
- If a Brightspace tool has an accessibility concern, please submit a ticket through the TN eCampus Help Desk indicating:
- The name and number of the course
- The Brightspace tool
- The accessibility problem
- If you need help with accessibility when creating and adopting documents as an instructor or If you find content in the course you are teaching to be inaccessible, please submit a ticket through the TN eCampus Help Desk (new window) with the following information:
- The name and number of the course
- The module or location in the course where the materials can be found
- The inaccessible content (ex. life cycle video)
You also have access to an accessibility specialist. Please see the following Getting Help with Accessibility (new window) list.
8.6. Document Templates and Headings
Introduction
A key aspect to accessibility and creating a clean consistent look in a course is to use document templates. Templates define fonts, styles, and other aspects behind the scene. When done correctly, screen readers and other assistive technologies will respond more accurately to users.
Starting From a New Page
Choose an appropriate template from the Select a Document Template menu. Add content to your new page.
Headings
On the surface, headings appear to be larger fonts decreasing in size as the hierarchy of the topic descends, but headings communicate the organization of the content to all readers and are required for assistive technology tools to work correctly. Take a look at this example.
The fonts are progressively smaller, but screen readers and other assistive technologies use headings to navigate the content. Simply changing font properties make the document inaccessible. Find more information about headings and accessibility at the W3C Web Accessibility Tutorials (new window) site.
With the structure set, start entering text and other content.
*Please note, text may be copied from many sources, but unexpected formatting and HTML code may be added to the page. It is recommended to copy text content to a text editor like Notepad for PC computers or TextEdit for Mac computers.
From your plain text tool, copy the text content to the Brightspace text editor. Select the text sections and choose the appropriate hierarchy level for the headers. Choose paragraph for regular text sections.
*Please note, images must be uploaded separately into Brightspace. (See the tutorial on Managed Files for more on this topic.)
This may seem like extra steps, but following this procedure will deliver predictable, accessible results and save valuable time.
Editing An Existing Page
If you have an existing course page and the template was not set to General Page Template, this can be remedied by choosing the Select a Document Template menu, but this step will eliminate your content.
First, make a copy of the page or paste it into a blank document, such as Word. This is only recommended as a visual reference to aid recreation of the page's content, formatting, links, and images as it was setup.
Continue to copy the text into a text editor as previously described and rebuild the page from the preceding steps given.
Finished Page
When finished, the document will have the correct page structure and headings for an easy to read and accessible page.
8.7. Decorative Images in Brightspace
Course Images
Images can be an important part of any course. Images may enhance information or contribute to the understanding of text content. Those types of images need alternative text to be accessible. Other images are purely decorative and add no content value. Those types of images need to be correctly tagged as decorative in the alt text field add two quotation marks (“”) or "Null" in the alternative text field.
Which images do not need descriptive alt text?
- Images of visual styling such as borders, spacers, and corners
- Images supplementary to link text to improve its appearance or increase the clickable area
- Images that are illustrative of adjacent text but not contributing information (“eye-candy”)
- Images identified and described by surrounding text
You can learn more about decorative images at W3C Web Accessibility Initiative (new window).
Decorative or Substantive
Is this image decorative or substantive to the content?
That is a judgment call. This could be a whimsical or decorative image on a page, but there could be a number of ways to use this image in a meaningful way. The intent of the image depends on the context it is used.
Adding Images
Before you can add an image to a course page, you must add the file to the appropriate folder in Managed Files. Take a look at the steps to add an image and the appropriate alt text. Select and edit the page that needs an image. Choose the image (camera) icon from the menu.
Choose Course Offering Files to access the image file.
*Please note, the other options will add images to your course pages, but the files will not be stored in Brightspace for cloning and future uses of the course.
Navigate to the folder storing the image file. To preview the image, choose the file name first. Choose the radio button and choose Add to place the image on the course page.
If the image is decorative, there are two options:
- Enter Null in the Alternative Text box
- Check This image is decorative
Choose either procedure, but do not use both. This course has the same image twice, but the alt text is different.
Take a look at the HTML code to see the difference.
The first image is enclosed in a green border with the alt text in a red border. The second image is enclosed in a tan border with the alt text in a red border. A screen reader will work with each correctly by skipping the image. The second image will be flagged by Brightspace ’s accessibility checker. Brightspace uses this opportunity to guide users to double-check there is no useful description of the image.
8.8. Captioning Video in YouTube
What is video captioning?
Captions are a text form of audio information in video and animations. This includes the words that are spoken, who is speaking when it is not evident, and important sounds like music, laughter, and noises. Captions must be synchronized with the visual content to contextualize them. You can learn more about captioning at W3C (new window).
Captioning Methods
Captioning video is an important step in making content accessible that can be accomplished to a varying degree by a variety of means. Authoring software may offer captioning through the video editing process, but it may lack a hosting option to share videos. Many users may choose YouTube or other services for free hosting options.
- If captions are prepared, then import the appropriate file to the video on YouTube.
- YouTube offers manual captioning, but that is time consuming and tedious, but it is very accurate if applied correctly.
- YouTube also offers auto captioning, but it will need some tweaking to be useful.
Steps to Caption on YouTube
Upload a video or open the Video tab and select an existing video in YouTube Studio.
Scroll down the left menu to Subtitles. The upload process typically includes setting the language, but this is a place to add or edit the language. In this example, the captions/subtitles are published (automatic). Choosing the Options menu opens to edit, download, or delete.
Before sharing a new video, check for captioning to see what captioning work, if any, has been done. Some authors may allow community contributions. Otherwise, check with the owner about getting the captions added or updated before sharing the video.
There are two things to easily check to confirm minimum quality. It is best to check the entire video, but you will likely know right away if any serious effort has been made to make the video compliant.
- Check the published status. Select the video and view the published properties.
- Auto captioning will not have punctuation or capitalization if it has not been edited, and it may also miss or confuse some words.
New Videos Uploaded to YouTube
Videos take some time to simply upload. YouTube also needs some additional time to process the video to share it online. Initially, there will be a message about the latter before you can take the next steps. Once the video is processed for sharing, there will be options to add captions via the methods listed below. All are good options, but they are all manual methods. YouTube's auto-captioning service is working in the background after the upload. This is an invisible process to the user. This also takes some additional time that could take many minutes to several hours that depends on the length of the video and server capacity.
- Upload a file requires previously created transcript or caption files limited to the .vtt or .srt file format. If you have another file type, there are converters on the web you can use.
- Transcribe and auto-sync allows you to just type the speaking and sounds and use YouTube to sync the text with the actual timing.
- Create new subtitles/CC is the most tedious process. You must add the caption text and manually set the timing.
Edit Auto-captions
Waiting for auto-captions to process looks pretty appealing if you are new to the process, but it does require some edits. Notice some of the details highlighted here. Capital letters and punctuation are missing. Words can be confused or missing. As an example, TN eCampus always requires edits.
Make any necessary edits. Choose Delete Draft to cancel changes or choose Save Changes when finished.
8.9. Descriptive Audio or Video Description
“Descriptive Audio” “Video Description”
Before we dive in, take a moment to look at a brief video clip from the animation, Frozen (new window).
The terms "Audio Description" and "Description" are also used to name this topic. All 4 terms refer to the verbal depiction of key visual elements in media and live productions not accessible to blind or visually-impaired people. Imagine a TV show, movie, presentation, or live performance with a visual impairment. Hearing the spoken words does not fully convey the crucial information that is expressed visually through gestures, character actions, or scenery. In the Frozen video clip, the limited dialog and sounds conveyed a small portion of the experience. Audio description is needed to convey much of the meaning and the ability to experience the video.
Adding a Second User-Selectable Audio Track
A second user-selectable audio track is the most ideal, but most devices don’t have the capability of merging multiple soundtracks. Just creating two tracks may also be problematic. The description must be timed during or just before the visual content is displayed without talking over the spoken content.
Video with limited speaking portions may be adequately described between speaking portions. The Frozen video used this method. Description was added while it played without notably talking over the dialog or sounds or delaying the playback. It also used a method called "ducking" to lower the main audio track to provide distinct description audio. The volume is restored during the dialog portion.
Video with substantial dialog requires pauses in the playback to provide the description in advance of the portion requiring description. The spoken portion will follow as the video advances. Watch a sample video, My Story: Maria (video with Extended Audio Description), to see this method in action.
In one final example, The Hunger Games with audio description: Katniss hunting (new window), this video clip has no dialog. Without description, a visually impaired user would have no understanding of this portion of the movie. It highlights the need to consider description opportunities. While much of our school and office content is geared toward heavy dialog, there are still huge opportunities to make our content accessible and compliant with 504 standards.
Assessing Description Needs
So does every minute of my video need to be described? Not necessarily. Could you cover the screen and still fully understand what’s going on in the video? If not, it needs some description. Consider these made-up scenes from a nature documentary.
- The narrator says “Look at that!” followed by silence.
- Scene 1 could read, “Look at that man-eating lion! He is ready to pounce as he looks hungrily at the gazelle.”
- The narrator says, “I’ll stand over here while Jim wrestles the anaconda,” followed by the sounds of the snake-wrestling match.
- Scene 2 requires some additional description. How does an anaconda wrestle? Who is winning?
- The narrator says, “I’ll stand over here while Jim wrestles the anaconda,” followed by the sounds of the snake-wrestling match.
- Scene 2 requires some additional description. How does an anaconda wrestle? Who is winning?
Production Improvements
In the previous examples, the decision to add description is made to improve the content that is already developed and published. Like most accessibility concerns, it is much easier to create content with accessibility in mind instead of correcting products at a later time. Using the same examples, look at how the script could change to reduce the need for description in post-production.
- The narrator says “Look at that!” followed by silence.
- Scene 1 could read, “Look at that man-eating lion! He is ready to pounce as he looks hungrily at the gazelle.”
- The narrator says, “I’ll stand over here while Jim wrestles the anaconda,” followed by the sounds of the snake-wrestling match.
- Scene 2 could read, “I’ll stand over here while Jim wrestles the anaconda. He is a big one—over 6 ft long. The snake is wrapped around one of Jim's legs while Jim has both hands wrapped around the snake's neck. Looks like he is in the fight of his life."
Both examples could have more description if needed, but building in more descriptive dialog foundationally brings the whole project much closer for anyone with a visual impairment or someone just listening.
Video Captions and Transcripts
Keep in mind, captions are necessary to make audio content accessible to hearing-impaired people or for users in situations where audio cannot be played. Transcripts should include the text of both the captions and the descriptive audio. Both captions and transcripts are important to make your video more accessible, but the audio description recording should be used in conjunction with these efforts too.
8.10. Getting Help with Accessibility
Getting Help
If you need assistance in developing/selecting accessible materials for a TN eCampus course, please contact:
Nicola Wayer - TN eCampus Director of Instructional Design and Training
- Office Phone:(615) 366-3942
- E-Mail: nwayer@tbr.edu
If you need assistance with accessibility with an online course hosted by your local institution, please contact your institutions Distance Education Director or Dean.
If you need general assistance with accessibility with other courses, please contact one of the following Disability Services contacts at your local institution:
|
Last Name |
First Name |
Institution |
Email Address |
Role |
|---|---|---|---|---|
|
Gocher-Johnson |
Wanda |
Chattanooga State Community College |
Assistant Vice President |
|
|
Mathis |
Juliann |
Cleveland State Community College |
Disability Director |
|
|
Gooch |
Wynn |
Columbia State Community College |
Disability Services Counselor |
|
|
Baker |
Sherry |
Dyersburg State Community College |
Counselor/ADA Coordinator |
|
|
Nickell |
Linda |
Jackson State Community College |
Dean of Students |
|
|
Champion |
Belinda |
Motlow State Community College |
Director |
|
|
Dubree |
Katrina |
Nashville State Community College |
Director |
|
|
Walker
|
Denis |
Northeast State Community College |
Coordinator |
|
|
Satkowiak |
Ann |
Pellissippi State Community College |
Director |
|
|
Watson |
Tracey |
Roane State Community College |
Director |
|
|
Clemons |
Scedella
|
Southwest Tennessee Community College |
smcatee@southwest.tn.edu |
Coordinator |
|
Smith |
Leslie |
Volunteer State Community College |
Mgr. of Disability Services |
|
|
Jackson |
Amy |
Walters State Community College |
Coordinator |
8.11. Creating Accessible Materials
Creating Accessible Materials
Use this page to locate step-by-step resources for creating accessible materials. Each topic has document that may be downloaded from links at the bottom of this page.
- Accessibility Checkers
- Acrobat PDF Files
- Alternate and Descriptive Text
- Captioning Video
- Color and Contrast
- Excel Spreadsheets
- Exporting Documents
- Accessible Forms
- Hyperlinks
- Language
- PowerPoint Presentations
- Tables
- Video and Multimedia
- Word Text Files
8.12. Legal References for Accessible Design
Legal References for Accessible Design
We have a legal obligation to persons with disabilities under federal and state laws. Please review the following references and resources.
Americans with Disabilities Act (ADA)
The ADA prohibits discrimination on the basis of disability in employment, State and local government, public accommodations, commercial facilities, transportation, and telecommunications.
Section 504 of the Rehabilitation Act of 1973
Section 504 is a federal law designed to protect the rights of individuals with disabilities in programs and activities that receive Federal financial assistance from the U.S. Department of Education (ED). Section 504 provides: "No otherwise qualified individual with a disability in the United States . . . shall, solely by reason of her or his disability, be excluded from the participation in, be denied the benefits of, or be subjected to discrimination under any program or activity receiving Federal financial assistance . . . ."
Tennessee Higher Education Commission (THEC)
In 2015, THEC submitted recommendations to our public higher education institutions to meet their legal obligations to persons with disabilities. These recommendations are provided at THEC Accessibility Task Force Recommendations (new window) website.
TN eCampus
The following statement has been adopted to emphasize TN eCampus' commitment to accessibility:
“Instructional Materials and Technology will be Accessible for Persons with Disabilities”
Functional and Technical Standards for Accessibility
The functional standard for accessibility provides guidance that enhances the functional nature of the POUR design initiative found in the WCAG 2.0 standard. To meet our obligations under ADA/504 our IMTs (documents, sites, media, and/or technology) should be functionally accessible and not just technically conformant. To meet our functional accessibility standard, which means that any person can use the resource effectively to perform the designed intent, the resource is easy to use and the content is clear and unambiguous for all users, including persons with disabilities.
- Web Content Accessibility Guidelines 2.0 A & AA (new window)
- EPub3 Accessibility Guidelines (new window)
- Section 508/Refreshed (new window) (accessible technology procurement)
More Resources:
- TBR Accessibility Initiative (new window)
- Tennessee State Bill 1692 (new window)
- ADA.gov (new window)
- Section 504 of the Rehabilitation Act of 1973 (new window)
- University of Washington Resolution Agreements and Lawsuits (new window)
8.13. Alternate Access Plans (AAP)
Alternate Access Plans (AAP)
In compliance with Section 504 and Section 508 of the Rehabilitation Act of 1973 and ADA as amended in 2008, the TBR and TN eCampus shall apply THEC’s identified accessibility guidelines to Informational Materials and Technology products and services that it adopts, buys, creates, uses and maintains. When informational materials and technologies do not conform to those guidelines, an alternative access plan will be developed to address the accessibility.
At TN eCampus, we require an AAP be created when there are materials or resources within a course that are not in compliance with accessibility guidelines. The Alternate Access Plan for TN eCampus Courses (new window) form should be completed and submitted to Dr. Nicola Wayer via email at nwayer@tbr.edu. A copy of the plan will be shared with the institution’s administration and will also be placed in the developer section of the course.